Continue reading How to do JSON Parsing of a wrapper class in Salesforce
The post How to do JSON Parsing of a wrapper class in Salesforce appeared first on Salesforce Next Gen.
]]> How to do JSON Parsing of a wrapper class in Salesforce.
What is JSON Parsing?
We use JSON parsing to interchange data from a web server.
Data is always shared as a string from a web server
To make the data understandable to our system, we do JSON Parsing, and the data becomes a JavaScript object.
Example of JSON Parsing.
‘{ “name”:”John”, “age”:30, “city”:”New York”}’
Use the JavaScript function JSON.parse() to convert text into a JavaScript object
var obj = JSON.parse(‘{ “name”:”John”, “age”:30, “city”:”New York”}’);
The above example is to do parsing in JavaScript, To do JSON Parsing in Salesforce we have quiet similar approach.
But first we should understand few terms before we begin the JSON parsing concept.
To convert an object into a stream of string characters is known as serialization, i. e Object -> String. Once we serialize an object we can transport it over the web server.
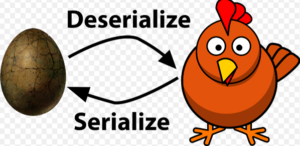
To convert a stream of string into an object is known as deserialization, or simply opposite of serialization is called deserialization, normally it is a response received from a web server. String -> Object.
To simplify the process of serialization and deserialization, Salesforce has provided a whole class for this purpose, i.e. JSONParser Class.
In below a callout was made to web service and it returned a response in JSON format. Then the response is parsed to get all the totalPrice field values and get the grand total.
public class JSONParserUtil {
@future(callout=true)
public static void parseJSONResponse() {
Http httpProtocol = new Http();
HttpRequest request = new HttpRequest();
String endpoint = ‘https://docsample.herokuapp.com/jsonSample’;
request.setEndPoint(endpoint);
request.setMethod(‘GET’);
HttpResponse response = httpProtocol.send(request);
System.debug(response.getBody());
// Parse JSON response to get all the totalPrice field values.
JSONParser parser = JSON.createParser(response.getBody());
Double grandTotal = 0.0;
while (parser.nextToken() != null) {
if ((parser.getCurrentToken() == JSONToken.FIELD_NAME) &&
(parser.getText() == ‘totalPrice’)) {
// Get the value.
parser.nextToken();
// Compute the grand total price for all invoices.
grandTotal += parser.getDoubleValue();
}
}
system.debug(‘Grand total=’ + grandTotal);
}
}
Example: Parse a JSON String and Deserialize It into Objects, for this example we are taking a hardcoded JSON String and the entire string is parsed into Invoice objects using the readValueAs method.
public static void parseJSONString() {
String jsonStr =
‘{“invoiceList”:[‘ +
‘{“totalPrice”:5.5,”statementDate”:”2011-10-04T16:58:54.858Z”,”lineItems”:[‘ +
‘{“UnitPrice”:1.0,”Quantity”:5.0,”ProductName”:”Pencil”},’ +
‘{“UnitPrice”:0.5,”Quantity”:1.0,”ProductName”:”Eraser”}],’ +
‘”invoiceNumber”:1},’ +
‘{“totalPrice”:11.5,”statementDate”:”2011-10-04T16:58:54.858Z”,”lineItems”:[‘ +
‘{“UnitPrice”:6.0,”Quantity”:1.0,”ProductName”:”Notebook”},’ +
‘{“UnitPrice”:2.5,”Quantity”:1.0,”ProductName”:”Ruler”},’ +
‘{“UnitPrice”:1.5,”Quantity”:2.0,”ProductName”:”Pen”}],”invoiceNumber”:2}’ +
‘]}’;
// Parse entire JSON response.
JSONParser parser = JSON.createParser(jsonStr);
while (parser.nextToken() != null) {
// Start at the array of invoices.
if (parser.getCurrentToken() == JSONToken.START_ARRAY) {
while (parser.nextToken() != null) {
// Advance to the start object marker to
// find next invoice statement object.
if (parser.getCurrentToken() == JSONToken.START_OBJECT) {
// Read entire invoice object, including its array of line items.
Invoice inv = (Invoice)parser.readValueAs(Invoice.class);
system.debug(‘Invoice number: ‘ + inv.invoiceNumber);
system.debug(‘Size of list items: ‘ + inv.lineItems.size());
String s = JSON.serialize(inv);
system.debug(‘Serialized invoice: ‘ + s);
// Skip the child start array and start object markers.
parser.skipChildren();
}
}
}
}
}
// Inner classes used for serialization by readValuesAs().
public class Invoice {
public Double totalPrice;
public DateTime statementDate;
public Long invoiceNumber;
List<LineItem> lineItems;
public Invoice(Double price, DateTime dt, Long invNumber, List<LineItem> liList) {
totalPrice = price;
statementDate = dt;
invoiceNumber = invNumber;
lineItems = liList.clone();
}
}
public class LineItem {
public Double unitPrice;
public Double quantity;
public String productName;
}
Another way to do deserialization is as below.
Invoice inv = (Invoice)JSON.deserialize(jsonStr, Invoice.class);
This will convert a the response string into a single Invoice object. But what if we want to deserialise a list of Invoice object. In this case we will use the below code to deserialise the list
List<invoice> lstInvoice = (list<invoice>) JSON.deserialize(jsonStr list<invoice>.class);
This will parse the string into the respected object list we created in our apex class.
This approach seems easy but it is always better to use the JSONParser Class to serialize and deserialize the object/object list
Also, Have a look at the below resources:
Also, Have a look at the below learning resources:
-
SOQL (Salesforce Object Query Language)
-
Apex Trigger Best Practices and the Trigger Framework
-
Salesforce Interview Question and Answers Part 2
-
Salesforce Interview Questions on Test Class
-
Salesforce-lightning-interview-questions-2018
6. Salesforce Interview Questions Batch Class
The post How to do JSON Parsing of a wrapper class in Salesforce appeared first on Salesforce Next Gen.
]]>Continue reading Trailhead Leaderboard(Unofficial)
The post Trailhead Leaderboard(Unofficial) appeared first on Salesforce Next Gen.
]]>Hello everyone, Today I am presenting to you Salesforce Trailhead LeaderBoard(Unofficial), a Leaderboard is typically used to signify rank among the fellow participant and helps in bringing out the competitive best of everyone. I believe that trailhead has now become a global competition, where More and more companies are asking its employees to enroll to the Trailhead and start learning.
There are companies who are trying to build their employee’s (Salesforce Admin – developers) career path/growth to include trailhead badges, projects, and trails in their career path. It is becoming imperative for companies like them to showcase their employee’s hard work and brag about it or in fact show it as a swag like we brag about the Salesforce’s certifications. Therefore leaderboard like this provides the perfect platform for companies to showcase their effort.
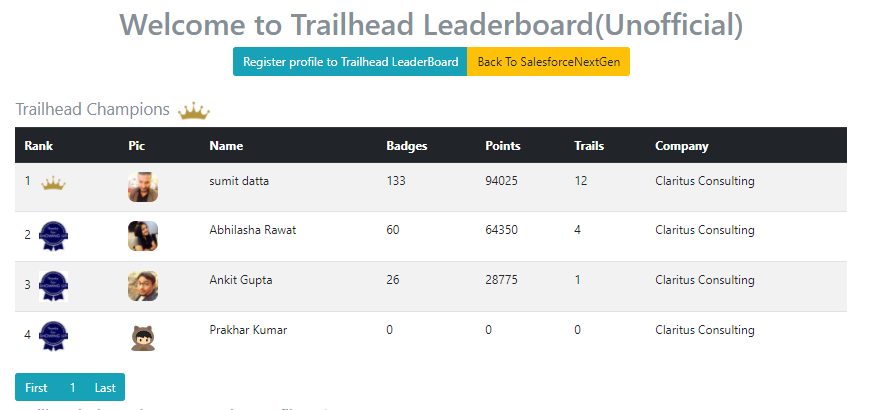
Furthermore I firmly believe that Salesforce Trailhead should provide an official Leaderboard down the line in the future, but meanwhile, you can register your profile by clicking on the button below.
The post Trailhead Leaderboard(Unofficial) appeared first on Salesforce Next Gen.
]]>Continue reading Salesforce Trailhead Widget for your Website
The post Salesforce Trailhead Widget for your Website appeared first on Salesforce Next Gen.
]]>Hi Friends
Recently, I have been working on a small project, where I wanted to make a profile card, which displayed your trailhead profile (your rank, Badges, point and your basic Info available on Trailhead). Something like shown below.

This Salesforce Trailhead widget will help you, showcase your hard-earned Badges, points and completed trails on your website. If you own a WordPress site, Blogspot or any website, just use this widget like a swag to brag about your achievements in trailhead.
Any impact on my Blog or website? well this widget uses an asynchronous call to an external server and everything is calculated there and the result is embedded on your website without using any of your website’s resources.
To Use this widget for your website please follow the below instruction.
Step 1
To begin we need your trailhead profile Id, you can find your trailhead profile by logging into your trailhead account and clicking on the profile drop-down menu as shown in the image below:
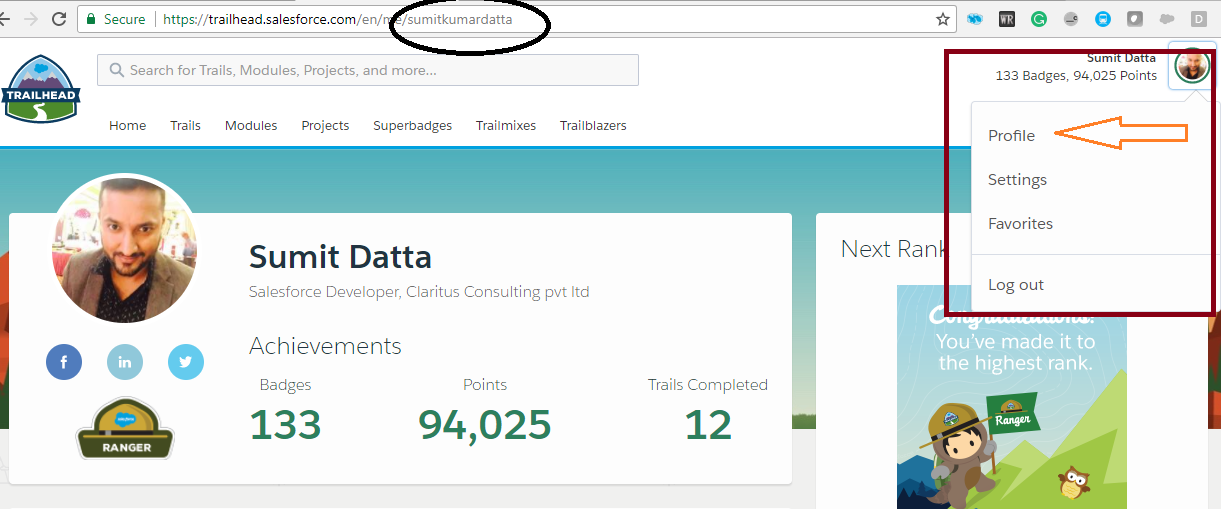
you will either find a vanity URL or a Profile ID – ‘005500000061VVIAA2’ copy it and paste it temporarily on your system.
Step 2
Copy the below code and paste on your page:
https://gist.github.com/sumitkumardatta/2b67d71c20c09742a4b7e958dd0119e4
Step 3
Now In the code line shown below:
Have a Happy New Year from salesforce Next Gen
Also Have a look at the below resources:
Also Have a look at the below learning resources:
The post Salesforce Trailhead Widget for your Website appeared first on Salesforce Next Gen.
]]>Continue reading Salesforce Lightning Tutorial: Lightning Component basics
The post Salesforce Lightning Tutorial: Lightning Component basics appeared first on Salesforce Next Gen.
]]>Chapter 1: Prerequisite for Lightning Component Development
My Domain
Before we begin to deep dive into the development of Lightning Component we need few things to be enabled in our Developer Edition Org. First thing is to enable My Domain in the DE org. Enabling My Domain and activating it can take up to half an hour, therefore we need to have My Domain as early as possible for any development.
Adding a Custom Domain, serves many other purposes as well, which are mentioned below:-
- Highlight business identity and unique domain URL.
- Login screen can be branded and customized.
- Work in multiple Salesforce Org at the same time.
- Set up custom login policies.
- It is a required feature for Single-sign On facility and Lightning Components.
My Domain is also available for sandboxes and more info about My Domain can be found in the Below mentioned document.
https://help.salesforce.com/articleView?id=domain_name_overview.htm&type=5
Before we begin the development lets create the custom object that we require for this tutorial.
To create a new object in the Lightning Experience(LEX), follow the below instruction these instruction are given assuming the you have enabled the Lightning experience in your org or you already have it enabled.
- Go to Object Manager, by clicking on the gear icon on the top-right of your org, then click on the Setup.
 Fig 1.1: Setup link
 - A new window will open, click on the object manager tab, this will open the list view of the objects presently deployed in you Org, now click on the create button and then click on custom object.
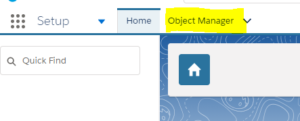
Fig 1.2: Object Manager Tab

Fig 1.3: Create button
- Now fill up all the required fields i.e. Label, Plural Label, Object Name Record Name and its Data type, and other features which are mentioned below, accept all the default values other than the one mentioned below.
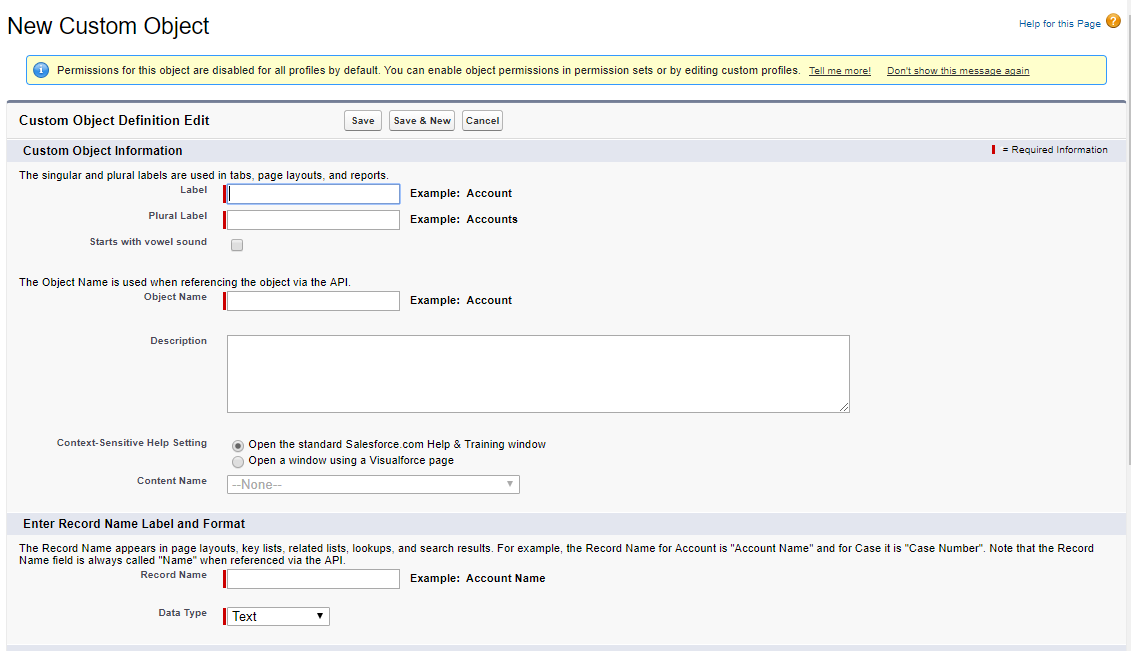
Fig 1.4: Object Definition Page
Field Value Label Expense Plural Label Expenses Starts With vowel sound checked Object Name Expense__c
- Once the object’s definition is saved, then on the object definition page, click on the link Fields & Relationships link and create custom fields on this object. Click on the new button, it will take you to the Data type selection screen.
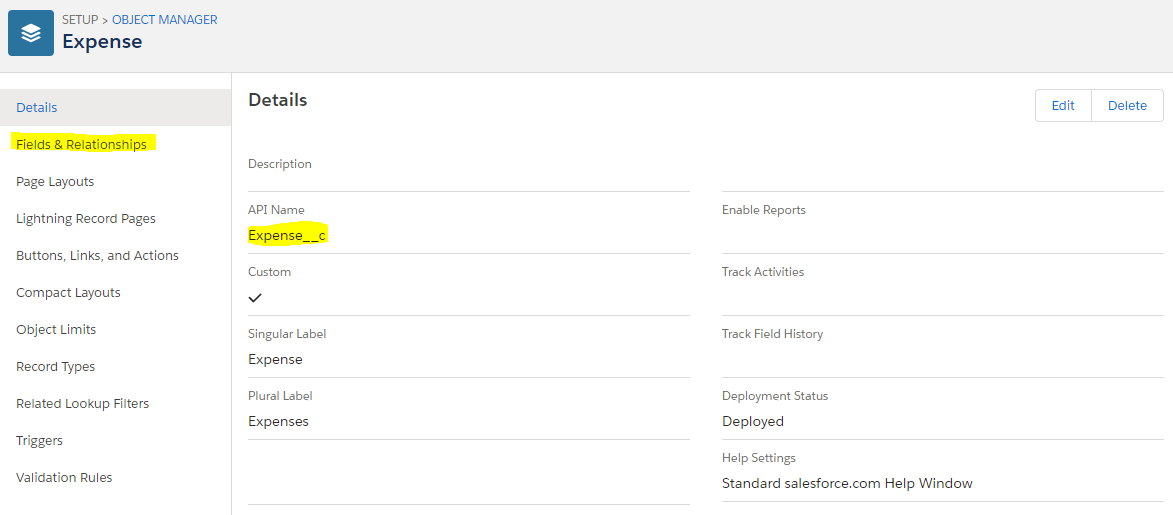
Fig 1.5: Object definition page
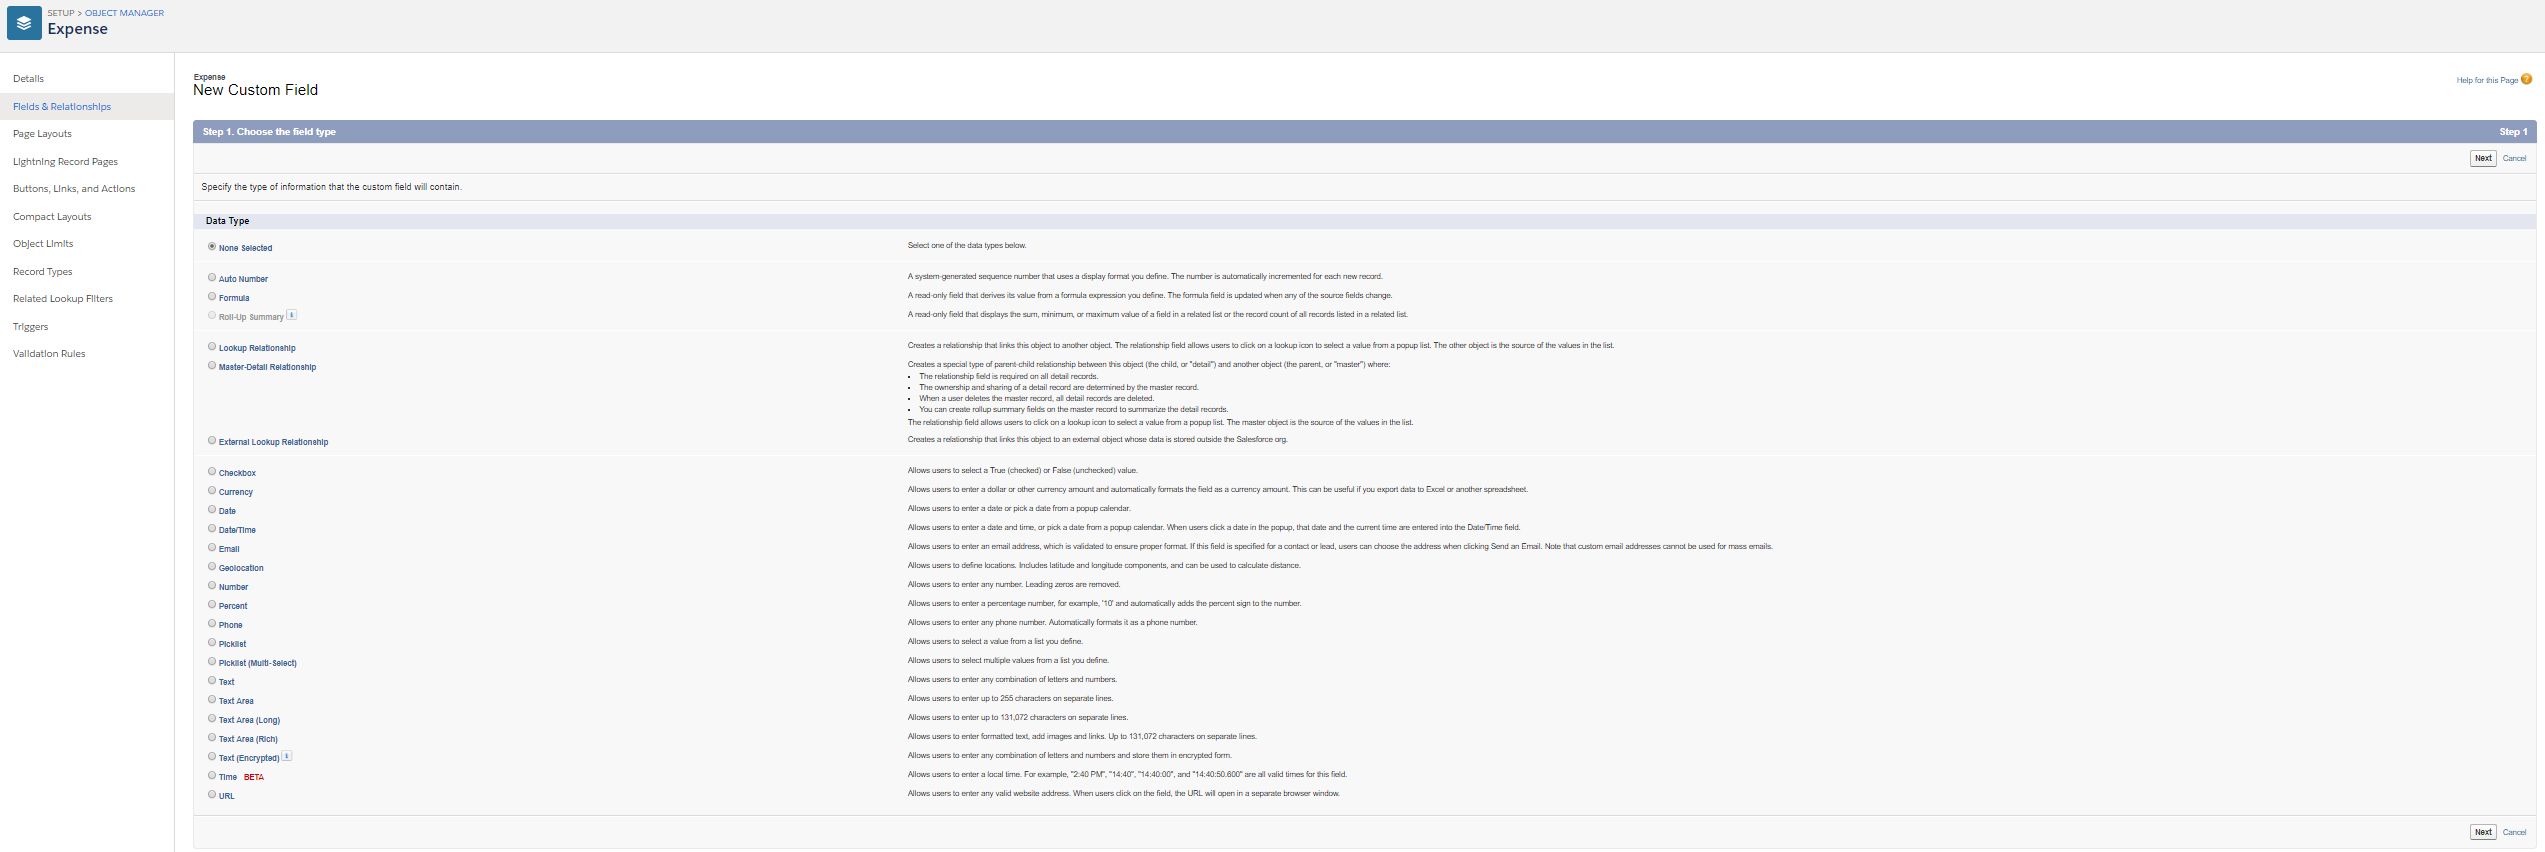 Fig 1.6: Field Data type Selection page
 - Create the below mentioned fields
Field Label API Name Field Type Amount Amount__c Number(16,2) Client Client__c Text(50) Date Date__c Date Reimbursed Reimbursed__c Checkbox Make sure that before we begin, you must have some knowledge of Apex Basics and Database, otherwise it would very difficult to understand some concept mentioned here.
Chapter 2: Getting Started with Lightning Components
Before we dive into the abyss of Lightning, first we need to know that why we should use lightning and what are the benefits of using the Lightning Component. Its benefit includes the following features.
- Out of the box Component set to kick start our app building experience, these components are smart and do not require optimization for different devices as they take care of it themselves.
- Performance, as we use stateful Client and stateless server architecture and rely on JavaScript on the client site to deal with all the UI component meta data and app data. Server calls are reduced as they are called only when they are necessary.
- Event Driven architecture, for better performance of components.
- Faster development device-aware and cross browser compatibility and component rich ecosystem.
Let’s know Lightning Components framework a bit more.
What Is the Lightning Components Framework?
It is a UI framework used for developing apps which run both on mobile devices and desktop, it makes use of single page application architecture using dynamic, responsive components for the interface. It implements JavaScript on the client side and Apex on the server side.
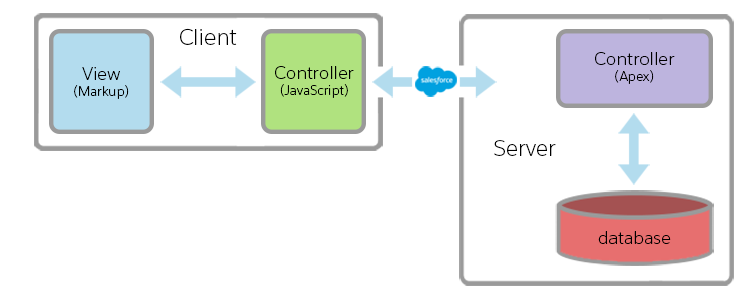 Fig 2.1 Lightning Framework
It is a framework with a collection of code and services to help developers create unique and modern Apps, it was born to build salesforce for mobile devices but later on it was decided to use this framework for both desktop and mobile devices. This framework is for building Single Page application.
Where You Can Use Lightning Components
Lightning components can be used in many different ways, like customizing the org, standalone app and even apps that can be hosted on other platforms (using Lightning out).
Lightning components can be embedded in LEX app launcher, as a tab in Salesforce App Navigation. They can be used in Lightning App Builder and Community builder.
Lightning components can be added to a custom lightning page, record page as a quick action or a standalone app.
Creating and Editing Lightning Components
Let’s begin writing some code and create awesome components for our org.
To write the code we need to open the IDE, which can be accessed by either clicking your name (in Classic) or the gear icon in the LEX.
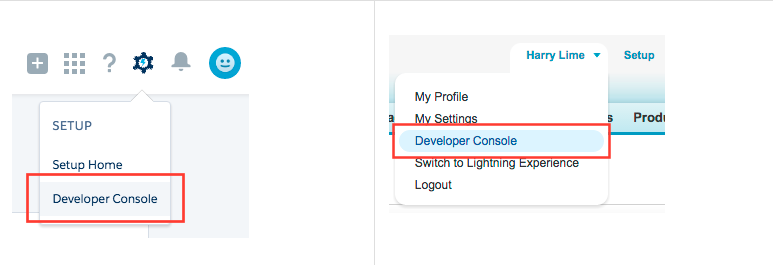 Fig 2.2: Developer Console link
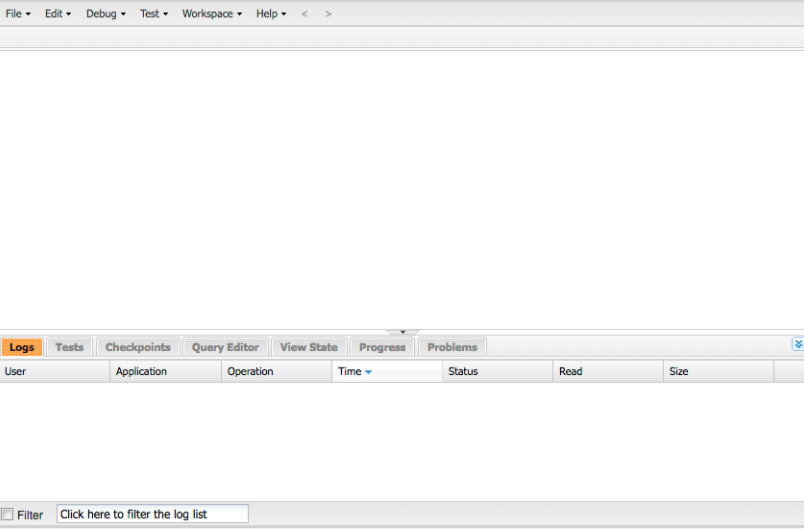 Fig 2.3: Developer Console Interface
Create Lightning Components in the Developer Console
To create a Lightning Component in the developer console follow the below instruction:-
- Click on file and then hover over the new menu and then click on Lightning Components, this will open another dialogue box as shown below.
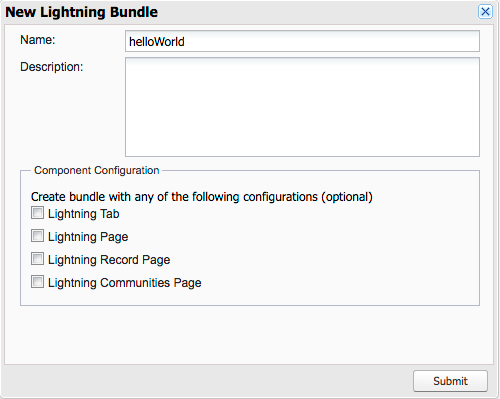 Fig 2.4: Lightning Bundle
- Give it the name helloWorld and click on submit button.
- This will open helloWorld component bundle and helloWorld.cmp as tabs. By default it provides us with opening and closing tag of aura:component, for this section just type <p> Hello Salesforce Lightning </p>
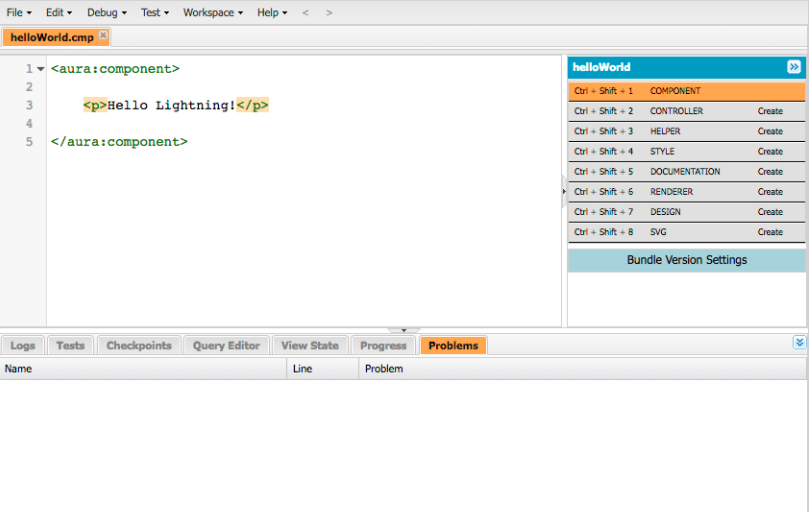 Fig 2.5: HelloWorld Component
We have created our first component, now how to view this component, it is not as simple as Visualforce Page. To view Lightning component we first need to put in a container app. Let us make a simple container app for our helloWorld Component.
For creating the App follow the below instruction:
- Click on file and then hover over the new menu and then click on Lightning Application, this will open another dialogue box which is the New Lightning Bundlepanel, enter the name of our container app “harnessApp” for the app name, and click Submit you will have something as shown
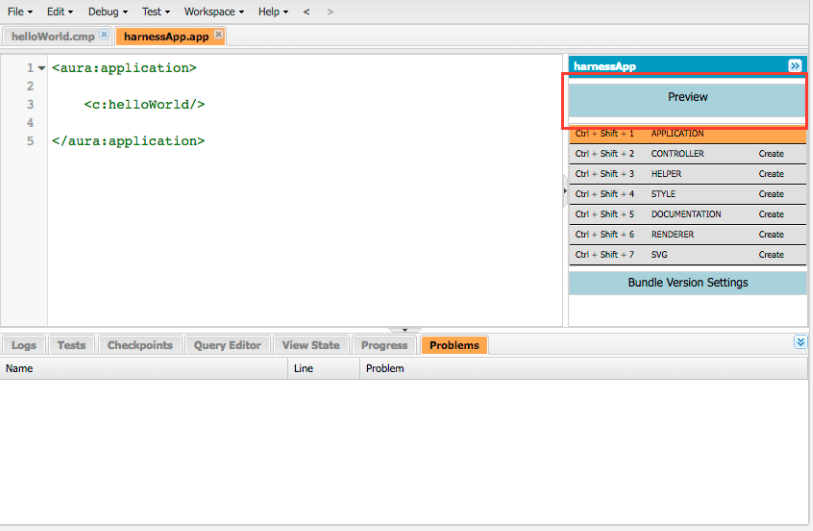 Fig 2.6: The container App
- This app will have <aura:application> tag written by default, just type <C:helloWorld/> inside these tags and click on save. The difference between a Lightning App and component is visible on the right side panel. In App there is a preview button and in the component there is no preview button.
So here you see how we created a component and then hosted it inside a Standalone Lightning App. So you must be wondering that, what a component is. So without a further adieu let’s dive deep into the component.
What Is a Component?
A Component is a bundle which contains set files, written and wired in such a way that they accomplish a common business goal .They are coherent yet loosely coupled set of code and form the basic building block of Lightning Component Framework. It encapsulates a modular and reusable piece of UI and can range from single line of text to entire application. Let’s discuss about the component’s mark up next. Component resource has a .cmp suffix. Below is an example of the component mark up.
<aura:component>
Hello, world!
</aura:component>
This is as simple as a component can be in our helloWorld.cmp
Component Naming Rules
A component name must follow these naming rules:
- Must begin with a letter, contain only alphanumeric or underscore characters, it must be unique in the namespace
- Can’t include whitespace, end with an underscore or contain two consecutive underscores.
Component Bundles
A component bundle consists of files and resources grouped together to achieve a common goal, it contains the following resources:-
- Component: resource name has suffix of .cmp and it contains all the mark up of the component. Each bundle can have only one component.
- CSS: resource name has suffix of .css and it contains all the styling of the component
- Controller: resource name has suffix of .js and it consists of client-side controller methods to handle the events.
- Design: resource name has .design as the suffix and it is required for a component to be used in lightning app builder, lightning pages or community builder
- Documentation: resource has .auradoc as suffix and is a description of the component, sample code and one or more component reference.
- Renderer: resource name has .js as a suffix and is used to override client-side renderer for a component.
- Helper: resource has .js as its suffix and it contains JavaScript Functions that can be called from any JavaScript code in the components bundle.
- SVG File: resource has .svg as the file extension and it contains custom icon resource for the components used in lightning App Builder or community builder.
Next we will start making our component a little bit more complex by using attribute and expressions.
Also Have a look at the below resources:
Also Have a look at the below learning resources:
The post Salesforce Lightning Tutorial: Lightning Component basics appeared first on Salesforce Next Gen.
]]>Continue reading Advanced Formula, Salesforce Platform unleashed!!!
The post Advanced Formula, Salesforce Platform unleashed!!! appeared first on Salesforce Next Gen.
]]>Introduction to formula fields and Advanced Formulas
Formula Field is a powerful capability that has been provided to us by force.com platform, it gives the ability to display the data according to our need. With the help of formula field we can perform calculations on numeric fields and display them as a percentage or if we want to convert a field into a clickable hyperlink or if we want to calculate number of days between two date fields of an object, we can accomplish all these tasks using formula fields.
To create a formula field, we need to understand the formula editor, the place where we create the logic of our formula field. To reach to formula editor we need to follow the following steps.
1. Go to a custom Object or standard object detail page over there scroll down to the section of custom fields.
2. Click on new button and select formula field give it a label and select the return type of the resulting value as shown below.
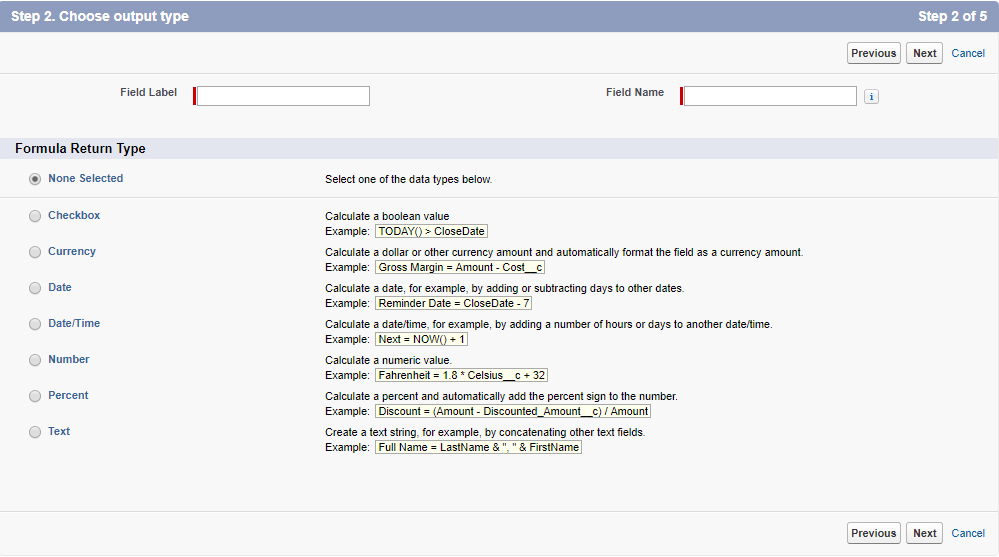
3. After selecting the Return type you are directed to the screen where you can create your formula, i.e Formula Editor.
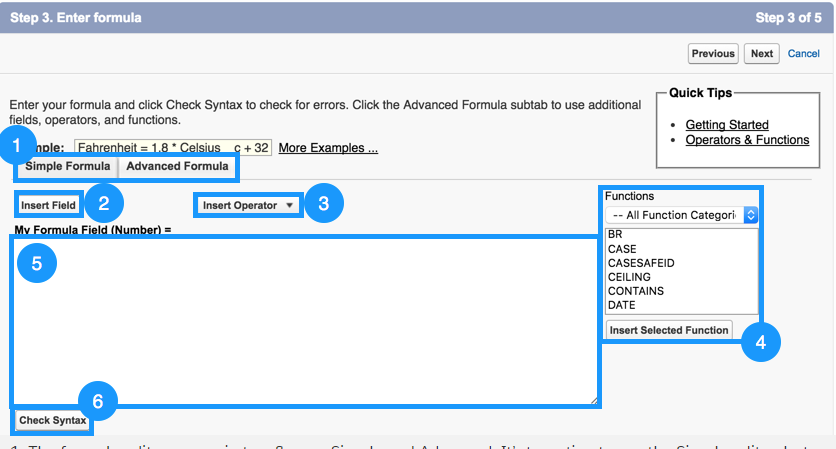
4. Formula Editor comes in two version, Simple and advanced, the only difference is that the advanced version has more options.
5. Insert Field button in the editor provides point and click access to the fields of the std-Object/ Custom Object and to the fields of object related to this entity.
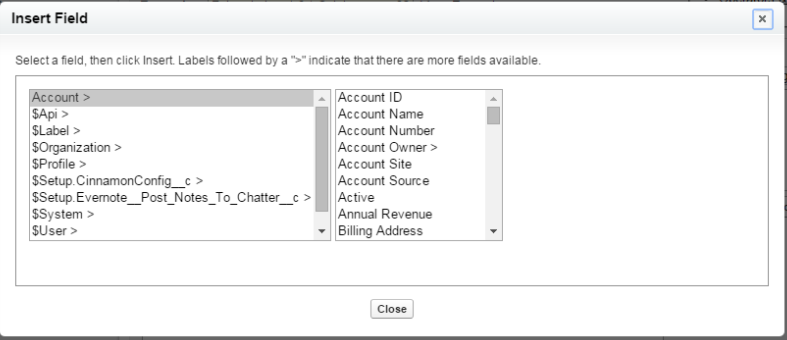
6. Insert Operator button provides us with the point click way to put logical operators in the formula.
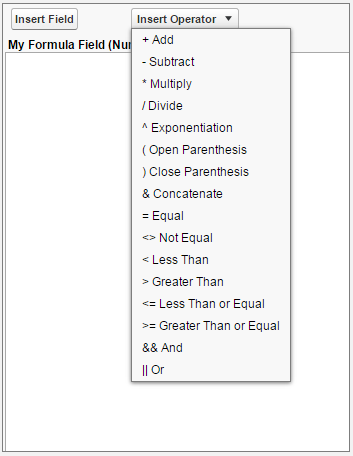
7. Lastly the Function panel provides the ease of access to insert a function in the formula.
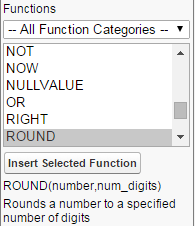
This pretty much sums up the formula editor and from here we will dig deep into the formulas and the use case where we can implement some useful logics.
Advanced Formula using Checkbox basic logic
Checkbox Type in Formulas
Checkbox is a Boolean field which is either selected or not selected i.e. it is either true or false. A use case of this could be to check if an account has more than 500 employees or not, if the formula evaluates to be true then the large account checkbox will be checked and if it is false then the checkbox will be unchecked.
Basic use of Logical Operators
Logical operators are adapted from the real world conversation i.e. if –this happens –then I will do this, and, or, not. We will discuss these operators in detail below:
AND()
In this function at least two arguments are required, but it can handle more than that. This function will return true only if all the arguments are true. Schematic of this statement is shown below in the table.

Suppose you a sales rep wants to know whether to reach out to a contact via email or mobile phone or if a contact has opted out of email and mentioned Do Not Call, then we would like a checkbox to be checked, indicating to the sales rep that this contact wishes not to be contacted. In this case we will use AND () function and the argument we will check is Do not Contact. The formula in the editor would look something like as shown below.

If a contact has selected both emails opt out and do not call option then the third checkbox will be checked indicating that this contact should not be contacted, but in case if only one option is selected then this checkbox will not be checked.
OR()
This function is similar to the And (), it also takes two variables as an argument, but the only difference is that, this function will return true if any one of the argument turns out to be true. Schematic of this statement is shown below in the table.

Suppose on a contact object we want to a checkbox to be selected if the contact is the CEO or is at an executive level. To know if a contact satisfies the above mentioned requirements, we need to check the title of the contact i.e. it begins with “Chief” or the title contains “President” or it the title contains “Executive”.
To find these values in a text we would be required to use two different methods.
1. Begins(text, compare_text) this method compares the two strings and checks if the “text” begins with “compare_text”, if this condition evaluates to be true then it will return true else it will return false.
2. Contains(text, compare_text) this method compares the two strings and checks if the “text” contains the “compare_text”, if this condition evaluates to be true then it will return true else it will return false.
The resulting formula would look something like below:
![]()
Or we can also write them using the symbols as shown below

Now whenever, if one of these conditions turn out to be true the checkbox will be checked.
NOT()
The NOT() method inverses the Boolean value of any field i.e. it will change true to false or false to true. For this let’s take an example where we want a checkbox to be checked if all the important information of a record has been filled by the rep, for example, the formula would something as shown below.
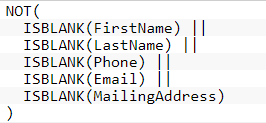
Or

IF()
This method can be written as IF(Testing_Condition, If_True_Execute_This, Else_Execute_This), it takes three arguments. First a condition to test, this is the condition which defines the flow of the execution, of this condition evaluates to be true, then the flow is transferred to the second argument i.e. “If_True_Execute_This” if not then the flow is transferred to the third argument i.e. “Else_Execute_This”.
Let’s take an example where we first want to check if a contact is executive or not. If it turns out to be true then we would like to check its department, if the department is “sales” then we will check its area code which should be “212” else return false and if the department turns out to be “Marketing” then the area code should be “415”, else return false. This can be represented in a if Method as below.

So that’s how we use Checkbox with the formula field.
Using Percentage, Number and Currency in the Formula Fields
To use number, currencies and percentage in formula field, we first need to understand the characteristic of each field. Below is the schematic of the three return types.

Now we will discuss about some operators which are commonly used with these fields.
Mathematical operators
Arithmetic operators like (+,-,*,/) are used to perform calculations on the numeric field values and these operations can be grouped in parenthesis as well. We can also use logical operators as well on these fields like (>,<,<=, >=, !=).
Formula editor also provide other Mathematical formulas like Round(), min(), max() etc.
Now let’s see how to use these return type in a formula field.
In this example our goal is to find Interest on an account, for this we first create a currency field on Account named Principal and it will have 2 decimal places. After we have created this field we will create another field “Interest Rate”, it would be a formula field with return type percent. This field is dependent on the amount present in the principal field and is evaluated as mentioned below.
Interest Rate equals to 0.02 if the amount in the principal is less than 10000, it is 0.03 if the principal is between 10000 and 100000, it 0.04 for values greater than 100000. To evaluate the value of interest rate we will make use of the following formula.

Now to find the interest we have the principal and we have the interest rate as well.
To find the interest we make use of the formula A=Pe^(RT) where A is accumulated Interest on Account, P is the Principal, R is the rate of Interest and T is the number of year the account has been open and e is the mathematical constant.
To recreate this formula in Salesforce we need to implement another mathematical function provided in formula editor i.e. EXP(Num) this will raise the mathematical constant to the power of the Num.
We have already create a formula to find R and to find T we need to calculate this using another method in the formula editor that is Today() and we need to provide the value returned by this method to another Method Year(). This will return only the year of the present date. From this value we will subtract the year when the account was opened in the salesforce by using another method Value() which converts a text into integer. Your final formula should look something like this.
Principal__c * EXP(Interest_Rate__c * (YEAR(TODAY()) – VALUE(YearStarted)))
Now we will discuss about the Date and Date/Time Fields in formula
Date and Date/Time fields in Formula
To understand how to use Date and Date/Time field in formula we need to first understand the two fields. A Date field holds year month and day values and Date/Time have an extra value of time along with the other values. The time value is stored as GMT but it is displayed as per the current organizations time zone.
Also consider that when subtracting two date values a whole number is returned and when two Date/Time values are subtracted a fraction value is returned. We have to build formula fields keeping these factors about Date and Date/Time field in mind.
Common methods and operators used with Date and Date/Time fields
DateValue() and DateTimeValue()
Salesforce platform provides us with methods which help us in working with Date and Date/Time fields. To begin with if we want to convert a Date/Time value to Date we will use method DateValue(), it takes a text value or Date/Time and provides a Date as a return. Similarly we have DateTimeValue() method which returns a Date/Time Value.
Today() and now()
These methods provide same information i.e. today’s date the only difference is that the value returned by Today() is a Date value and value returned by Now() is a Date/Time Value. To find the day, month, year of a Date value we use the methods day(), month(), year() respectively, these methods take a Date value as an argument and return a number as value corresponding to the argument.
It seems pretty straightforward to calculate on Date fields but things get complicated when we take business days into the consideration. Let’s have look at the example to understand in detail.
We want to create a formula field which adds 3 business days to today’s date. This seems simple If today’s date is a Sunday, Monday or Tuesday because adding 3 business days is similar to Today() + 3. But what if today is Wednesday, Thursday, Friday, adding business days here is equal to Today +3 +2 i.e. business days and the 2 weekend days. Also if Today is Saturday then again it is different than the previous two condition, it is equal to Today() + 3+ 1, i.e. only one weekend day.
To implement this logic we will make use of another method provided to us by the salesforce i.e. case(). This method takes and expression and compares it the n number of cases and transfer the flow of logic to the result value which is corresponding the case which matches the expression it’s syntax is as shown below.
Case(Expression, Case1, result1, case2, result2,……, else result)
To begin the implementation we first need to know which day is today, for this we need to find the number of days between today and a known past Sunday. After finding the number of days we would use another method MOD() and divide the number of days with 7 and the result of this method will give us the number corresponding to the current day i.e. 0 for Monday, 1, for Tuesday, 2 for Wednesday, 3 for Thursday etc. The final formula would look as shown below.
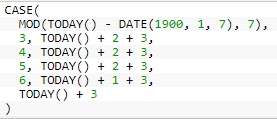
Now we will learn about using Picklist in the formula fields
Picklist in the Formula
Picklist is a field where we select a value from a drop down list which is populated with some predefined values. A formula field cannot return a picklist as a value but it can reference a value which is selected in a picklist.
Common methods that are used along the picklist
ISPICKVAL() and PRIORVALUE()
IsPickVal(picklistField, compare_text) method takes two arguments and returns true if the value of the picklist field matches that of the compare text. PriorValue(picklistField, compare_Text) method as the name suggests compares the previous value of the picklist to the compare text and returns true if they match.
Let’s have a look at the below scenario where Account.rating picklist value is used along with other parameters to define the priority of the case.
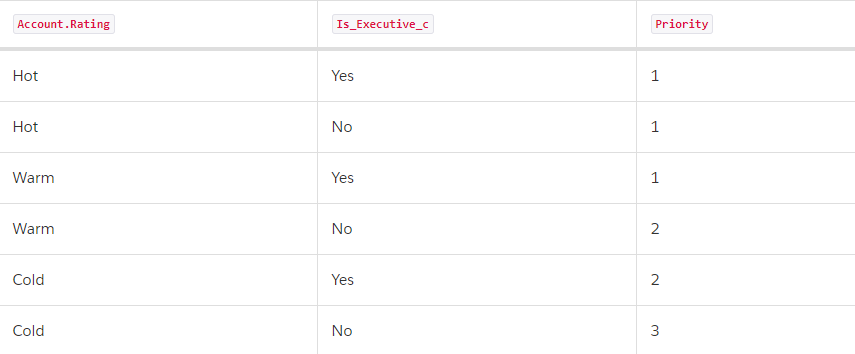
The formula to implement the above logic would look similar to the below code.

Now we will discuss the use of text values in the formula.
Use Text Formula
Text in formula field can be useful if we want to display two concatenated text fields or if we want to convert numbers, currency and dates to text or if we want to display text conditionally. For example FirstName & ” ” & LastName .
This will display first and last name along with a space between the two.
Common functions to use with Text Return type in Formula
Salesforce platform provides us with many functions to make it easy to work with text values. With the help of these functions we can easily convert other values to text and vice versa or you can find a specific string in the text. Let’s dig deep in to these functions.
Text()
This method accepts one argument and will return a corresponding text value. It accepts any value i.e. number, percent, currency, date and date/time, picklist. The resulted text is not formatted i.e. no commas or currency symbol or percentage sign for e.g. if we give Text(Percent) then if the percent is equal to 30% it will return 0.3.
When the Text method receives a Date or Date/Time value it will convert it in to the corresponding Date and Date/Time with the standard formatting for e.g. Text(DateVar) will return 2017-09-28 for September 28th 2017, and Text(DateTimeVar) will return 2017-09-28 18:00:00Z for September 28th 2017 6 PM, the ‘Z’ in the end means that the value returned is in GMT. The result of the Date/Time will return the text in GMT only ir respective of the time zone of the org.
We have already used other string functions like Begin() and Contains(), there is one more String method which is used commonly i.e. Substitute(Text, oldString, newString) it will return the text and will replace any instance of the oldString with the newString. Let’s dig deep in using the text as a return type in formula field with the below use case.
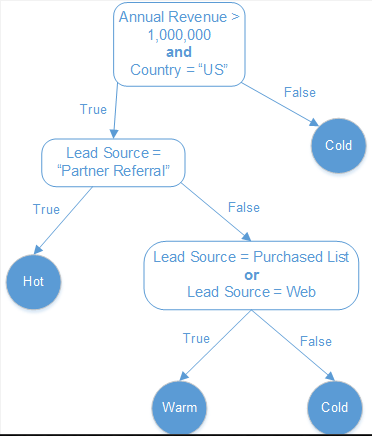
In the above examples let’s write down the conditions:-
Hot—It refers to the lead with its Annual Revenue is more than a million, it’s Country is the United States, and the Lead Source is Partner Referral.
Warm— It refers to the lead with its Annual Revenue is more than a million, it’s Country is the United States, and the Lead Source is either Purchased List or Web.
Cold—The lead doesn’t satisfy any of the above conditions.
To reach this automation we will create a formula which would look something like this.
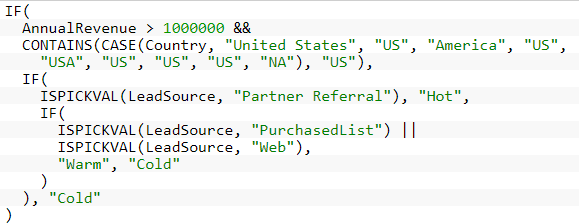
Based on the above rating we create a field which is showing a conditional text, i.e. based on the formula the value of the rating field will change. Now based on the value of this rating field we can create another field which will display an image corresponding to the value of the rating field. For this, we will use Image method in the formula editor and with the help of the Case method, we can change the address of the image we use the formula below to show conditional images.

Also Have a look at the below resources:
Also Have a look at the below learning resources:
The post Advanced Formula, Salesforce Platform unleashed!!! appeared first on Salesforce Next Gen.
]]>Continue reading Insights of SOQL and Relationship Queries on Force.com
The post Insights of SOQL and Relationship Queries on Force.com appeared first on Salesforce Next Gen.
]]>Introduction
Salesforce Object Query Language commonly known as SOQL is the language to query data from the salesforce.com platform. SOQL is very similar to SQL, it is just that SOQL utilizes the joins differently. The data model of Force.com is based on relationships of each object and to traverse the relationship path which is a fundamental building block while constructing a query. With the help of these queries, we can fetch data from different objects in one single query thus utilizing the joins implicitly. We construct the relationship in SOQL by using the path traversal which helps in joining the data.
Relationships in Force.com
In order effectively make SOQL queries, we would first need to understand the type of relationships available on the force.com platform. There are two types of relationships:-
- Lookup Relationship
- Master-Detail Relationship
Both of the relationships are 1-to-many but force.com platform treats them differently, both of these relationships are defined from child to parent.
Lookup Relationship
They are a flexible relationship between two objects and are used to create complex relationships. One of the main features about this relationship is that it is not enforced, i.e. an Orphan record is allowed in this relationship. We can create a record without entering a value in the relationship field. This data model allows a relationship to exist between a child and parent but it is not mandatory.
Permissions to usage and visibility are not governed by the permissions and visibility of the parent object, therefore it provides the flexibility to children to dictate their own sharing rules.
The lifecycle of the child record is not dependent on the lifecycle of the parent record, i.e. if parent record gets deleted then the child record is not deleted.
Roll up functionality are provided to implement declaratively and if required then it has to be implemented explicitly.
Master-Detail Relationship
This relationship is a special case of lookup Relationship, this relationship comes with some prebuilt functionality provided by force.com platform. Firstly Orphan record is not allowed in a Master-detail relationship, i.e. we cannot insert a child record without specifying a parent record. The relationship is enforced and no child record can exist without a parent record.
Permission to usage and visibility of child record is not flexible and is governed by the permission and visibility of the parent record. Sharing rules of parent records are imposed over the child record.
The master-detail relationship is provided with built-in cascade delete functionality, i.e. if a parent record is deleted then the child records also get deleted, this functionality is useful in many scenarios.
In Master-Detail Relationship there are many roll-up features are available to declare using point and click functionality and reduces the implementation time.
SOQL results and Data Binding
The result set of SOQL can be accessed programmatically and it utilizes the navigation with relationship underlying the data model of force.com. The result set of SOQL is anchored to a base object i.e. the object written after FROM clause. The result returned by the SOQL is a list of the object, this set also contains the list of fields which were included in the select clause of the SOQL statement. This set of field can have another nested select statement, therefore, there is a possibility that the result may have a nested object in the result set.
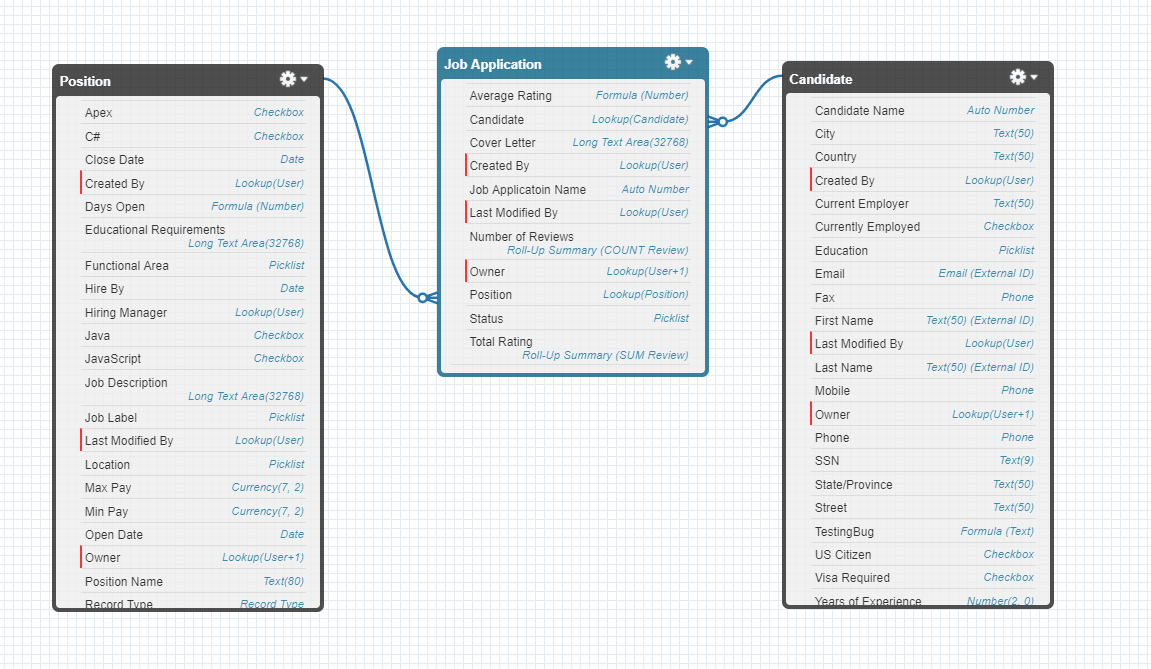
Consider the below schema, in this, we have established an m-n relationship between Position and Candidate with the help of another object i.e. Job Application. Following is more elaborated relationship these objects have.
- Position can have n number of Job Application from various Candidates
- A Candidate can apply for more than one Position
- Also, there is a possibility that a Candidate applies to a company and not to a specific Position.
Kindly refer the Schema as shown in the picture below.
Now we are going to answer questions related to reporting and to answer them we will write SOQL and explain the type of joins and relationship queries.
Right Outer Join
To begin with, the question no 1 is: Find all the job applications related to Departments.
Now the object Job Application does not have the field Department and therefore we would have to reach out to the object which has this value for each job application i.e. Position__c. The resulting query would something like below.
SELECT Name, Position__r.Department__c FROM Job_Application__c
The result set it returned is below:
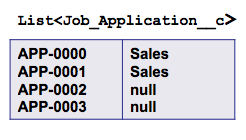
In this query, you would have observed that we have utilized a path expression Position__r.Department__c which reaches out to the related object and fetches out the value of the desired field, this type of join is known as Right Outer Join between the two objects. It is an implicit join statement where the path expression results in the desired value from the related object.
Left Outer Join
Next question is Find all the position and their related Job Application records.
In this scenario, we want to fetch all the related Job applications and there is a possibility that one Position may have more than one Job Application from different Candidates. To achieve this w would have to create a nest SOQL query, where the parent object is Position and the related child records are Job Applications. Note that here we are traversing from ‘m’ side of the m-1 relationship. The Query would look something like below
SELECT Name, (SELECT Name FROM Job_Applications__r) FROM Position__c
The result of this query would be something like below:

This query is very useful in fetching the related records and now we are traversing from the ‘1’ side of a 1-m relationship. The result set her contains the list of Position records and each of these position records is having a list of child records i.e. Job Applications. This type of query is known as Left Outer Join.
Left Inner Join
Next Question to answer is: find all those positions which have an associated Job Applications.
SELECT Name FROM Position_c WHERE Id IN (SELECT Position__c FROM Job_Application__c)
It will fetch result something like below:
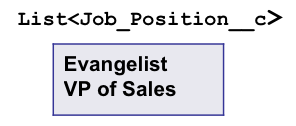
In the earlier versions of Force.com’s SOQL this type of query was not possible but after Spring 10 this feature was added. Earlier we would have to fetch the Id’s of all the Positions associated with Job Applications in a separate query and then use them in the above-shown example. Now, force.com allows select statement in conjunction with the select clause and the Ids of the position can be fetched directly in the IN Clause of the select statement. This type of join represents the Left Inner Join.
Right Inner Join
Next Question is: Find all the Job Applications for Positions that are in the Sales Department?
Here we are going to utilize path traversal to fetch the value of the position name in the select clause and here we need to filter the result set of Job application based on the Department and this field is again not on the Job Application object. Therefore we would use the path traversal method and use this field in the Where Clause of the SOQL statement and the query would look something like below.
SELECT Name,Position__r.Name, FROM Job_Application__c WHERE Position__r.Department__c = ‘Sales’
The result set of this query would look something like below:

Left Anti-Join
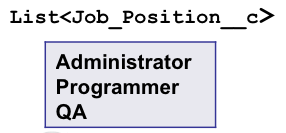
Now we have a scenario where we have to fetch all the Positions which do not have a Job Application associated with it.
In this scenario, we have to check whether there is any child record is associated or not with the Position object. Here the Select clause would be similar to the Left Inner Join but instead of the In Clause we would use the NOT In Clause and it will bring the result set opposite of the Left Inner Join.
The query would look something like below:
SELECT Name FROM Position_c WHERE Id IN (SELECT Position__c FROM Job_Application__c)
It will fetch result something like below:
Right Anti-Join
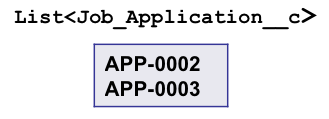
In this scenario, we are going to find all the Job Applications which are not associated with a Position.
To achieve this although we do not implement any join the resulting set is Right Anti-Join. The Query would look something like below:
SELECT Name FROM Job_Application__c WHERE Position__c = null
The result set would be something like below:
The only field we use here to filter the result is the relationship field therefore thus simulating as a join but without traversing any field on the related object.
Cheat Sheet
Force.com has provided a cheat sheet to easily utilize the Join Patterns and this sheet is made keeping in mind the 1-m relationship pattern. The parent object is on left and child is on right for the below cheat sheet.
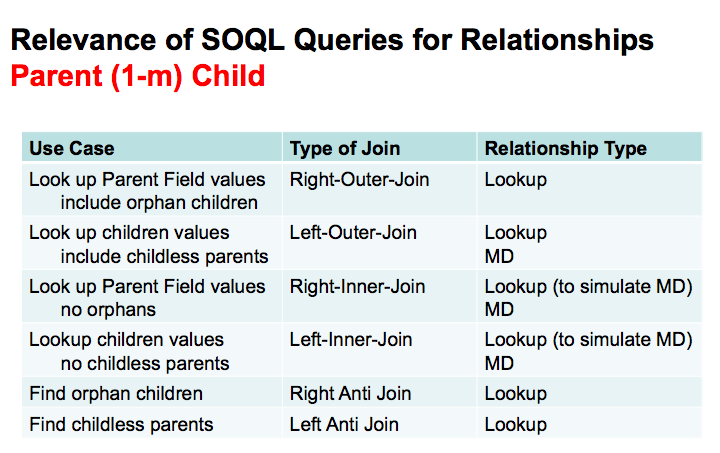
To summarize all the joins we can say that to use Outer joins to display the records where there is no restriction of the relationship, i.e. to fetch all the records with or without a value in the related field. When you want to find the records which do not have a value in the related fields i.e. childless parent or orphaned Child, then use the Anti-Join patterns.
Date Functions
Force.com’s SOQL has provided with various functions which are exclusive to only date fields only and we can fetch data filtered appropriately with the help of these functions.
Functions are broadly divided into 5 categories:
- Calendar functions: the syntax of the functions is as follows:
CALENDAR_MONTH, CALENDAR_QUARTER, CALENDAR_YEAR
- DAY functions: the syntax of the functions is as following:
DAY_IN_MONTH, DAY_IN_WEEK, DAY_IN_YEAR, DAY_ONLY
- FISCAL functions: the syntax of the functions is as follows:
FISCAL_MONTH, FISCAL_QUARTER, FISCAL_YEAR
- HOUR function: the syntax of the functions is as following:
HOUR_IN_DAY
- WEEK function: the syntax of the functions is as following:
WEEK_IN_MONTH, WEEK_IN_YEAR
Example of the Date Function in the query is as below:
SELECT Title, Name FROM Position__c WHERE CALENDAR_ YEAR (Date_Closed__c) = 2015
Aggregate Result with GROUP BY
Force.com platform in the Spring 10 release has introduced more new features in SOQL and these were the inclusion of Group By and Having Clause. These clauses help in generating reports and analysis on the go from the data in hand. These queries are useful while making Roll-up Summaries on the objects with the lookup relationship.
Let’s work on a scenario where we can implement the roll up like feature, suppose we want to find the total number Job Application which has been applied in various departments. To achieve this we would write a SOQL similar to the one given below:
SELECT Position__r.Department__c deptname, COUNT(id) total FROM Job_Application__c GROUP BY Position__r.Department__c
This query will have a result set similar to the one below:
In the query above we see a new of dealing with the grouped fields, here we are first of all referring the aggregated field with the alias name i.e. deptName. It can also be seen that the field which is aggregated is from the related object and job is obtained using the path traversal expression. In the second field, we are fetching the total numbers of Job Applications which are applied in a given department as the result set is grouped according to the department, for this field we used the alias name as the total. The aliasing the aggregated fields provides us with the means to refer them in the aggregated results.
Now the main difference between a normal SOQL and a SOQL with the aggregated field is that the result of the query is not a list of sObject but it is a list of AggregateResult. Since the new result set is containing the fields which were specified in the query and they are referred in the aggregate result using the alias name and are fetched using getter method as shown below.
List <AggregateResult> aggrs = [SELECT Position__r.Department__c deptname, COUNT(id) total FROM Job_Application__c GROUP BY Position__r.Department__c];
for (AggregateResult ja : aggrs)
{
System.debug(ja.get(‘deptname’) + ‘ | ‘ + ja.get(‘total’));
}
How to Use Aggregate result in Visualforce Page
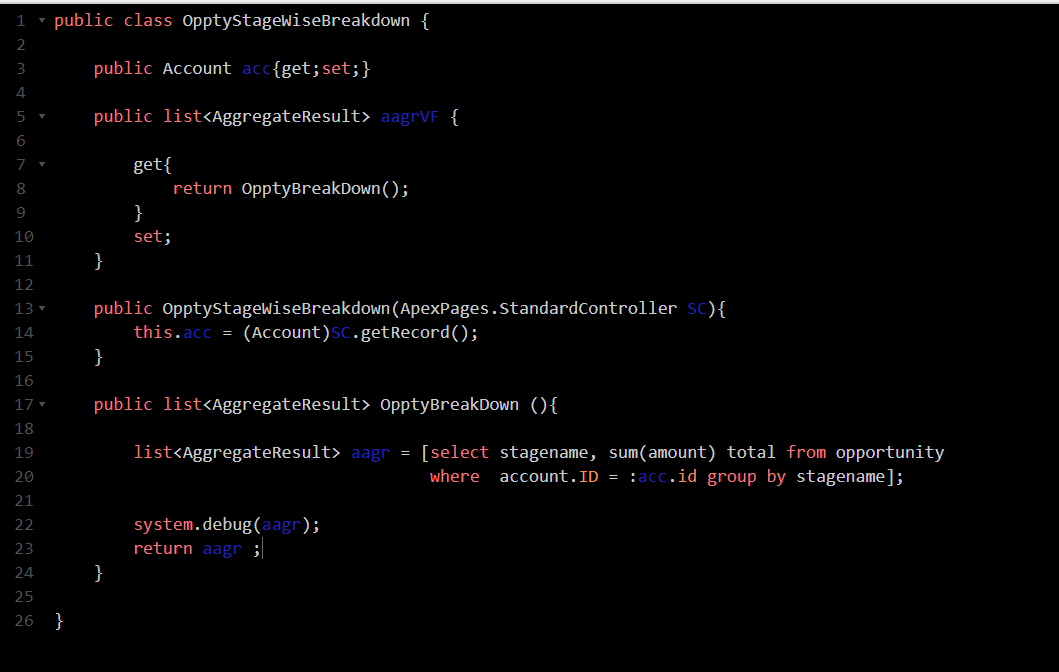
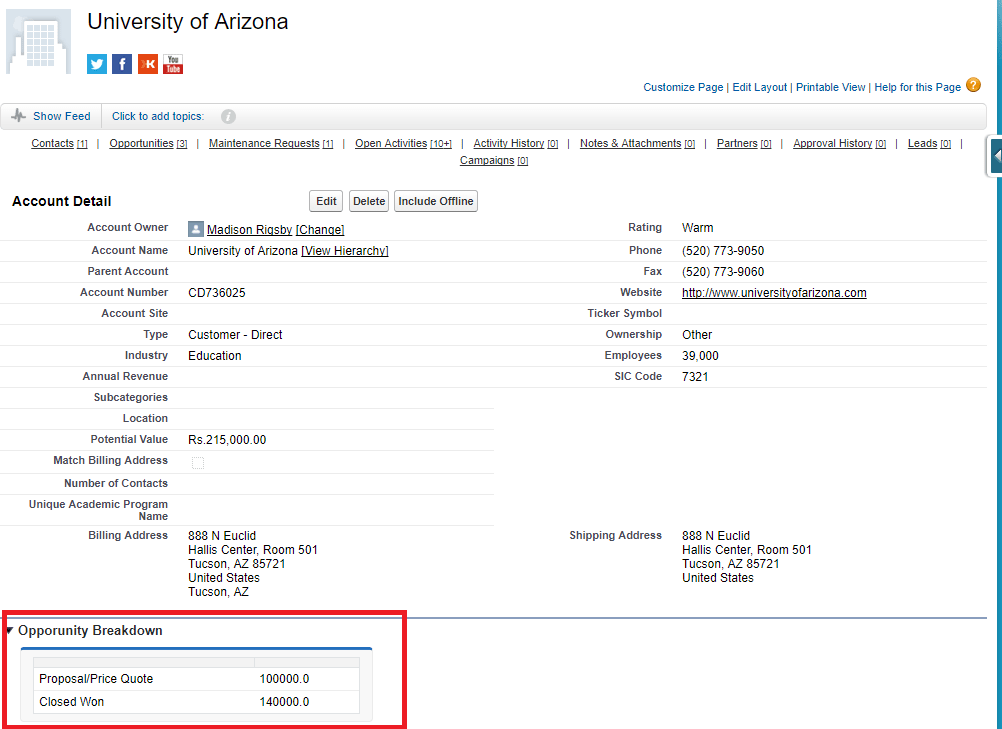
In this section, we are going to see how we can use the Aggregate result in a Visualforce page. For this, we are going to create an extension and use Account standard controller. In this extension, I am going to fetch all the opportunities of an account and segregate them according to their present stage name and display the total amount of each stage.
To display the value of each stage I have created a Page Block Table, where I am passing the List of the Aggregate result as the value and created a variable to traverse the list. I am going to place this Visualforce page as a section on the account standard detail page and it will display the information related to the specific account.
Controller Extension:
VisualForce Page:

Output UI:
Summary
This includes the common patterns found in SQL and can now be implemented in SOQL as well like Joins and aggregate functions and other functions. These methods help improve the overall code efficiency and performance.
Scenario-based Question
- Find the Maximum, minimum and Sum of all the opportunities of each account whose stagename is Closed Won?
ANS:
Select account.id, min(Amount), max(Amount), sum(Amount) TotalOppValue from Opportunity where stagename = ‘Closed Won’ group by account.id
ResultSet:

Also Have a look at the below resources:
Also Have a look at the below learning resources:
The post Insights of SOQL and Relationship Queries on Force.com appeared first on Salesforce Next Gen.
]]>Continue reading Apex Trigger Best Practices and the Trigger Framework
The post Apex Trigger Best Practices and the Trigger Framework appeared first on Salesforce Next Gen.
]]>Apex Trigger Best Practices
In this section we will understand the best practices a user needs to follow to ensure the Trigger runs smoothly throughout its lifetime.
We have always run in the situation where we have begun with a trigger which has a few lines of codes and serves a single purpose. But as the time progress our trigger becomes more and more complex with addition of new business logic and keeps on growing. Soon it becomes difficult/ impossible to manage.
Sooner or later we are going to find our self in a situation where a trigger has become too difficult to maintain and even the slightest change may have a disastrous effect. Therefore I have compiled few best practices for writing Apex Trigger to avoid the above mentioned scenarios and they are mentioned below:
1. One Trigger Per Object
The reason this is on top my best practice list is that, if we make more than one Trigger on an object then we are not able to control the order of execution of these trigger’s i.e. there is no proper flow control. A single Trigger is capable enough of handling all the possible combinations of DML events and Trigger’s context. Namely insert, update delete and undelete (Before and After). So as a best practice we just need to create a single Trigger and it will handle all of the context. For example see the below code:
trigger OptyTrigr on Opportunity (
before delete, after insert, after update, after delete, after undelete, before insert, before update) {
Write your Trigger logic here
}
2. Logic-less Trigger
Next good practice is to make Trigger without covering any business logic inside the trigger itself, make it logic-less piece of code. All we want to do here is to invoke the Trigger on the desired DML event and let it delegate the task to a specific handler class. The main reason behind that is testing a Trigger is not easy if all the business logic is written in the body of the Trigger. If we have written methods inside the body of the trigger, then these methods cannot be exposed for testing purpose and methods of trigger cannot be used anywhere in the org. Therefore stuffing logic inside the body of the Trigger will make a mess one day in future. Therefore we should create a helper class which receives delegation from the Trigger and all the application logic is written there. Below is an example of the handler class.
trigger OpportunityTrigger on Opportunity (after insert) //Trigger
{
OpportunityTriggerHandler.HandleAfterInsert(Trigger.new);
}
public class OpportunityTriggerHandler { // Handler Class
public static void handleAfterInsert(List opps) {— Business Logic—-}
}
3. Handler methods Specific to the Context
One more best practice is to create methods which are specific to the context, i.e. they are invoked based on the DML event. If I am handling more than one DML Event then I would write as many methods in the handler class not the Trigger and I would route the trigger flow to the correct Handler method based on the context variables like Trigger.isAfter or Trigger.isInsert etc.
Now we come to the stage that we already know the best practice to create a Trigger but why we should use a Framework for the same. We are going to find answers to this question below.
Why Use Framework?
Trigger framework simplifies the development of a trigger, but it is not necessary to use framework all the time for the development of the trigger. Framework helps in the following manner:-
1. Helps in following best practices
2. Implementation of new logic and new handler method in an easy manner.
3. Maintenance of code and testing of Trigger is simplified
4. Enforces consistent implementation of the trigger business logic
5. It Implements tool, utilities and abstraction and make the handler logic as lightweight as possible which will help in maintaining the code
Let’s discuss the usability of the framework in detail.
Routing Abstraction
Routing abstraction is a logic in which the flow of the trigger transaction is transferred to a method and this transfer of control is based on the context of trigger. The logic will check in which context the trigger was invoked and it will dispatch the flow to the method responsible for handling the context. To implement this logic we have to make the logic to route the flow but if you use trigger framework then this routing would be handled by the framework.
Recursion Detection and Prevention
Another common mistake a developer makes is letting the trigger run in a recursive manner. Recursion is a very powerful tool, but if appropriate care is not taken then it can result in unexpected outcome. Trigger framework, in this case, acts a watchdog and observes all the trigger execution and can detect recursion and figure out a way to handle the situation in an appropriate way.
Centralize Enablement and disablement of Trigger
Turing on and off a trigger is not an easy task and the traditional method using change sets is time consuming. The ability to disable the trigger at will is a huge advantage and this can be achieved using trigger framework. Trigger framework can be connected to a custom setting in the org and it can control the on and off of the trigger.
Let’s understand by following an Example of Framework provided in salesforce developer guide.
Trigger Framework example
To begin with let’s have a look at the basic Implementation of a Trigger on opportunity object.
//Trigger
trigger OpportunityTrigger on Opportunity (after insert, after update, after delete, after undelete) {
new OpportunityTriggerHandler().run();
}
// The Handler Class
public class OpportunityTriggerHandler extends TriggerHandler {
public OpportunityTriggerHandler() {}
}
You can see that although there are more than on context that are being called in the trigger but we have only one line the trigger’s actual body. The only line of code that we have written in the trigger’s body is the one where we are calling the run method of the trigger handler class, i.e. “new OpportunityTriggerHandler().run();”.
Let’s make this example more practical by adding a scenario and logic to it. But where will we write the logic, if you guessed Helper class, then you are right, we will make use of predefined context handler methods which are overridable. As context method are called automatically based on the DML Event we do not have to worry about calling them.
Ok So let’s assume that we have a requirement where we have to update Amount field to zero when an opportunity is marked Closed/Lost. To implement this logic event we will use before update trigger. So the first thing which we will do is to override the existing before update method in the handler class and write our application logic there, and it will get called automatically by the framework. Write code as shown below.
// The Handler Class
public class OpportunityTriggerHandler extends TriggerHandler {
public OpportunityTriggerHandler() {}
protected void override beforeUpdate() {
setLostOppsToZero();
}
private void setLostOppsToZero(List) {
for(Opportunity o : (List) Trigger.new) {
if(o.StageName == ‘Closed Lost’ && o.Amount > 0) {
o.Amount = 0;
}
}
}
}
Here you can see that not a single line of code was written inside the trigger. The only thing which we did was to override the method beforeUpdate in the handler class. But not only this, we had to do one more task and that was to cast the Trigger.new context variable into the list opportunity. We have to cast the context variable into the list of opportunity because trigger automatically cast these variables to the respective object automatically but when these variables are referred outside of the trigger, then we have to first cast them into the specific object type and then perform the required task, as shown above.
So now we know that whenever there is a change in the requirement then we do not have to make any changes in the trigger body but instead modify the trigger handler class. We can have as many context hander methods as there are the DML Events.
Below is the schematic of the Trigger Framework, it mentions what is offered by the framework and what developer has to provide to it.
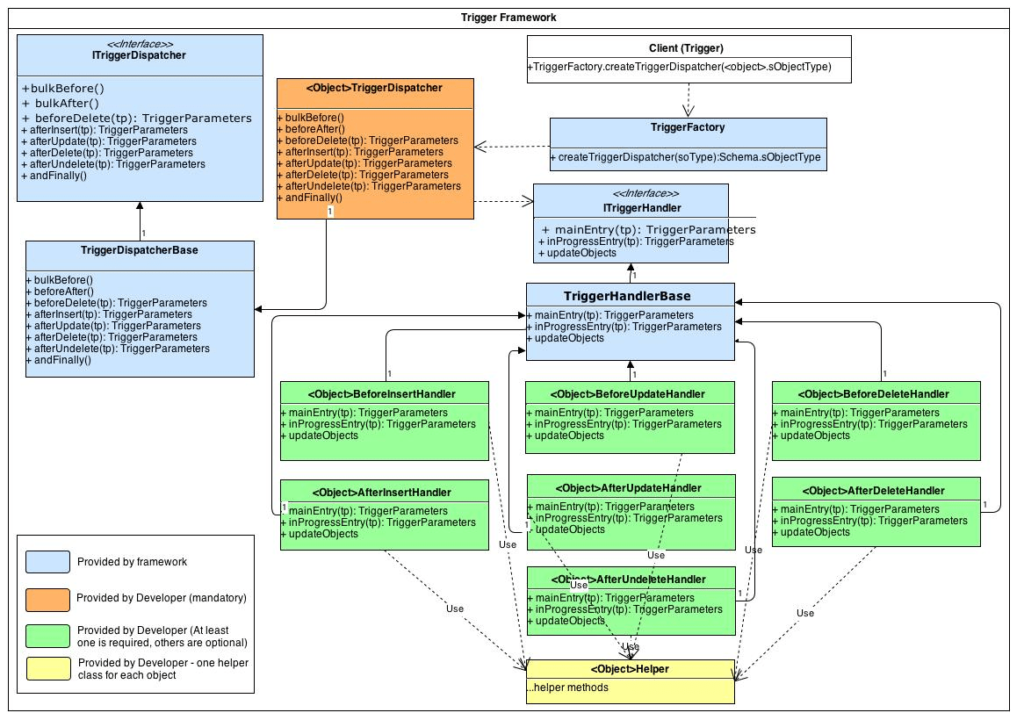
Entity Diagram of Trigger Framework Image Source: https://code.google.com/archive/p/apex-trigger-architecture-framework/
We have seen now how to implement the framework but how is the framework doing all this. We just created a Trigger handler class that inherit from a base class TriggerHandler provided by the framework. This class has the following roles.
1. It has the definition of the overridable context methods for each event
2. It supervises and manages execution of the Trigger
3. It also provides the routing logic to call the right context method
The run() Method
Run method is the method which provides access to the trigger framework. It initiates when it is called from inside the trigger. It is the method which runs the supervisory logic and is responsible for the appropriate routing of the trigger flow. It does all this by checking the current context and then calls the appropriate context method. Below is the source code of the run method.
public void run() {
if(!validateRun()) return;
addToLoopCount();
// dispatch to the correct handler method
if(Trigger.isBefore && Trigger.isInsert) {
this.beforeInsert();
} else if(Trigger.isBefore && Trigger.isUpdate) {
this.beforeUpdate();
} else if(Trigger.isBefore && Trigger.isDelete) {
this.beforeDelete();
} else if(Trigger.isAfter && Trigger.isInsert) {
this.afterInsert();
} else if(Trigger.isAfter && Trigger.isUpdate) {
this.afterUpdate();
} else if(Trigger.isAfter && Trigger.isDelete) {
this.afterDelete();
} else if(Trigger.isAfter && Trigger.isUndelete) {
this.afterUndelete();
}
}
The methods called in the handler are defined logic-less, they are meant to be overridden if nothing overrides it then no action is taken and nothing really happens. They are defined as below:
Protected virtual void afterInsert(){
}
Supervisor Logic
Trigger handler not only route the trigger execution but also performs other tasks as well, like preventing the recursion etc. Trigger framework provides a utility with which we can control the number of executions per trigger invocation. See the example below:
public class OpportunityTriggerHandler extends TriggerHandler {
public OpportunityTriggerHandler() {
this.setMaxLoopCount(1);
}
public override void afterUpdate() {
List opps = [SELECT Id FROM Opportunity WHERE Id IN :Trigger.newMap.keySet()];
update opps; // this will throw after this update
}
}
Trigger framework also provides us with power to bypass invocation of a trigger. Although it is not a good practice to bypass a trigger but in a scenario where the creation of an object ends up creating another object, in this case a trigger may invoke when the second object is inserted. Below is an example of code where the trigger handler is bypassing the invocation of trigger and later on when the task is completed we can clear the bypass logic from the trigger, see the example code below.
public class OpportunityTriggerHandler extends TriggerHandler {
public override void afterUpdate() {
List opps = [SELECT Id, AccountId FROM Opportunity WHERE Id IN :Trigger.newMap.keySet()];
Account acc = [SELECT Id, Name FROM Account WHERE Id = :opps.get(0).AccountId];
Case c = new Case();
c.Subject = ‘My Bypassed Case’;
TriggerHandler.bypass(‘CaseTriggerHandler’);
insert c; // won’t invoke the CaseTriggerHandler
TriggerHandler.clearBypass(‘CaseTriggerHandler’);
c.Subject = ‘No More Bypass’;
update c; // will invoke the CaseTriggerHandler
}
}
Finally on/off switch ability to enable / disable trigger at the production environment. It has always been difficult to enable and disable the Trigger at production, when it is causing production issue. This is achieved by creating a custom setting in salesforce org and this functionality can be extended to Visualforce page and an admin can easily enable / disable a trigger at Production.
Also check other trigger resource:
- Design Patterns for Bulkifying an Apex Trigger
- Making the Apex trigger a bit more complex!!
- Writing a Simple Apex Trigger !!
- Your first Salesforce Apex Trigger from scratch!!!
- Salesforce Interview Questions on Trigger
References:
Apex Trigger framework : https://github.com/kevinohara80/sfdc-trigger-framework/blob/master/src/classes/TriggerHandler.cls
Entity Diagram of Trigger Framework : https://code.google.com/archive/p/apex-trigger-architecture-framework/
Trigger Pattern for Tidy, Streamlined, Bulkified Triggers : http://developer.force.com/cookbook/recipe/trigger-pattern-for-tidy-streamlined-bulkified-triggers
The post Apex Trigger Best Practices and the Trigger Framework appeared first on Salesforce Next Gen.
]]>Continue reading Asynchronous Apex, The Savior from Salesforce Governor Limits
The post Asynchronous Apex, The Savior from Salesforce Governor Limits appeared first on Salesforce Next Gen.
]]>Asynchronous Apex, we all know how sometimes Salesforce Governor Limit can haunt us at times. With the limited amount of resource available due to the multi tenant architecture, we have to restrict our self with the optimum usage of the resources. But what if we want to use the platform to its maximum limit, what if we want to do the process on huge volume of data.
To overcome the above-mentioned crisis, Salesforce Apex has provided us with the feature of Asynchronous Apex. To start with Asynchronous Apex provides us with the double governor limits in most of the cases and in some, we can perform a bulk operation on records up to 50 million.
There are lots of benefits of using Asynchronous Apex, but we are supposed to choose which Asynchronous apex would be the best way to reach our business goal.
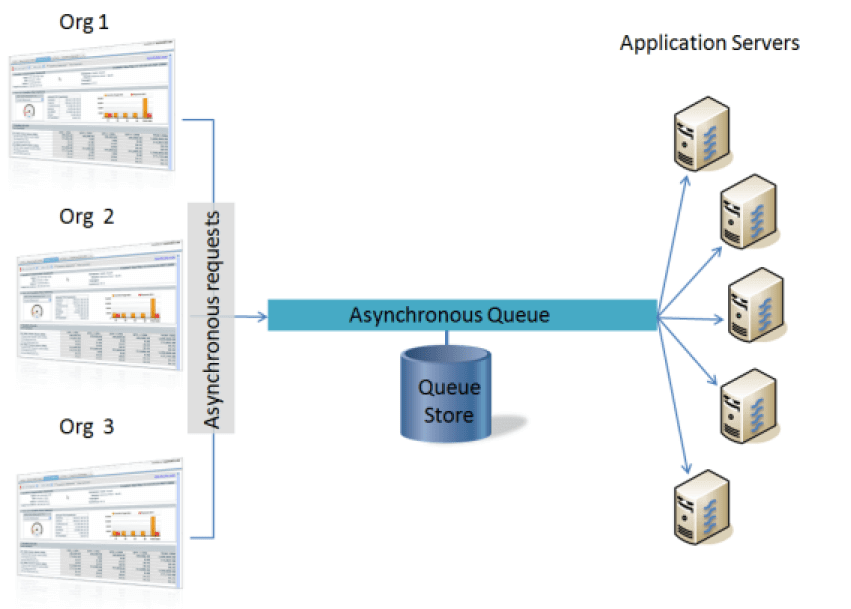
Image Source: https://developer.salesforce.com/page/Asynchronous_Processing_in_Force_com
How Asynchronous calls are handled by Salesforce’s Queue store and is then distributed to the application servers.
There are 4 Asynchronous Apex features their name and use cases are mentioned below:-
- Future Methods: it is a basic asynchronous feature, we imply this method when we want to prevent any delay in the transaction or when we make a web call out or when we want to prevent the mixed DML error
- Batch Apex: To do bulk processing of records or for the jobs that require larger query result for example processes like Database maintenance jobs.
- Schedule Apex: This feature is used to schedule the invocation of an apex class at a specific time, this can be a recurring event or a one-time task.
- Queueable Apex: When one task is dependent on completion of another task we make use of this asynchronous feature, Also job chaining and complex type of jobs are achieved using this feature
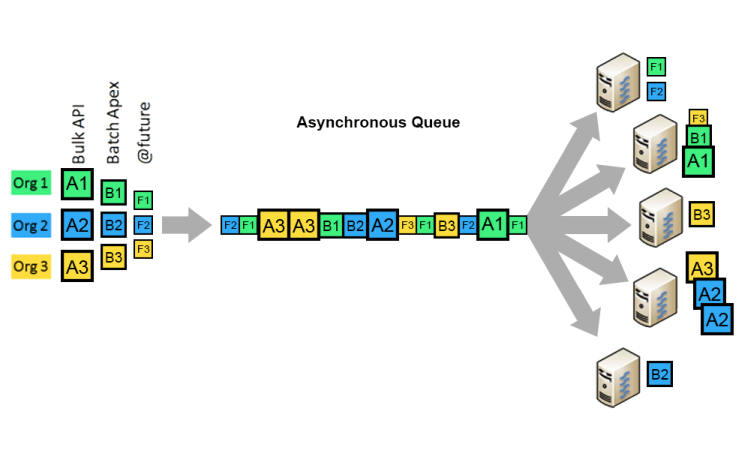
Image Source: https://developer.salesforce.com/page/Asynchronous_Processing_in_Force_com
The above Image is depicting the Process-type(future, batch, and bulk API) wise distribution of the asynchronous processes which are then distributed to different application servers.
Now we will discuss each of these features in detail:-
Asynchronous Apex: Future Method
It is a method which runs on a separate thread in the background. It does not impact the performance of a running transaction as it carried out in a different context. We use this method for the execution of long running operation such as a web call out where we are not sure when the response will come or whether a response will come or not.
This is not the only use case of the future method we also use them to isolate DML statement because there is a possibility that when two DML operation is performed over different sObject then we might get a mixed DML operation error. Future methods help us in preventing this error.
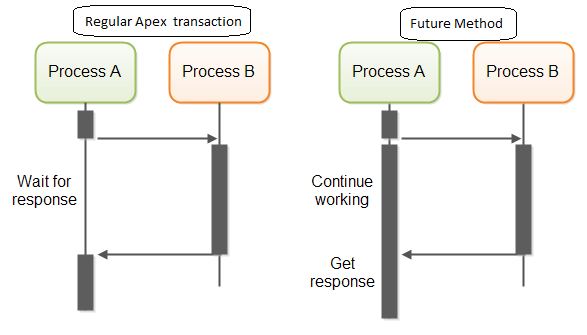
Image: Depicting the difference in thread processing between apex normal transaction and in future method
The specialty of the Future method is that it executes when the resources are available and does not out overhead on the server. This is the reason that execution of the code does not have to wait for the completion of a long running operation and also we get higher Governor limits when we use Asynchronous Apex.
Simple syntax of the future method is mentioned below:
Global class ClassNameOfFutureMethod
{
@Future
Public static void FuturemethoName()
{
ß Code to be executed à
}
}
Some consideration before we start implementing the future method is that it should be declared as a static method and the only return type it can have is void. Secondly, the parameter defined for the future method must be primitive i.e. no salesforce sObject can be passed as a parameter to the future method. The reason an sObject is not passed in the future method is that there is a possibility that the sent sObject might change between the time the future method is executed.
To interact future method with the sObject that already exists in the database, we can pass the ID of the object instead and then fetch the latest version of the record in the method itself and then perform the task, as shown below.
global class ClassNameOfFutureMethod
{
@future
public static void FuturemethoName (List<ID> rIds)
{
// We can get the records based on the list of Ids
List<custObj> obj = [SELECT Name FROM custObj WHERE Id IN : rIds];
// We can Process records after fetching the records
}
}
Below is a skeletal code of a future method that interacts with an external web service. For this we have to add an extra annotation to the method to make the platform aware that this method will interact with an external service, as shown below
global class ClassNameOfFutureMethod
{
@future(callout=true)
public static void FuturemethoName (List<ID> rIds)
{
// We can get the records based on the list of Ids
List<custObj> obj = [SELECT Name FROM custObj WHERE Id IN : rIds];
// We can Process records after fetching the records
}
}
Future methods are invoked as any other method in the apex, but a Future method cannot invoke another future method. There are certain limitations of the future methods in addition to the above-mentioned limitation which are given below:
No more than 50 methods with Future annotation can be called in a single apex invocation.
Maximum 250000 invocation is allowed per rolling 24-hours or number of licenses multiplied by 200 whichever is the greatest is the limit of the invocation. This limit is for the entire organization and is shared with the entire Asynchronous apex, i.e. Batch Apex, Queueable Apex and scheduled Apex.
Testing Future Methods
Since Future method is called in different context then the running thread, it has to be tested in a different way than the normal. To make them run in the same context we make use of startTest() and stopTest() code block. All asynchronous method written after the startTest are collected by the system and are executed synchronously after the stopTest method is called, as shown below.
@isTestprivate class ClassNameOfFutureMethodTest { @isTest static void test1() { Test.startTest(); ClassNameOfFutureMethod.FuturemethoName (); Test.stopTest(); } // Verify the result with help of system.assertEquals }}
Best practice and performance for Future method
Salesforce implements a queue based framework for the handling of the asynchronous processes, the queue is implied to balance the load of request across organizations, following are the best practice for the future methods:
- Ensure fast execution of the of the future methods by tuning the query used in the method, the longer the future method takes to complete the execution the more delay occurs for the requests in the queue.
- Testing the future method to the maximum numbers of the result expected to handle, this will help in determining the delay
- Use batch apex if the number future method invocation is reasonably large. Avoid using a large number of future methods.
Next, we will discuss the Queueable Apex
Asynchronous Apex: Queueable Apex

Queueable Apex is also a way of running Apex jobs asynchronously and to make a class Queueable we need to implement an interface i.e. Queueable interface. With the help of this interface, we can queue jobs and also monitor them, this is an enhanced way of running the asynchronous process as compared to the future method.
Queueable jobs are similar to the future method as both are queued before the execution and get executed only after the resources are available, but the extra feature it offers is below:
- An id is generated when the job is queued, with help of this Id one can monitor the progress of the job, from Salesforce UI or programmatically.
- Non-primitive types are also allowed in these jobs, they can be accessed when the job is executed.
- Chaining of the job is possible in Queueable apex, but it can call only chain one Queueable job
Queueable jobs implements the Queueable interface, in this interface we have an execute method which has return type of void and take QueueableContext as a parameter. Below is an example of implementation of the Apex Queueable job:
public class QueueableClass implements Queueable {
public void execute(QueueableContext context) {
contact con = new contact(lastName=’Datta’,Phone=’9999999999′);
insert con;
}
}
In order to add this class to the queue list, we need to make use of SystemEnqueueJob, these methods return an Id. With help of this Id, we can monitor its progress and check its status.
ID queuejobID = System.enqueueJob(new QueueableClass());
AsyncApexJob queuejobInfo = [SELECT Status,NumberOfErrors FROM AsyncApexJob WHERE Id=: queuejobID];

Testing Queueable Jobs
As we know that Queueable is an asynchronous job, therefore to test these classes we have to make use of the startTest and StopTest methods, where all the asynchronous method runs synchronously. Below is an example of the Queueable job and the way to test it.
@isTest
public class QueueableClass Test {
static testmethod void test1() {
Test.startTest();
System.enqueueJob(new AsyncExecutionExample());
Test.stopTest();
Contact con = [SELECT lastName,Phone FROM Contact WHERE lastName =’Datta’ LIMIT 1];
System.assertNotEquals(null, con);
System.assertEquals(‘9999999999’, con.Phone);
}
}
Chaining the Jobs
There is a possibility that we want to perform a certain task after the completion of another job. As discussed before, we can call another Queueable Job from inside of a running queueable job. To do this we need to add another job to the queue in the execute method of the presently running job. We achieve this as shown below.
public class QueueableClass implements Queueable {
public void execute(QueueableContext context) {
contact con = new contact(lastName=’Datta’,Phone=’9999999999′);
insert con;
System.enqueueJob(new anotherQueueableJobClass());
}
}
Limitations of Queueable Jobs
- 50 jobs can be added to the queue with System.enqueueJob() method in a single transaction
- Maximum depth of chain job is 5 i.e. 4 child jobs and initial parent job for Developer and Trail organizations but there is no limit in other editions
- Only one job can be chained at a time, i.e. only one child job from the same Queueable job.
Now we will discuss Apex Scheduler
Asynchronous Apex: Apex Scheduler
To make a class invocable at a specific time, first, we need to implement Schedulable interface in the class and then schedule it either from Salesforce UI or from the system.schedule method.
Implementing the Interface schedulable
To invoke a class on a regular basis we first need to implement the Schedulable interface, which like Queueable apex has an execute method. The scheduler run as system and user permission has no significance in executing the class.
As mentioned above, while implementing schedulable interface we need to implement the execute method of the interface which is a global method and takes schedulableContext as an argument, its syntax is given below.
global void execute(SchedulableContext sc){}
This method is used to instantiate the class we want to schedule, as shown below.
global class MyScheduleClass implements Schedulable {
global void execute(SchedulableContext SC) {
Class2beSchedule M = new Class2beSchedule ();
}
}
The next method is used to schedule the class it is called system.schedule, as shown below.
MyScheduleClass m = new MyScheduleClass ();
String CronExpression = ’20 30 8 10 2 ?’;
String SchedulejobID = system.schedule(‘My Job’, CronExpression, m);
The schedulable class can also be used to Schedule a batch class, as shown below.
global class MyScheduleClass implements Schedulable {
global void execute(SchedulableContext SC) {
batchclass M = new batchclass ();
database.executeBatch(M);
}
}
Batch can also be schedule using the method system.schedulebatch, about this we will study in detail in later section.
Once the job is scheduled we can keep track of it with the help of schedulableContext, with help of its getTriggerID we can retrieve the Id of the scheduled job and we can query the CronTrigger Object and monitor the progress of the job.
To schedule a class we discussed that there are two ways:
- From system UI
- Using System.Schedule method
The difference between the two ways is that in the system.schedule method we can also specify the minutes and seconds as well but using the UI we can just mention the hour of the day.
Schematics of how to schedule a class from UI
Step 1:

Step 2: To schedule weekly
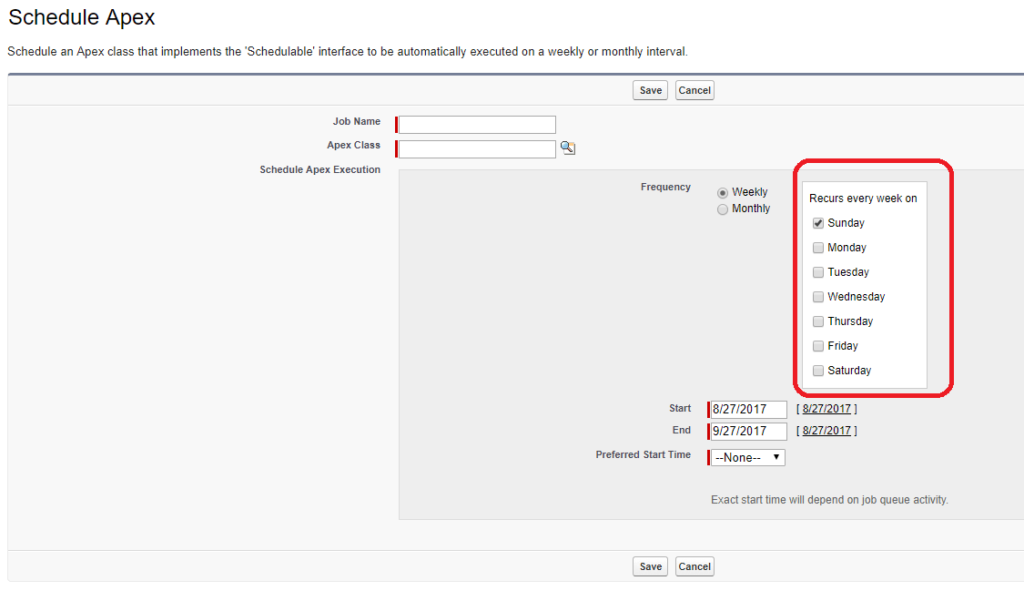
To Schedule Monthly

Let’s discuss how to create a cron expression:
Basic syntax of cron expression is
S M H DOM Mon DOW Yr
S- Seconds
M- Minutes
H- Hour
DOM- Day_of_month
Mon- month
DOW-Day_of_week
Yr -Year
Then there are some special characters which are used in conjunction with the values like ‘*’, ‘?’, “,”,’-‘
Some sample cron Expressions are mentioned below:
| Expression | Description |
| 0 0 13 * * ? | Class runs every day at 1 PM. |
| 0 0 22 ? * 6L | Class runs the last Friday of every month at 10 PM. |
| 0 0 10 ? * MON-FRI | Class runs Monday through Friday at 10 AM. |
| 0 0 20 * * ? 2010 | Class runs every day at 8 PM during the year 2010. |
Limitation of Apex Scheduler
Following are the limitations of Apex Scheduler:
-
- We can have only 100 apex scheduled jobs at one time in a particular Organization which can be checked and counted at scheduled jobs page in sSalesforce
- They also count against the shared limit for the Asynchronous Apex i.e. 250000 for a rolling 24-hours period.
- Extreme care has to be taken if the job is getting scheduled via Apex Trigger
- Synchronous Web service callouts are not supported by the schedule Apex, to make call out we have to make use of the Asynchronous call out, however, a batch can job can be scheduled and callouts are supported from the batch
- If a scheduled job is supposed to run during the maintenance downtime will be scheduled to execute after the maintenance work is completed.
Now let’s shift our focus to batch class.
Asynchronous Apex: Batch Class
Salesforce Governor limits us to build a long running process like data cleansing or data archiving, where records more than 50000 are being processed at one time. To fulfill this requirement Salesforce has to introduce the batch Apex, a batch job makes smaller chunks of the data which is known as batch size and then asynchronously work on each batch in a separate thread and therefore not hitting the governor limit.
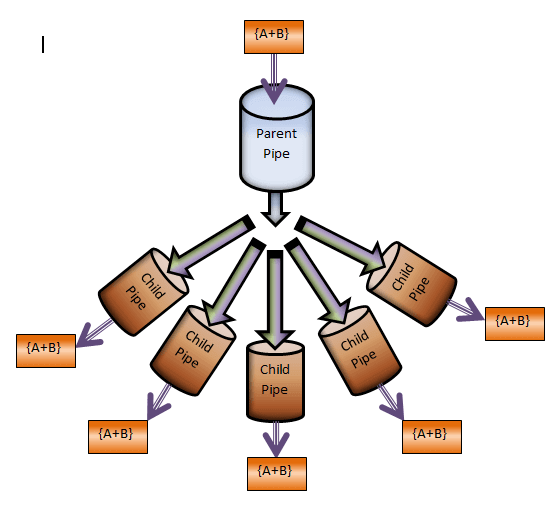
ImageSource: https://i.stack.imgur.com/7mHOq.png How batch works
A batch job can be invoked at runtime programmatically using apex and it can also be scheduled using a scheduled job as discussed above.
Using batch Apex
A Class to be executed as a Batch has to implement the batchable interface. In this interface, we have to implement three methods, i.e Start, execute and finish methods.
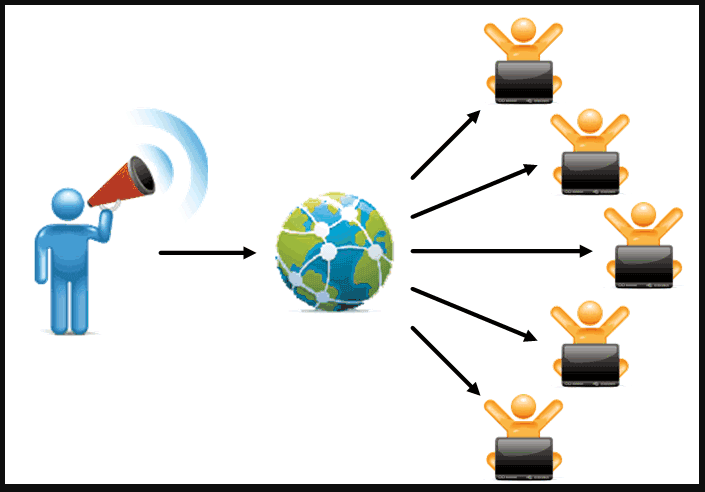
Image source: http://4.bp.blogspot.com/-Cug5KaAx5Q4/UkjTViCbSnI/AAAAAAAAAFI/r4ayS5iarrw/s1600/marketing-process-distribute1%5B2%5D.gif Schematic of a Batch Class
To collect the records on which we have to perform the bulk processing tasks are collected in this method, this method returns an iterable or a Database.querylocator, both of the return types have their use cases but mostly Database.querylocator is used.
When a simple query is used to generate the collections of record, we should use database.querylocator. This object by passes the Salesforce governor limit of 50000 records and can return up to 50 million records in an org.
Iterable is created only when we have to create a complex scope or collection of records, Iterable is limited to 50000 records only.
The syntax of the start method is as below:
global (Database.QueryLocator | Iterable<sObject>) start(Database.BatchableContext bc ) {}
After the collections of record is gathered the execute method is then next executed. This method is called for each batch, it takes a reference to database.BatchableContext object and a list of sObject. Batches are normally executed in the order they are received, but their execution order is not guaranteed.
The syntax of Execute method is as below:
global void execute(Database.BatchableContext BC, list<P>){}
Once all the batches are executed, then the last method Finish is called. This method takes the batchable context as a parameter and is used to perform post processing task like sending an email.
Syntax of Finish method is as below:
global void finish(Database.BatchableContext BC){}
Each batch is considered as a separate transaction and they avail fresh set of apex governor limit, i.e. if a batch of 500 records are being processed with scope of 50 then 10 batches are going to be executed separately and the governor limits will reset for each batch.
Examples of batch Classes
global class UpdateAccountFields implements Database.Batchable<sObject>{
global final String Query;
global final String Entity;
global final String Field;
global final String Value;
global UpdateAccountFields(String q, String e, String f, String v){
Query=q; Entity=e; Field=f;Value=v;
}
global Database.QueryLocator start(Database.BatchableContext BC){
return Database.getQueryLocator(query);
}
global void execute(Database.BatchableContext BC,
List<sObject> scope){
for(Sobject s : scope){s.put(Field,Value);
} update scope;
}
global void finish(Database.BatchableContext BC){
}
}
To call this batch class we need to us the following code:
String q = ‘SELECT Industry FROM Account LIMIT 10’;
String e = ‘Account’;
String f = ‘Industry’;
String v = ‘Consulting’;
Id batchInstanceId = Database.executeBatch(new UpdateAccountFields(q,e,f,v), 5);
The following code is to re assign the account owner to a new one.
global class OwnerReassignment implements Database.Batchable<sObject>{
String query;
String email;
Id toUserId;
Id fromUserId;
global Database.querylocator start(Database.BatchableContext BC){
return Database.getQueryLocator(query);}
global void execute(Database.BatchableContext BC, List<sObject> scope){
List<Account> accns = new List<Account>();
for(sObject s : scope){Account a = (Account)s;
if(a.OwnerId==fromUserId){
a.OwnerId=toUserId;
accns.add(a);
}
}
update accns;
}
global void finish(Database.BatchableContext BC){
Messaging.SingleEmailMessage mail = new Messaging.SingleEmailMessage();
mail.setToAddresses(new String[] {email});
mail.setReplyTo(‘batch@acme.com’);
mail.setSenderDisplayName(‘Batch Processing’);
mail.setSubject(‘Batch Process Completed’);
mail.setPlainTextBody(‘Batch Process has completed’);
Messaging.sendEmail(new Messaging.SingleEmailMessage[] { mail });
}
}
To call the owners reassign batch class we need to use the following code:
OwnerReassignment A = new OwnerReassignment();
A.query = ‘SELECT Id, Name, Ownerid FROM Account ‘ +
‘WHERE ownerid=\” + u.id + ‘\”;
A.email=’test@acme.com’;
A.fromUserId = u;
A.toUserId = u2;
ID id = Database.executeBatch(A);
To Allow Callout in the batch class we need it to implement another interface i.e. Database.AllowsCallouts
Each batch execution is a different transaction and one transaction is unaware about the status and progress of the other transaction. The entire batch executed are asynchronous process and do not have a state after they have finished executing. To maintain the state and pass a value from one batch to another we need to specify another interface while defining the class, i.e. Database.Stateful.
Below is the code to aggregate the total of amount of opportunity.
global class SummarizeAccountTotal implements
Database.Batchable<sObject>, Database.Stateful{
global final String Query;
global integer Summary;
global SummarizeAccountTotal(String q){Query=q;
Summary = 0;
}
global Database.QueryLocator start(Database.BatchableContext BC){
return Database.getQueryLocator(query);
}
global void execute(
Database.BatchableContext BC,
List<sObject> scope){
for(sObject s : scope){
Summary = Integer.valueOf(s.get(‘total__c’))+Summary;
}
}
global void finish(Database.BatchableContext BC){
}
}
Batch Apex governor Limits
- 5 batch jobs can run concurrently at a time in a given organization
- Upto 100 jobs can be held in the Apex Flex queue.
- Maximum number of batch that can be executed is 250000 per rolling 24 hour periods. This limit is shared among the all asynchronous process like Future, Queueable and schedulable.
- Maximum of 50 mil records can be returned by Database.querylocator and if more records are returned then the job is terminated immediately.
- Maximum limit of a batch size is 2000, if higher value is set then the records are chunked into size of 2000, in case of iterable there is no upper limit.
- A batch can implement a maximum of 100 callout and the call can be from any method i.e. start, execute and finish
Batch Apex Best Practice
- Take extreme precaution when scheduling a batch from a Trigger, as it can breach platform limit very easily.
- While testing only one batch of apex can be tested using test.starttest() and Test.StopTest methods().
- Use Database.Stateful only if you want to share instance member variable value across the whole job, otherwise it will impact the efficiency of the overall job performance.
- Future methods are not allowed in a batch class, it cannot execute a future method
- Another Batch job can be called from the finish method of the Batch class, it is called chaining batch job.
Also check the interview questions based on Batch Class
Batch class : Salesforce Interview Question
The post Asynchronous Apex, The Savior from Salesforce Governor Limits appeared first on Salesforce Next Gen.
]]>Continue reading Salesforce interview Questions Latest
The post Salesforce interview Questions Latest appeared first on Salesforce Next Gen.
]]>In this post, I have collected all the Salesforce interview Questions which were asked to me in Salesforce interview for 2-3 years of experience. I have compiled these questions to the best of my knowledge.
The answer provided here are answered to the best of my knowledge and they can be wrong, so kindly refer Apex developer guide and visualforce guide and other means to verify the answers.
If you think any answer is incorrect then do mention the same in the comments.
Here goes the list of Salesforce Interview Questions
Q 1. Which of the below can’t be used in Apex DML Operation?
- a) trigger.old
- b) trigger.new
- c) trigger.new and trigger.old
- d) None of the above
Q2.When considering trigger context variables, which of the statement is true?
- a) We can delete trigger.new
- b) We cannot delete trigger. new
- c) trigger.new is always ready only
- d) trigger.new is ready only, so we can delete
- e) None of the statement is true
3. In Apex, if you want to make something public, you need to use the PUBLIC access modifier.
4. On deletion of parent record, the child record should not getddeleted, which relationship will satisfy this requirement?
- a) Lookup
- b) Master-Detail
- c) Many to Many
- d) Master to Master
- e) Both b & c
Q.5. Product manager at XYZ company is required to help their sales team in selling certain products, but product manager does not have access to the opportunities and his involvement is required in assisting the deal. How will a salesforce admin resolve this scenario?
- a) Notify the product manager using opportunity update reminders
- b) Enable opportunity teams and allow users to add the product manager.
- c) Use similar opportunities to show opportunities related to the product manager.
- d) Enable account teams and allow users to add the product manager.
Q.6. When would a developer use upsert and external IDs? (There are two correct answers.)
- a)To integrate with an external system.
- b) To migrate customizations from sandbox to production.
- c) To load related records without knowing Salesforce record IDs.
- d) To use the Web Services API to query for data.
Q7. Considering child to parent relationship, you can traverse —
- a) up to five levels
- b) up to one level only
- c) up to three levels
- d) up to four levels
- e) All of the above statements are true
Q.8. Which of the Data format and communication is supported by REST API?
- a) XML and Synchronous
- b) JSON, XML and Asynchronous
- c) JSON, XML and Synchronous
- d) JSON and Synchronous
- e) None of the above
9. Which of the authorizations are supported by SOAP API ?
- a) Session ID
- b) Oath 2.0
- c) Both Oath 2.0 and Session ID
- d) None of the above
Q.10. Write a SOQL query to find the Ids and Cust__c of the Object CustObj__c. CustF__c field should contain either of the below values —
*AAA and BBB selected or *CCC selected
Select id, Cust__c from CustObj__c where CustF__c includes(‘AAA;BBB’,’CCC’)
*CCC selected
Select id, Cust__c from CustObj__c where CustF__c includes(‘CCC’)
Q.11. Write an SOQL query which returns account IDs for all Accounts that do not have any open Opportunities?
select id from account where id in (select accountid from opportunity where stagename in (‘Closed Won’, ‘Closed lost’))
Q.12. Which of the below SOQL query is true?
- a) Select Account.Narne , (Select Note.Body From Account.Notes ) From Account
- h) Select Account.Name , (Select Note.Body From Account.Notes where Note.Body LIKE `D%’) From Account
Q.13. Which one is a valid exception handling block in Apex?
a) try { code block }
catch (exceptionType)
{ code_block }
finally code block
b) try { code block }
catch (exceptionType)
code block
}
c)try { code block }
catch (exceptionType) {
code block }
catch (Exception e){ }
d) All of the above.
e) None of the above.
Q.14. Class annotated with isTest must be declared as?
a)Private
b)Public
c)Global
d)Private and Public both
e) None of the above
Q.15. Which statement is False regarding the isTest annotation
- a) Classes defined as isTest must be declared as Private.
- b) Classes defined as isTest do not count against organizations limits for Apex scripts.
- c) Classes defined as isTest cannot be called from another class or trigger.
- d) Classes defined as isTest can only contain methods declared as test methods.
- e) None of the above
Q.16. Which triggers are invoked when two contacts are Merged?
- a) Only delete and update contact triggers
- b) Only delete and update triggers on the parent account
- c) No triggers
- d) Delete and update contact triggers and triggers on the parent account
- e) None of the above
Q.17. In Salesforce which fields are indexed automatically?
- a) Primary keys
- b) External lds
- c) Audit dates (such as last modified date)
- d) Only External ids and audit dates
- e) All of the above
Q.18. Given the controller code what is the expected output?
<apex:page controller=”the controller”>
{lout}
<apex: page>
public class theController
{
public string out{
get {
if(out== null) out = ‘getter’;
return out ;
}
set;
public theController()
{
Out= ‘constructor’;
}
public void setout
{ out = ‘action’; }
}
- a) null
- b) action
- c) constructor
- d) getter.
Q.19. Which among these is a valid SOQL to query all records in an organization, including delete and archived activities?
- a) SELECT count() FROM contact WHERE accountid = a.id QUERY ALL.
- b) SELECT count() FROM contact WHERE accountid = a.id INCLUDE ALL.
- c) SELECT count() FROM contact WHERE accountid = a.id ALL ROWS.
- d) None of the above.
Q.20. How can permission sets be used?
- a) To assign unique login hours for specific users
- b) To assign access to a custom object for specific users
- c) To assign access to a custom field for specific users
- d) Only b & c
- e) All of the above
Q.21. Customer wants to add a custom validation process to the contact save process. Before the record is created and saved to the database, the customer wants run a validation, which will checks if the associated account is active or not, this validation should be active for all UI as well as integration requests. Which design accomplish this
- a) A custom Web service
- b) A before insert trigger
- c) A custom Visualforce controller
- d) A client-side 5-control
Q.22. What types of element do list contains.
- a) Integer
- b) String
- c) Object
- d) Integer and string
- e) All of the above
Q.23. Which of the following code segments show a correct way of accessing data with Standard List Controllers?
- <apex:page standardController=”Account” recordSetVar—“accounts” >
<apex:pageBlock >
<apex:pageBlockTable value=”{!accounts}” var=”a”>
<apex:column value=”{!a.name}”/>
</apex:pageBlockTable>
</apex:pageBlock>
</apex:page>.
- <apex:page standardController=”Account” var=”accounts” >
<apex:pageBlock >
<apex:pageBlockTable value=”{!accounts}” var=”a”>
<apex:column value=”{!a.name}”/>
</apex:pageB1ockTabie>
</apex:pageBlock>
</apex:page>
- <apex:page standardListController=”Account” recordSetVar=”accounts” >
<apex:pageBlock >
<apex:pageBlockTable value=”{!accounts}” var=”a”>
<apex:column value=”f!a.namer>
</apex:pageBlockTable>
<apex:pageBlock>
<apex:page>
- <apex:page standardListController=” Account” var=”accounts” >
<apex:pageBlock >
<apex:pageBlockTable value=”{laccounts}” var=”a”>
<apex:column value=”a.name}”/>
</apex: pageBlockTable>
</apex:pageBlock>
</apex:page>.
Q.24. Which among these is a valid constructor for standard controller extension on Account?
- a) public myControllerExtension(ApexPages.Controller stdController){
this.acct= ( Account)stdController.getRecord();
}
- b) public myControllerExtension(ApexPages.StandardSetController stdController){
this.acct = (Account)stdController.getRecord();
- c) public myControllerExtension(ApexPages.StandardController stdController) {
this.acct = (Account)stdController.getRecord();
- d) None of the above.
The post Salesforce interview Questions Latest appeared first on Salesforce Next Gen.
]]>Continue reading Data Model and Management
The post Data Model and Management appeared first on Salesforce Next Gen.
]]>Data Model
A data model is a way to represent the tables in the database which makes sense to humans, they help in understanding the relationship between different objects and Salesforce provides a very intuitive way to model the database.
In the database a table is equivalent to an object, fields of the object are referred as a column of the table and a row of this table is known as a record. The data model is a collection of these objects and field in an app.
There are many types of objects supported by Salesforce like standard object, custom object, external objects, Big Objects and Platform events. We are going to stick with standard and custom object for now.
Standard objects are the objects which are already created by Salesforce and are useful when it comes to the core of the Salesforce i.e. CRM, all the objects which are common and relevant to CRM is already present in Salesforce, for e.g. Account, Lead, Contact, Opportunity etc.
Custom Objects are the objects which are created if the standard out of the box objects is not able to satisfy a business need or requirement. A custom object could be anything like a student object, property object, room object etc.
Objects are basically a blueprint of a type of information, i.e. each record will have more or less exactly the same information if not less. Salesforce not only provides the intuitive way of creating an object it also creates few pages for us with writing a single line of code i.e. detail page and other page layout for the User interface.
Let’s find out how to create a custom Object (steps for Salesforce Classic):
- Login to your org and go to setup
- On left-hand side in the quick find box type object and you will see the left-hand sidebar will update itself and will show result relevant to our entered text, click on the objects under create the menu.
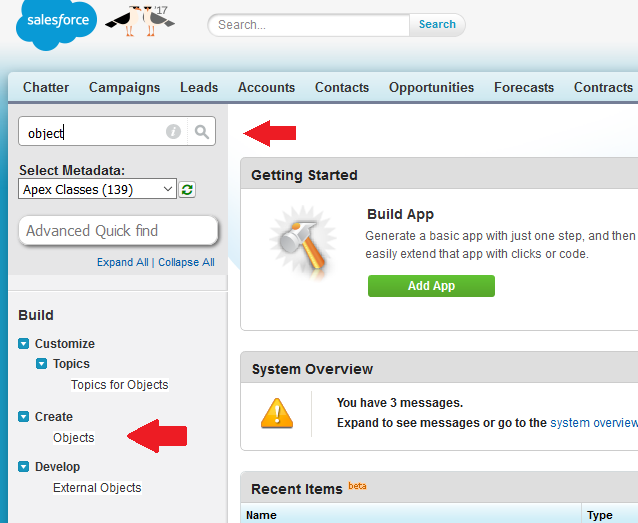
3. It will take you to a screen where you will list all the custom sObject and some information about them as well, you will find a button in the middle of the screen New Custom Object, click on this button.

4. This will bring you to the page where you define your new objects like its label, Plural label, API Name (Object name), its description what should be the type of the record name i.e. text or auto number
Then some other properties like Allow reports, activities, track field history deployment status, search status and feature of adding notes and attachment
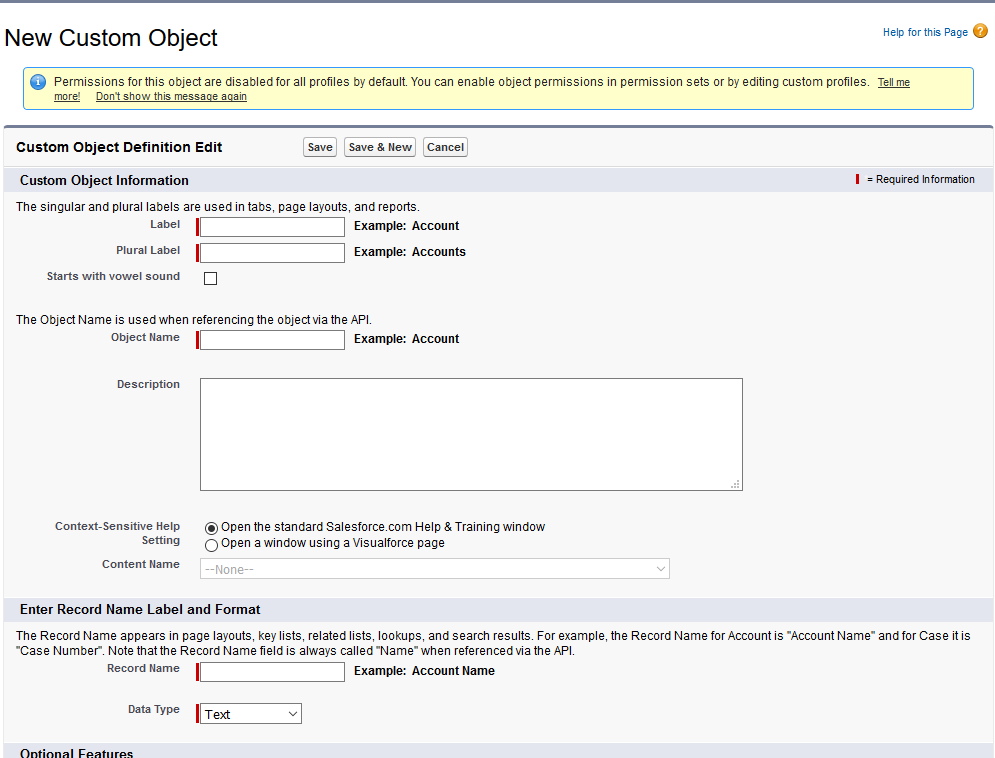
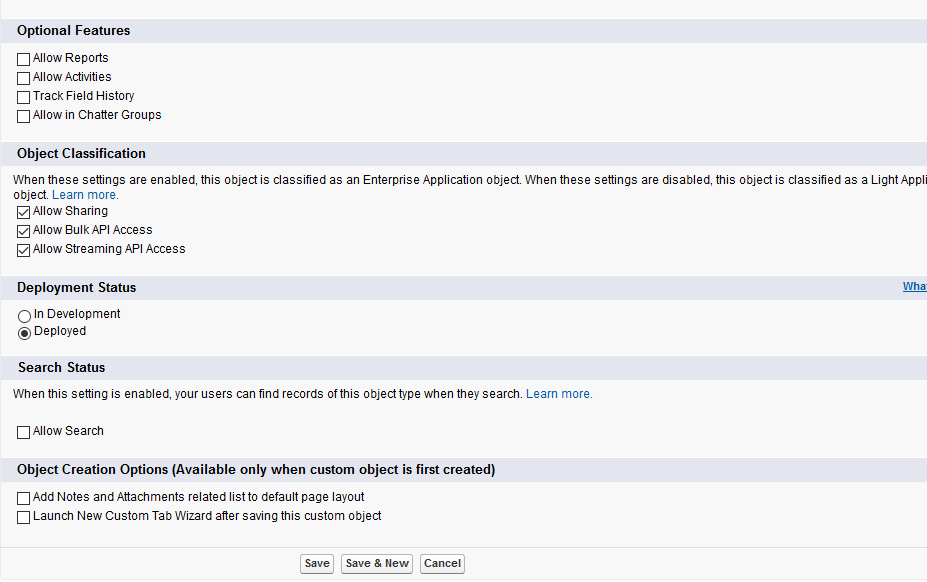
5. Once you have completed filing in the information, click on save and if you don’t see any error message then you have successfully created an object and would be directed to the object detail page.
And that is how you create an object, the properties you define on the object detail page will mold the behavior of your object in the Salesforce Platform.
Now since we have created a bigger container to hold information (Object), let’s know about how many fields and types of field are there to store relevant information.
There are broadly four types of field:
- Identity – it is a unique identifier throughout the Salesforce, it is a case sensitive field and is automatically generated for every record and is 15/18 character long.
- System – these are read only field and provide information about a record like when it was created or edited and by whom.
- Name – This is the only mandatory field need to be defined while creating a custom object it can be a text field or an auto number
- Custom – any field other than the one mentioned above are custom fields and have a custom data type associated to it.
There are many types of data type to indicate what kind of information a field is holding, few of the data types are – data/datetime, checkbox, picklist, currency etc. Following are the steps to create a custom field on account object (Salesforce Classic).
- Go to object Detail page of account object, type account In quick find box and click on field.
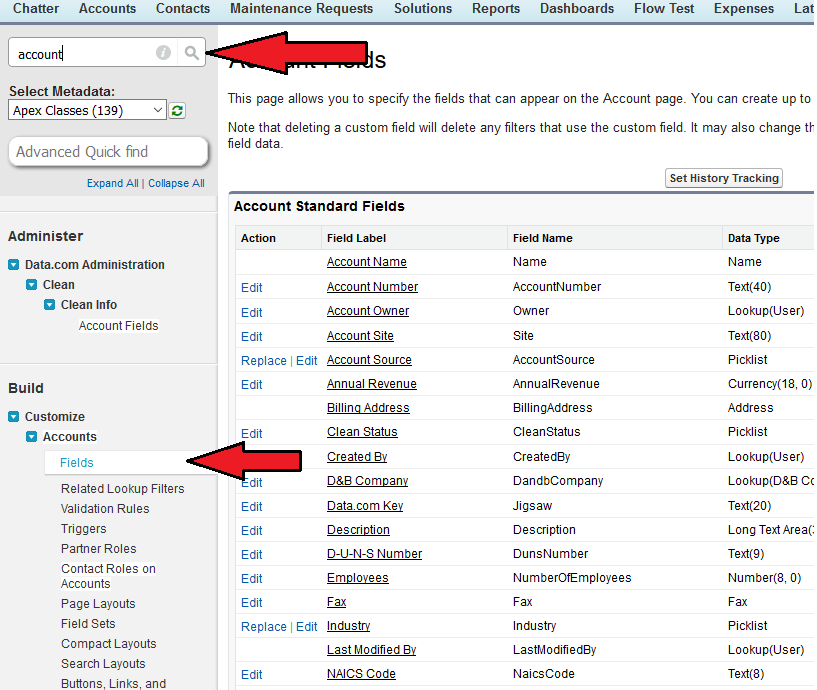
- Find Account custom fields and relationship section and click on the new button, it will take you to another screen, where you would be asked to select the data type of the field or if it is a relationship field or a special field like auto number formula of Roll-up Summary
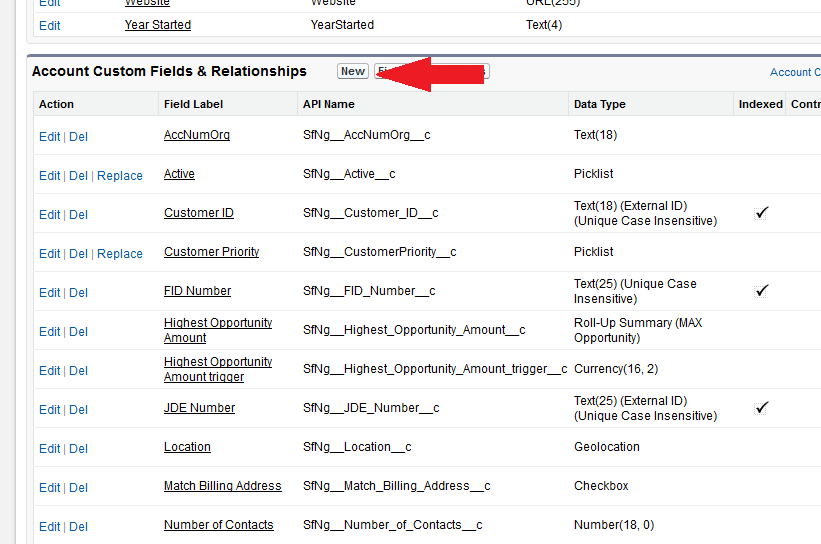
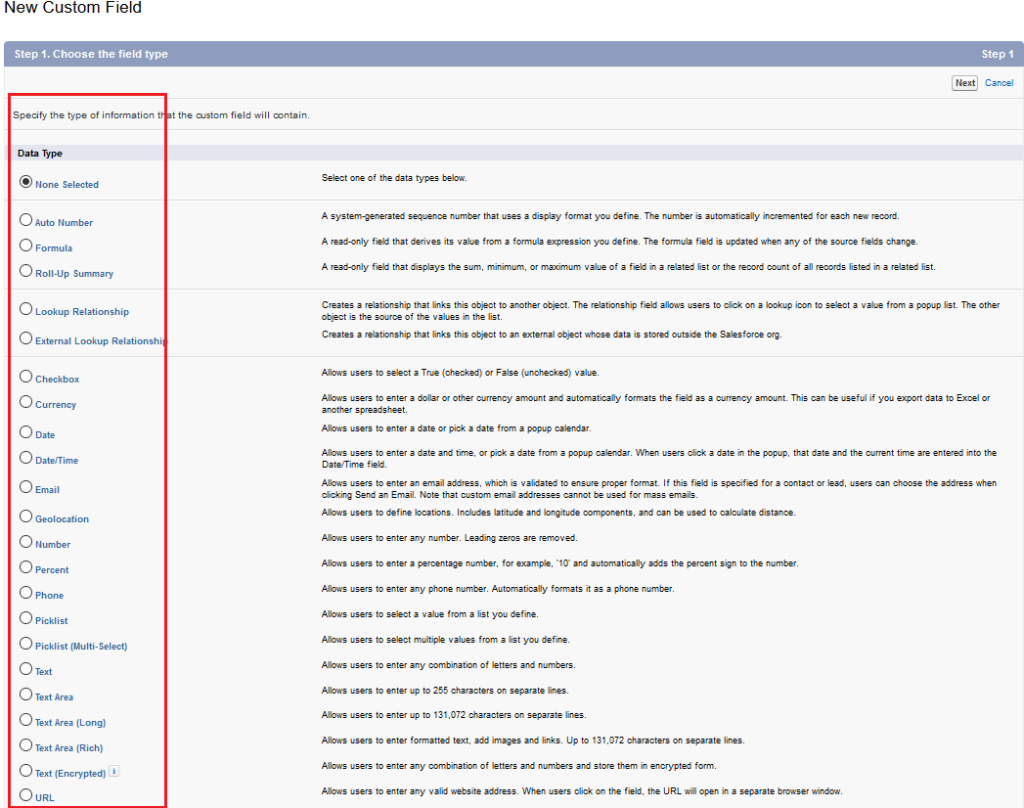
- After selecting the data type, click next and then you have to enter more details of the field like its Label, API name, description, help text, whether it is required or not and a place to put default value. These are the common fields available for almost all the data type but screen changes itself according to the data type selected by user.
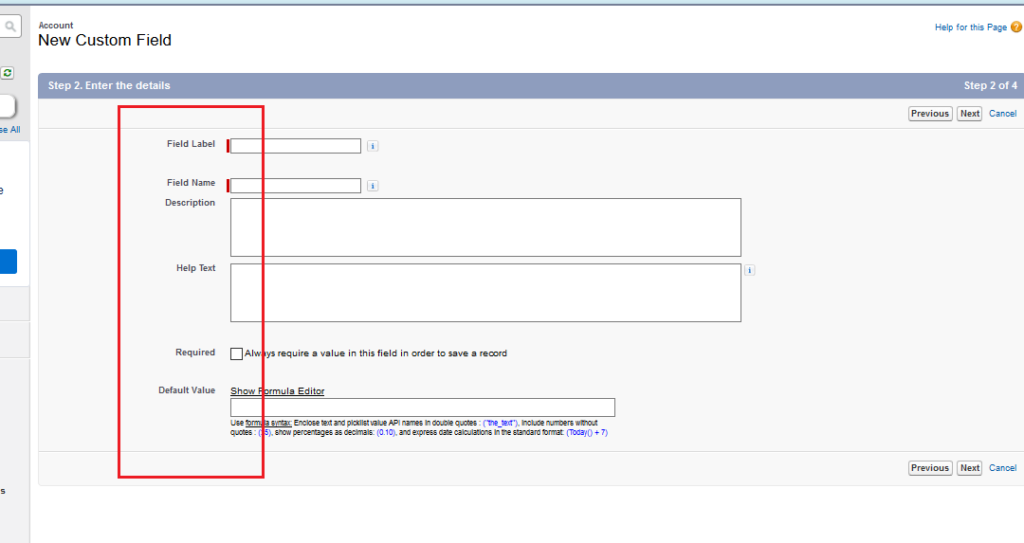
- After providing the necessary details click on next and this screen will take you to the field level security if you want change the default access of the field to specific profile.
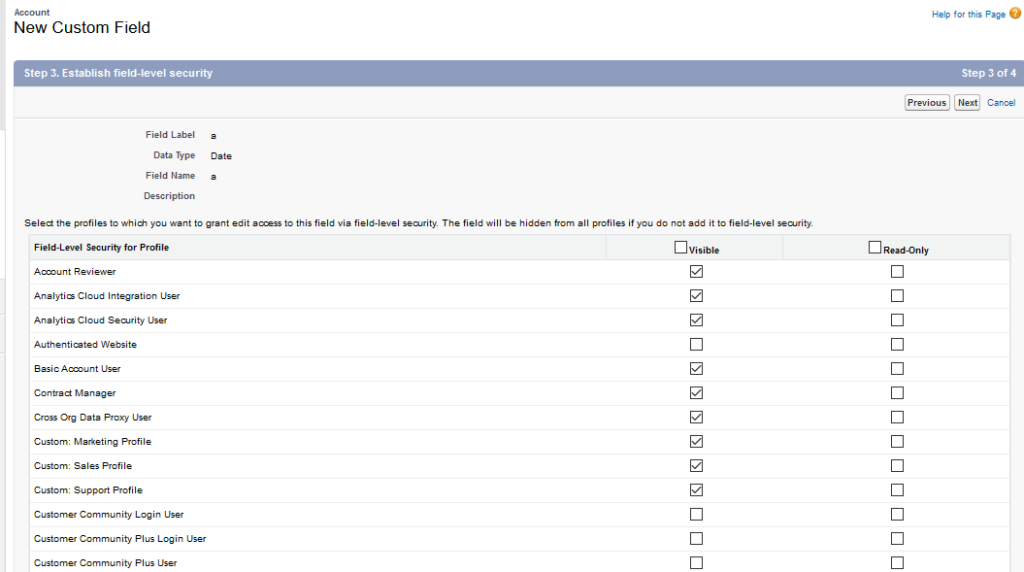
- After specifying the field level security, you are asked on which layout you want to place the newly created field, if you do not have more than one then the default layout of the object appears as selected choice.
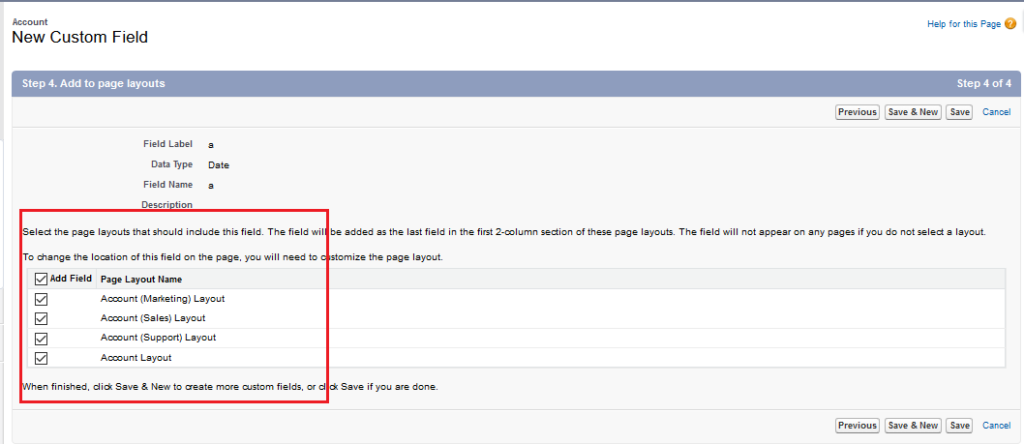
- Click on save and the newly created field can now be found on the page layout selected
And that is how you create a field.
Some tips to implement before you start customizing your org,
- Naming convention should be practiced to avoid ambiguity/or lazy naming for e.g. for a custom object to track equipment you named it property2, this could lead to confusion in the org be thoughtful
- Always include description or help text, so that it gets clear to the user what they are dealing with
- Make a field required if it is necessary, the field which are important to a particular object i.e. price of an equipment, then make price field required i.e. it must be filled before saving a record.
Data model is incomplete without defining any relationship between two objects, so now let’s dive deep into the object relationship
Object relationships
What are Object’s Relationships and how do they affect the data integrity in the salesforce? How many types of object relationship does salesforce Support? These are the type of question arises in one’s mind when we talk about Object relationship in salesforce.
To being with salesforce supports two type of relationships namely lookup and Master Detail. Lookup up relation is basically linking two objects and one object can access fields of other object through this relationship, where as master detail relationship is a bit more tightly linked to each other. In this one object is master and other is its detail or I should say one is parent and other is its child object. In MD relationship some behavior of child objects are governed by the master object.
Lookup relationship can be on- to-one or one-to-many, when two objects are linked as lookup relationship, means that they are sometime related and sometime not for example a contact object can be associated to account but it can be just a contact in itself, but this is not the case in Master Detail relationship. Master detail relationship does not work as standalone and the child object has to specify its master or parent object before it can be stored in database.
The link between master detail is such that when the parent record is deleted then the child record also gets deleted, but this not the case for lookup when one of the look up record is deleted only the field referring to the linked objects get deleted.
There is one more relationship available but only for User object, it is known as hierarchical relationship, where a hierarchy is established a management chain between the user objects.
Steps to create a relationship field is same for both look up and master detail with few minor changes, lets create a look up first.
- Go to setup, type objects in quick find menu and click on objects.
- Then click on the desired object and go to the custom field and relationship section and click on new, on the object detail page.
- Select look up field type and click next.
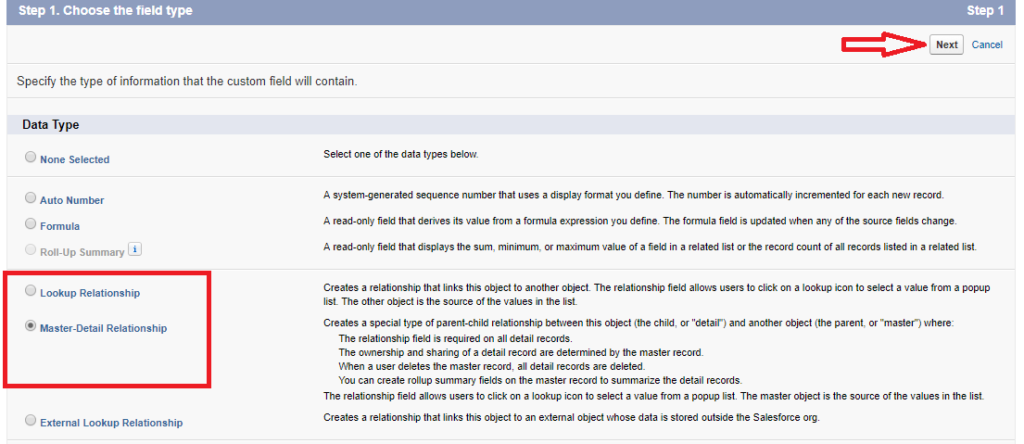
- Select the object you want to make a link.
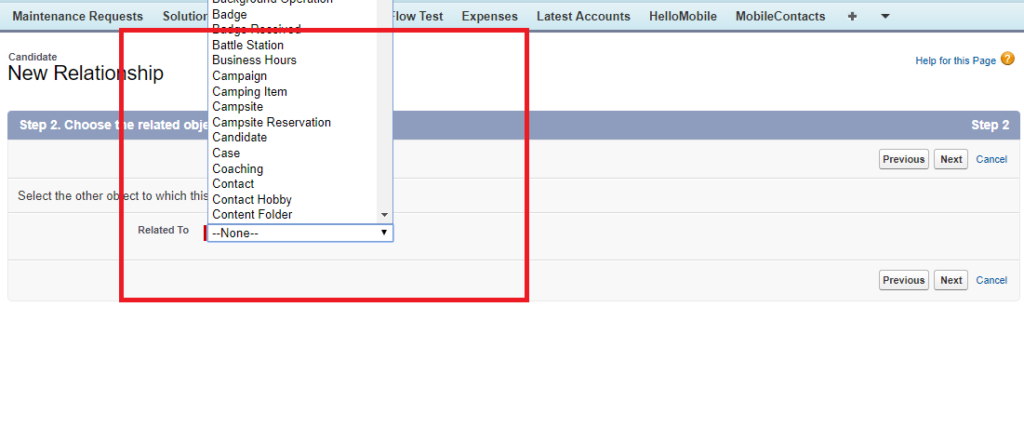
-
- Enter all the required field’s detail and click next it will then take you to the object permission page and then to the layout page
For Master detail relationship select MD on step 3 and follow the remaining steps as above.

Visualizing the object’s relationships
You can see your data model in action by using the salesforce very own schema builder, this tool helps you visualize your data and their relationship with each other. To reach schema builder go to setup and type schema in the quick find box and click on schema builder it will take you to a screen similar to this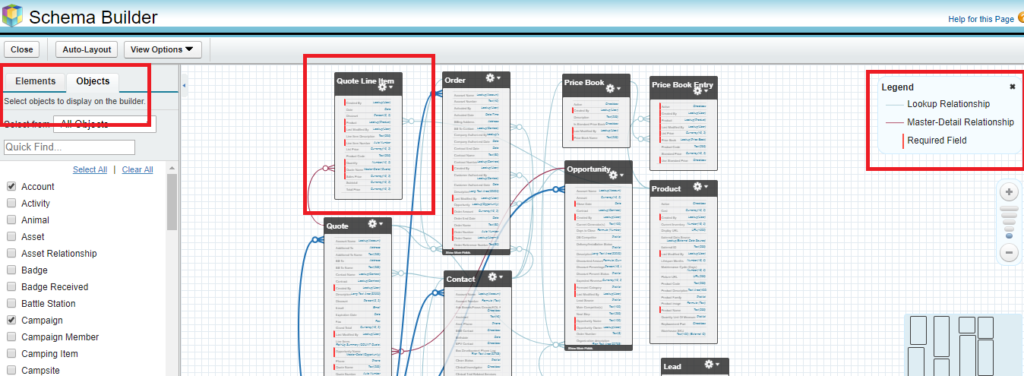
On this canvas, object can be dragged and dropped and it will not change their relationship, this way we can easily visualize the relationship. Schema builder is not only used to visualize data but also to create new elements like Objects and fields, which can be created directly in schema builder.
To create an object, select element tab on the left hand side bar and drag the Object element to the canvas and enter the required information and click save and that is it the new object is created, similarly, to create a field from the element tab select the required field and drag n drop it on the desired object, enter the respective details and click save and this is it, you have created a custom field on the selected object.
Data Management
Salesforce and any other CRM platform is data driven and therefore it’s a platform’s responsibility to provide simple user friendly way of managing this data, whether it Is data import or export. To manage Data in salesforce there various ways some are built in feature of Salesforce like Data import wizard and data export utility then there are many 3rd party applications like data loader (desk top application), Dataloader.io, Command line interface of Data loader (automatable).
Salesforce offers two main method of importing data.
- Data import wizard: used when the import size is limited to 50000 records, selected standard objects and all of custom object. It has simple interface for configuration parameter and field mapping for matching fields in the file.
- Data Loader: it’s a client application and can load records up to 5 million, can upload data in any object type and file type. Possible to automate data loading task and field mapping and other configuration can be specified in a separate configuration file.
But importing data is not as simple as it seems like, we have sometime pre import and post import task and similarly pre and post export tasks, like validating the import. Follow these steps to prepare data for importing.
- Create an export file
- Clean it up for accurate and efficient data import, look for duplicate record and remove if found any, delete unwanted information and check for spelling.
- Compare the fields in file with salesforce and match appropriately
- Make configuration changes required at salesforce end and
Let us now start using Data import wizard:
- To open the wizard, go to setup and type data import wizard in quick find box and click on launch wizard.
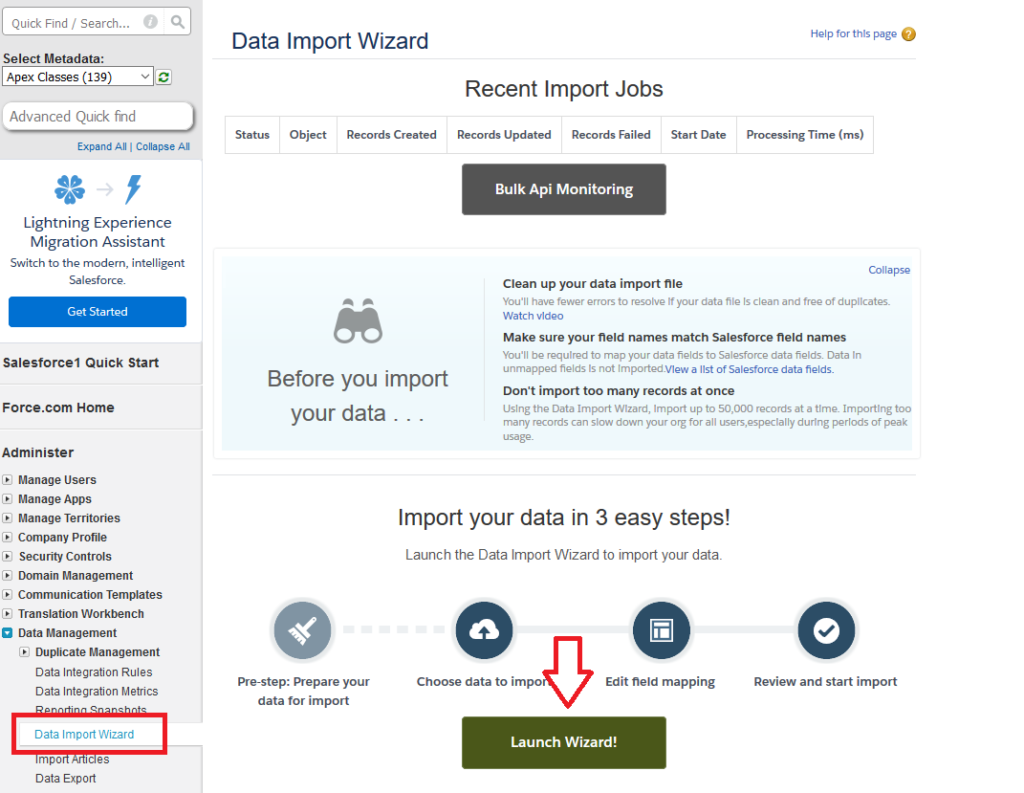
- After clicking on the button you would be directed to home screen of the wizard here you select which objects you are going to work with.
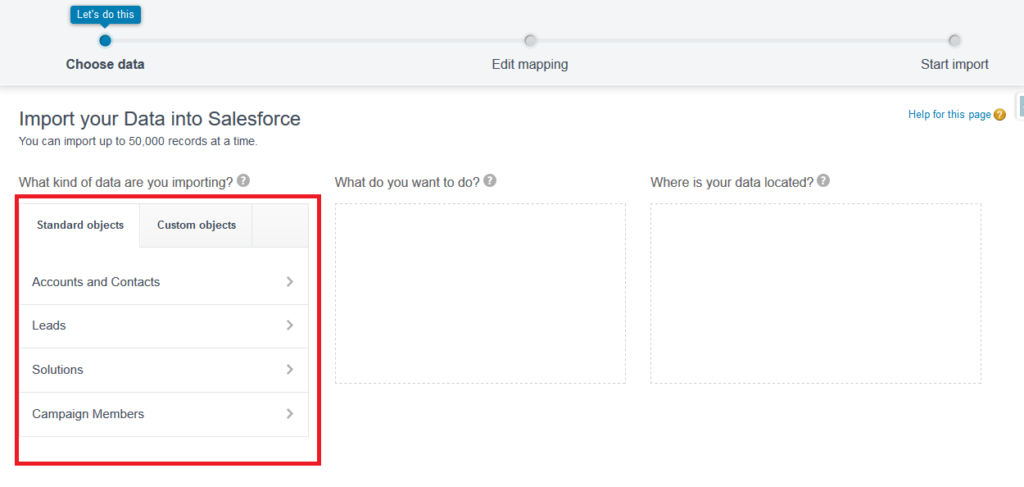
- Once you select the type of object to work with, the wizard will ask what to do next i.e. insert, update or both.
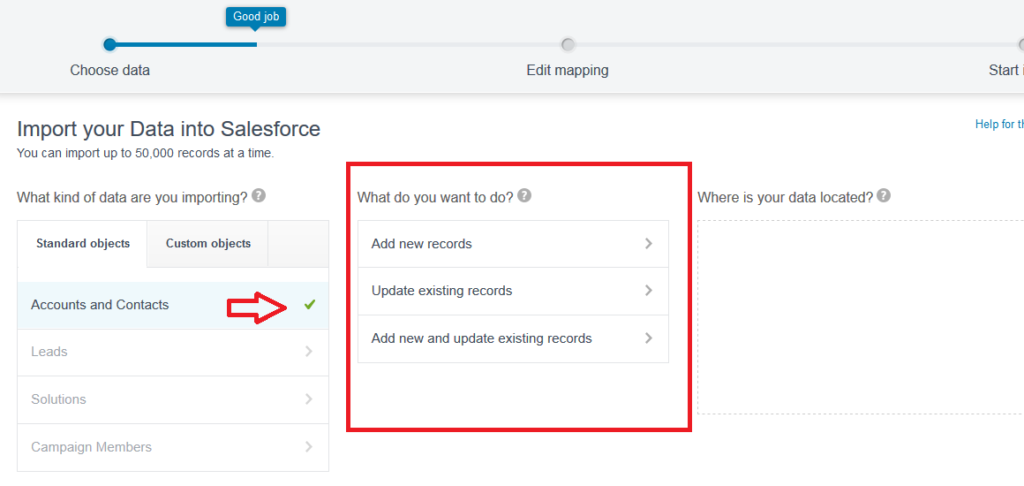
- After selecting the operation you would be asked for a matching criteria if you want to update a record and other operations like to initiating trigger or not, assigning the records to campaign if that is relevant to the importation of the records.
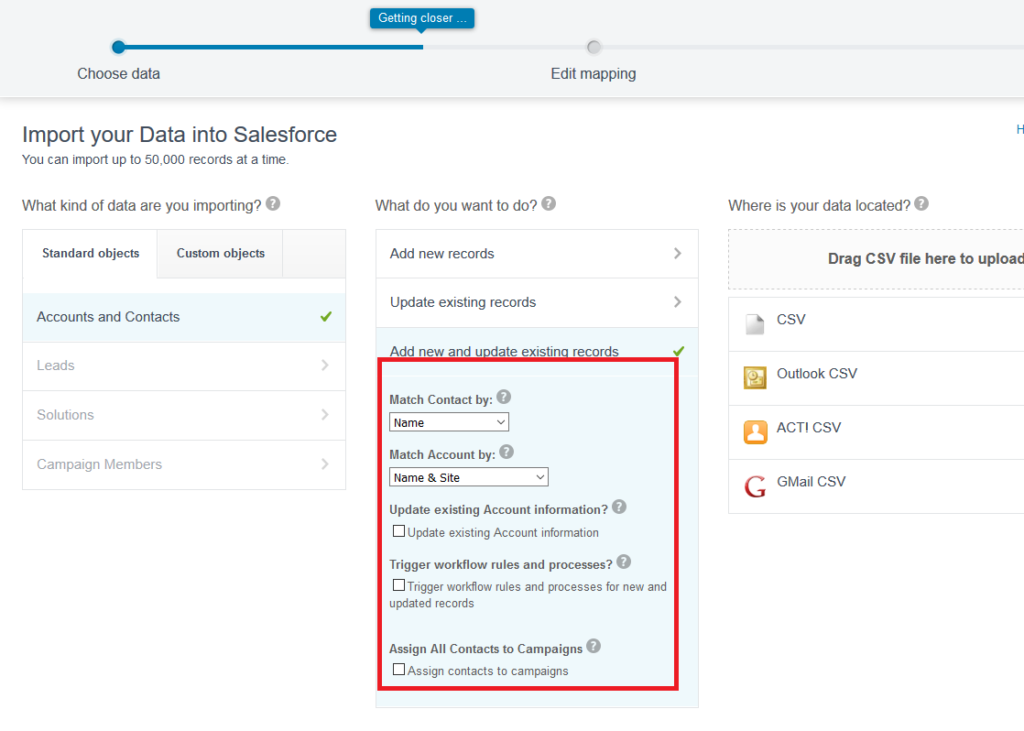
- Next is to upload the file containing the records, this can be of four formats supported by salesforce at the moment, i.e. CSV, Outlook CSV, ACT CSV and Gmail CSV.
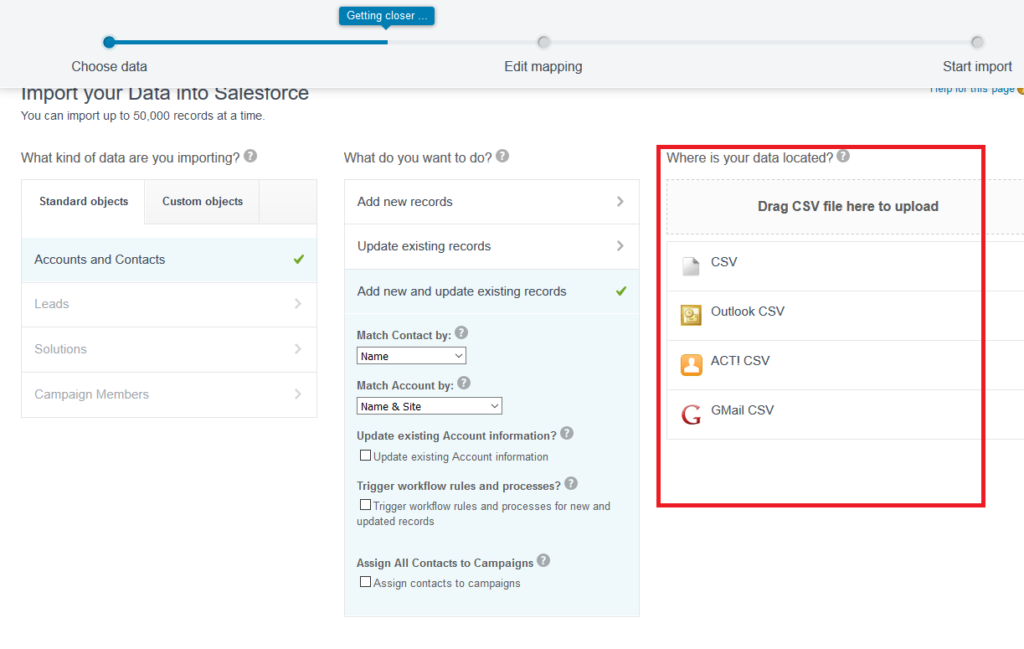
- Once the file is uploaded click next, most of the field will get automatically mapped wit field in salesforce for the remaining fields, you will be taken to the page where you will map the unmapped fields. Do the manual mapping and proceed by clicking on next.
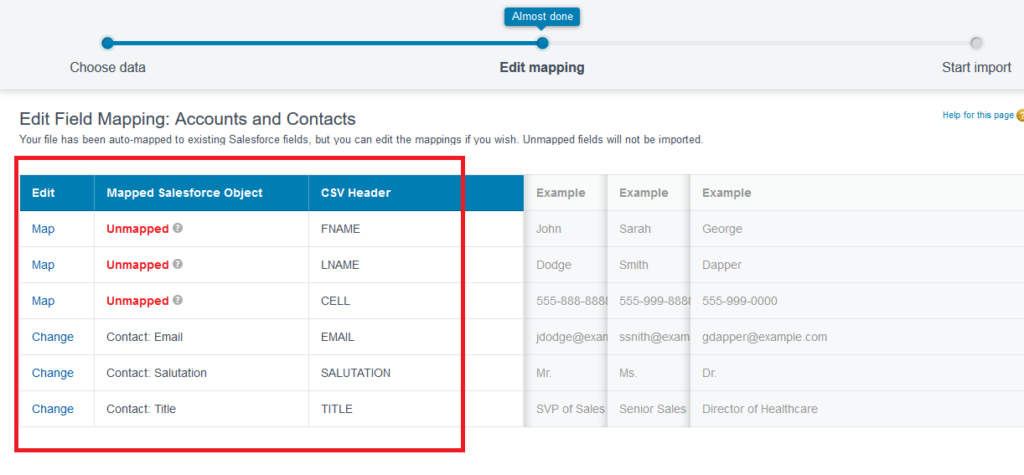
- Now you will be taken to the Review screen and the wizard will now ask to proceed with the import.
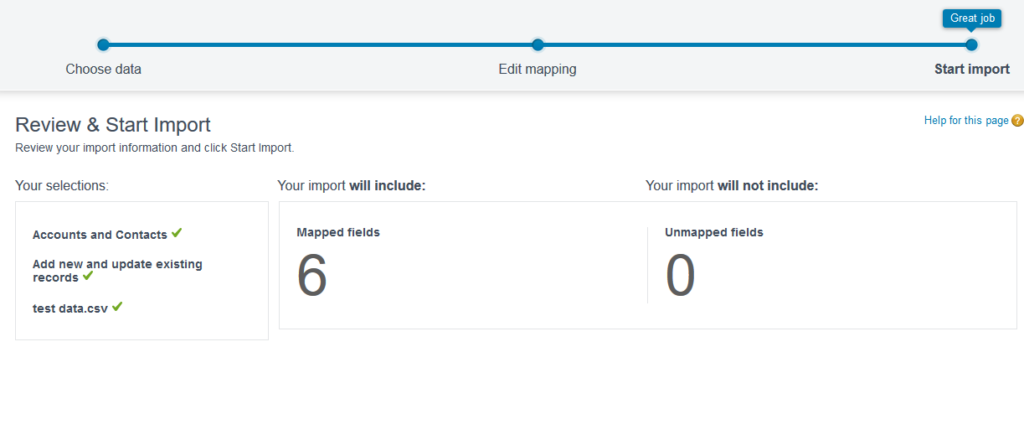
- click of start import you would be directed to the detail page of the bulk job we just started and we will get a job Id and other information related to the bulk data load job details.
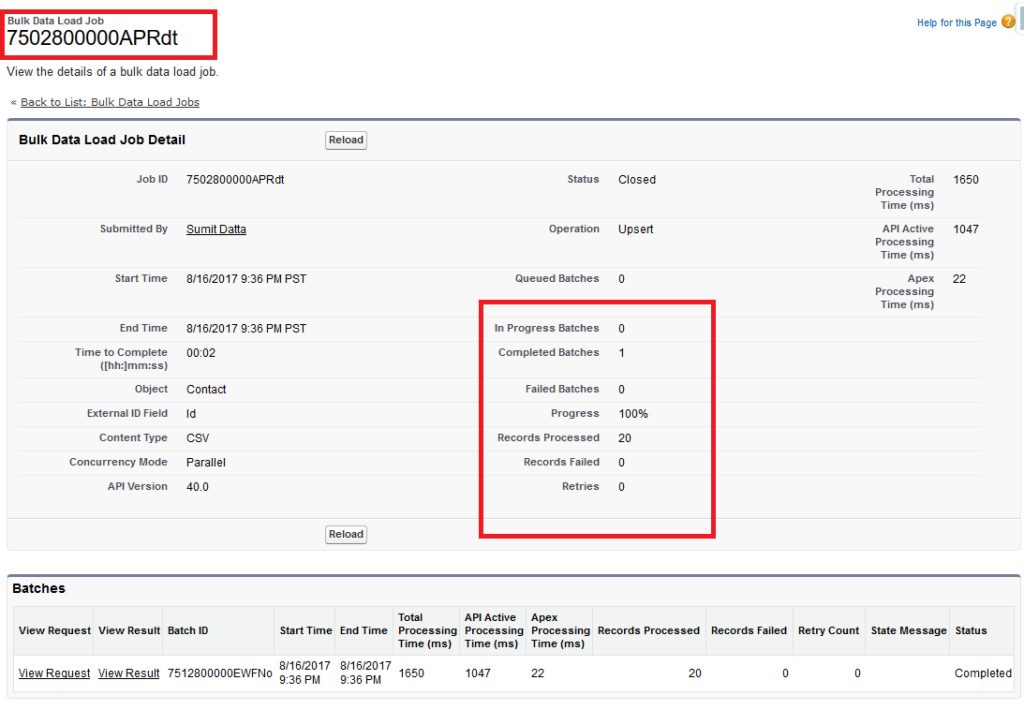
Next Come Data Export:
For this purpose again salesforce has provided the native functionality that can be found on the platform and we have 3rd party app like data loader to perform export task for us. Here we will discuss the export wizard only.
The native Data export let’s you export all of your data in the salesforce, to go export wizard type data export in quick find box and click on Data Export.
Once the data export home screen is reached there are two option one is export now which will straight away start the exporting operation and other is schedule export which automates this process and make it a recurring event.

Let’s click on the export now button, this will take you to the screen where you can select the export service, here you get an option to select all data or some selected objects. There is also an option to select image document and attachments and content versions.
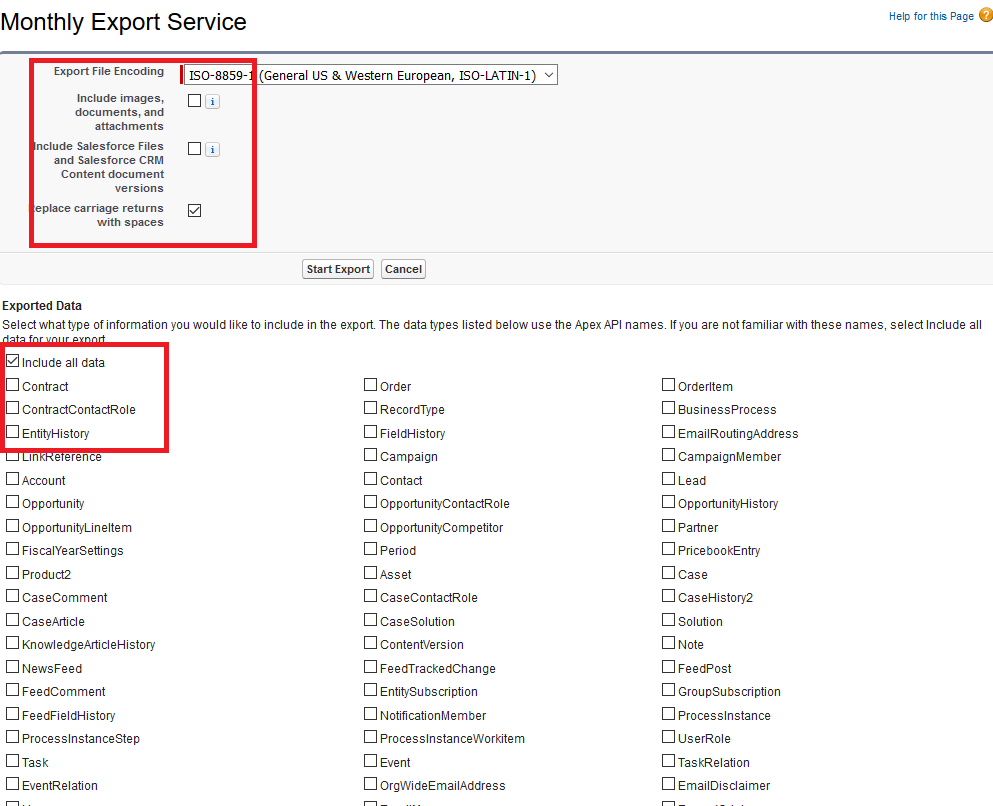
Once the desired objects are selected click on start export, you will then be redirected to the detail page of the export and you will receive an email with the link to the page where we can download the exported data.
Once the export procedure is completed it will add a link to the exported file. The file is in zip format and can be downloaded to the local machine from there. The file is present at this location for a limited time i.e. 48 hours, download the file before this time or you have to repeat this procedure again. Download as shown below.
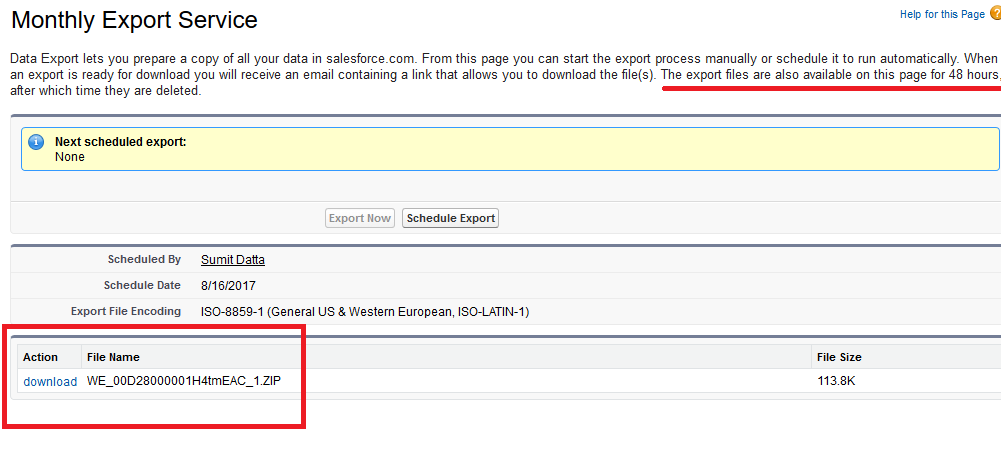
Similarly we can schedule the data export, from the home screen of data export click on schedule data export and this will take you to the screen similar to data export object selection screen, the only difference is the option to select the frequency of this export, here you can select day of the month and the duration of this service, as shown below
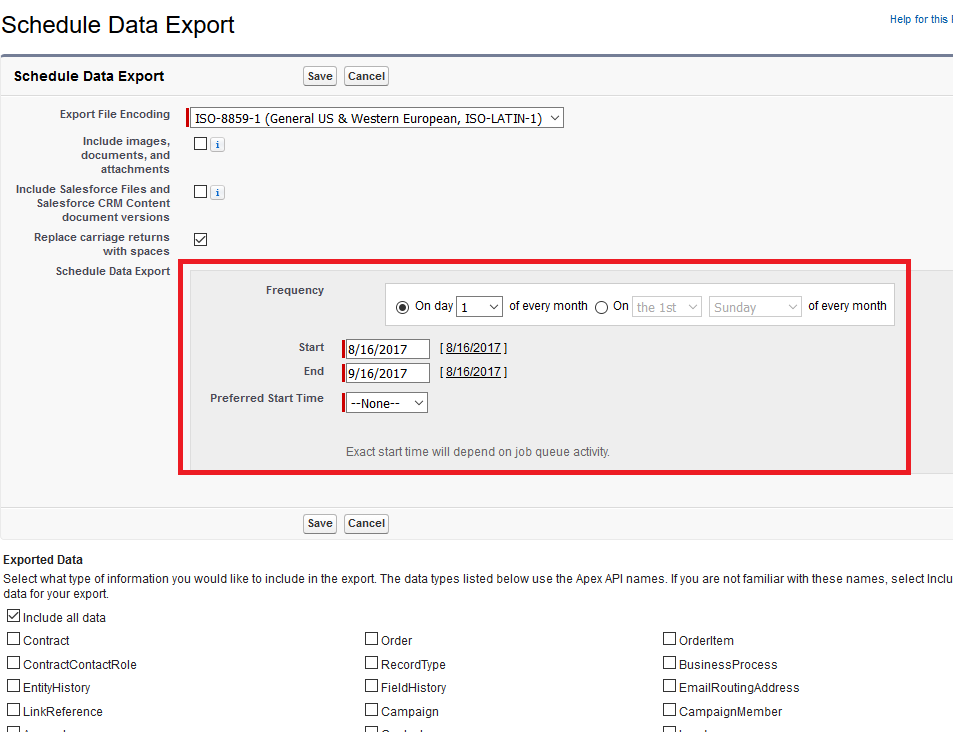
One can use this feature to download the data or export from one org and then automatically import this to other org using the Command line Data loader.
That is it from this post, reach out to me if you have any concern, Happy coding.
The post Data Model and Management appeared first on Salesforce Next Gen.
]]>