Continue reading How to create a Modal box in Lightning Component?
The post How to create a Modal box in Lightning Component? appeared first on Salesforce Next Gen.
]]>
In this post we are going to create a on demand Modal box or Pop Over, using the standard library provided by salesforce.
Modal boxes are used to display messages which requires user’s attention and is therefore displayed in foreground interrupting user’s workflow and seeking attention.
For the Modal we use a single tag provided to us by salesforce i.e. <lightning:overlayLibrary aura:id=”overlayLib”/> , we need to make sure that we use this tag only in lightning experience, lightning Communities and salesforce app only.
This single tag is used wherever we want to display the Message or popover view. There are some more custom components required for this tag to work properly which we are going to create as shown below.
What the content of this Modal box contains, for this we create a lightning component with name modalContent and will have two attributes for now i.e. a icon and the content to display. For this example, I have written static text, as shown below.
<aura:component implements=”force:appHostable,flexipage:availableForAllPageTypes,flexipage:availableForRecordHome,force:hasRecordId,forceCommunity:availableForAllPageTypes,force:lightningQuickAction” access=”global” >
<lightning:icon size=”medium” iconName=”action:approval” alternativeText=”Approved” />
Your application has been approved.
</aura:component>
Now in the main component we call this modalComponent and the parent component will display the modal content. Below is the code of the parent component.
<aura:component implements=”force:appHostable,flexipage:availableForAllPageTypes,flexipage:availableForRecordHome,force:hasRecordId,forceCommunity:availableForAllPageTypes,force:lightningQuickAction” access=”global” >
<lightning:overlayLibrary aura:id=”overlayLib”/>
<lightning:button name=”modal” label=”Show Modal” onclick=”{!c.handleShowModal}”/>
</aura:component>
You see here we do not directly place the modalContent in the component but we create the modalContent on click of the button in the controller of the Parent component as shown below.
({
handleShowModal: function(component, evt, helper) {
var modalBody;
debugger;
$A.createComponent(“c:modalContent”, {},
function(content, status) {
if (status === “SUCCESS”) {
modalBody = content;
component.find(‘overlayLib’).showCustomModal({
header: “Application Confirmation”,
body: modalBody,
showCloseButton: true,
cssClass: “mymodal”,
closeCallback: function() {
alert(‘You closed the alert!’);
}
})
}
});
}
})
Now we can put this component anywhere in the lightning experience and it will work immediately without writing the SLDS for the Modal box.
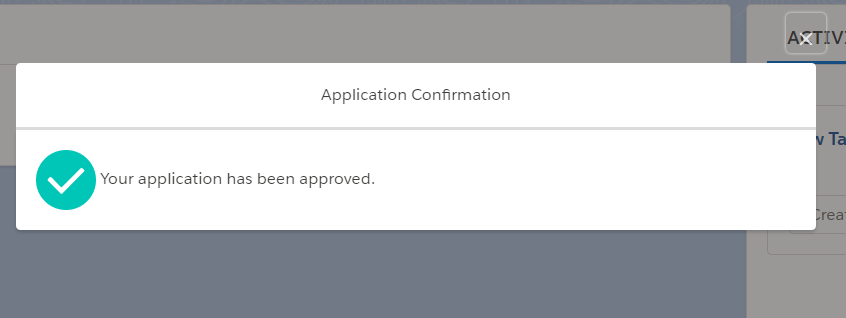
Let’s discuss the methods provided by the salesforce in this example, first we used the method $A.createComponents(), this method is used to create the lightning component on the go i.e. dynamically. Then in this method we call our custom component modalContent as ‘c:modalContent’. Next in the callback function we find our tag using the aura:id and method component.find(). After this we call method showCustomModal() which is a callback method and this method take couple of attributes such as header, body, showclosebutton, cssClass and closeCallback. This is how it looks as shown below.

Open Modal Button

Modal Box

Alert after closing Modal Box
As soon as we click on the lightning button, handleshowModal method is called from the client-side controller. And this how you use the lightning:overlayLibrary for Modal box.
Happy Coding.
Also, Have a look at the below resources:
Also, Have a look at the below learning resources:
-
SOQL (Salesforce Object Query Language)
-
Apex Trigger Best Practices and the Trigger Framework
-
Salesforce Interview Question and Answers Part 2
-
Salesforce Interview Questions on Test Class
-
Salesforce-lightning-interview-questions-2018
6. Salesforce Interview Questions Batch Clas
The post How to create a Modal box in Lightning Component? appeared first on Salesforce Next Gen.
]]>