Continue reading Insights of SOQL and Relationship Queries on Force.com
The post Insights of SOQL and Relationship Queries on Force.com appeared first on Salesforce Next Gen.
]]>Introduction
Salesforce Object Query Language commonly known as SOQL is the language to query data from the salesforce.com platform. SOQL is very similar to SQL, it is just that SOQL utilizes the joins differently. The data model of Force.com is based on relationships of each object and to traverse the relationship path which is a fundamental building block while constructing a query. With the help of these queries, we can fetch data from different objects in one single query thus utilizing the joins implicitly. We construct the relationship in SOQL by using the path traversal which helps in joining the data.
Relationships in Force.com
In order effectively make SOQL queries, we would first need to understand the type of relationships available on the force.com platform. There are two types of relationships:-
- Lookup Relationship
- Master-Detail Relationship
Both of the relationships are 1-to-many but force.com platform treats them differently, both of these relationships are defined from child to parent.
Lookup Relationship
They are a flexible relationship between two objects and are used to create complex relationships. One of the main features about this relationship is that it is not enforced, i.e. an Orphan record is allowed in this relationship. We can create a record without entering a value in the relationship field. This data model allows a relationship to exist between a child and parent but it is not mandatory.
Permissions to usage and visibility are not governed by the permissions and visibility of the parent object, therefore it provides the flexibility to children to dictate their own sharing rules.
The lifecycle of the child record is not dependent on the lifecycle of the parent record, i.e. if parent record gets deleted then the child record is not deleted.
Roll up functionality are provided to implement declaratively and if required then it has to be implemented explicitly.
Master-Detail Relationship
This relationship is a special case of lookup Relationship, this relationship comes with some prebuilt functionality provided by force.com platform. Firstly Orphan record is not allowed in a Master-detail relationship, i.e. we cannot insert a child record without specifying a parent record. The relationship is enforced and no child record can exist without a parent record.
Permission to usage and visibility of child record is not flexible and is governed by the permission and visibility of the parent record. Sharing rules of parent records are imposed over the child record.
The master-detail relationship is provided with built-in cascade delete functionality, i.e. if a parent record is deleted then the child records also get deleted, this functionality is useful in many scenarios.
In Master-Detail Relationship there are many roll-up features are available to declare using point and click functionality and reduces the implementation time.
SOQL results and Data Binding
The result set of SOQL can be accessed programmatically and it utilizes the navigation with relationship underlying the data model of force.com. The result set of SOQL is anchored to a base object i.e. the object written after FROM clause. The result returned by the SOQL is a list of the object, this set also contains the list of fields which were included in the select clause of the SOQL statement. This set of field can have another nested select statement, therefore, there is a possibility that the result may have a nested object in the result set.
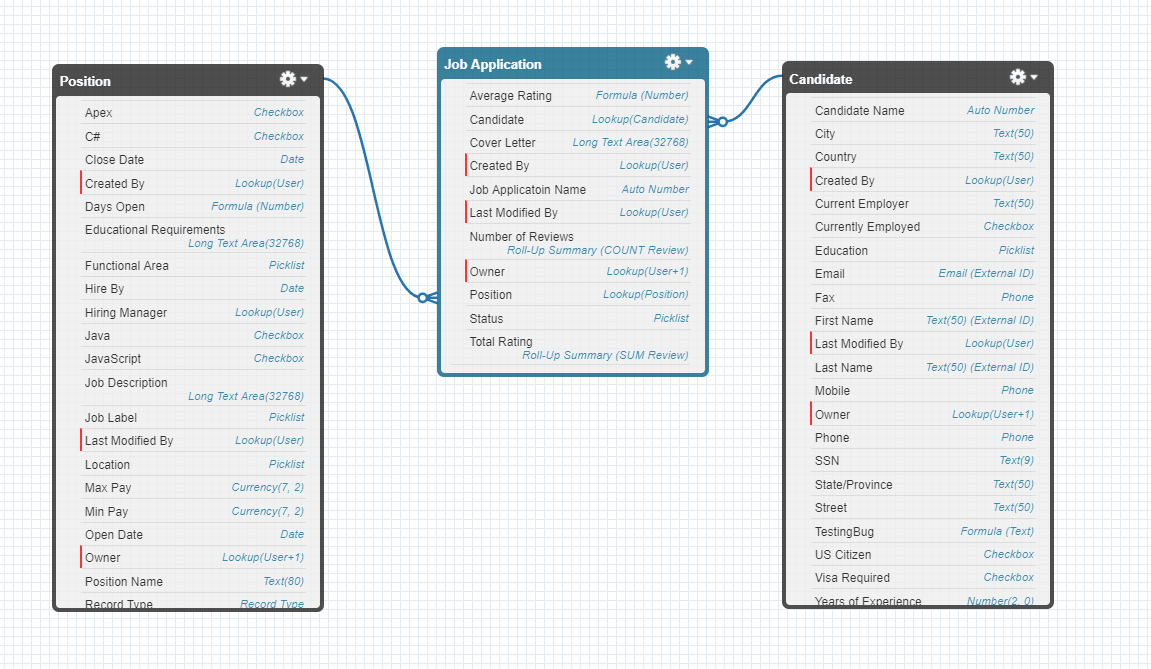
Consider the below schema, in this, we have established an m-n relationship between Position and Candidate with the help of another object i.e. Job Application. Following is more elaborated relationship these objects have.
- Position can have n number of Job Application from various Candidates
- A Candidate can apply for more than one Position
- Also, there is a possibility that a Candidate applies to a company and not to a specific Position.
Kindly refer the Schema as shown in the picture below.
Now we are going to answer questions related to reporting and to answer them we will write SOQL and explain the type of joins and relationship queries.
Right Outer Join
To begin with, the question no 1 is: Find all the job applications related to Departments.
Now the object Job Application does not have the field Department and therefore we would have to reach out to the object which has this value for each job application i.e. Position__c. The resulting query would something like below.
SELECT Name, Position__r.Department__c FROM Job_Application__c
The result set it returned is below:
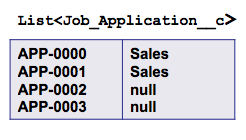
In this query, you would have observed that we have utilized a path expression Position__r.Department__c which reaches out to the related object and fetches out the value of the desired field, this type of join is known as Right Outer Join between the two objects. It is an implicit join statement where the path expression results in the desired value from the related object.
Left Outer Join
Next question is Find all the position and their related Job Application records.
In this scenario, we want to fetch all the related Job applications and there is a possibility that one Position may have more than one Job Application from different Candidates. To achieve this w would have to create a nest SOQL query, where the parent object is Position and the related child records are Job Applications. Note that here we are traversing from ‘m’ side of the m-1 relationship. The Query would look something like below
SELECT Name, (SELECT Name FROM Job_Applications__r) FROM Position__c
The result of this query would be something like below:

This query is very useful in fetching the related records and now we are traversing from the ‘1’ side of a 1-m relationship. The result set her contains the list of Position records and each of these position records is having a list of child records i.e. Job Applications. This type of query is known as Left Outer Join.
Left Inner Join
Next Question to answer is: find all those positions which have an associated Job Applications.
SELECT Name FROM Position_c WHERE Id IN (SELECT Position__c FROM Job_Application__c)
It will fetch result something like below:
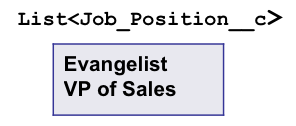
In the earlier versions of Force.com’s SOQL this type of query was not possible but after Spring 10 this feature was added. Earlier we would have to fetch the Id’s of all the Positions associated with Job Applications in a separate query and then use them in the above-shown example. Now, force.com allows select statement in conjunction with the select clause and the Ids of the position can be fetched directly in the IN Clause of the select statement. This type of join represents the Left Inner Join.
Right Inner Join
Next Question is: Find all the Job Applications for Positions that are in the Sales Department?
Here we are going to utilize path traversal to fetch the value of the position name in the select clause and here we need to filter the result set of Job application based on the Department and this field is again not on the Job Application object. Therefore we would use the path traversal method and use this field in the Where Clause of the SOQL statement and the query would look something like below.
SELECT Name,Position__r.Name, FROM Job_Application__c WHERE Position__r.Department__c = ‘Sales’
The result set of this query would look something like below:

Left Anti-Join
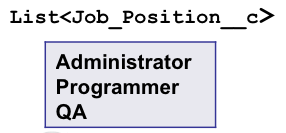
Now we have a scenario where we have to fetch all the Positions which do not have a Job Application associated with it.
In this scenario, we have to check whether there is any child record is associated or not with the Position object. Here the Select clause would be similar to the Left Inner Join but instead of the In Clause we would use the NOT In Clause and it will bring the result set opposite of the Left Inner Join.
The query would look something like below:
SELECT Name FROM Position_c WHERE Id IN (SELECT Position__c FROM Job_Application__c)
It will fetch result something like below:
Right Anti-Join
In this scenario, we are going to find all the Job Applications which are not associated with a Position.
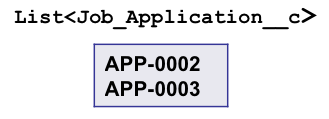
To achieve this although we do not implement any join the resulting set is Right Anti-Join. The Query would look something like below:
SELECT Name FROM Job_Application__c WHERE Position__c = null
The result set would be something like below:
The only field we use here to filter the result is the relationship field therefore thus simulating as a join but without traversing any field on the related object.
Cheat Sheet
Force.com has provided a cheat sheet to easily utilize the Join Patterns and this sheet is made keeping in mind the 1-m relationship pattern. The parent object is on left and child is on right for the below cheat sheet.
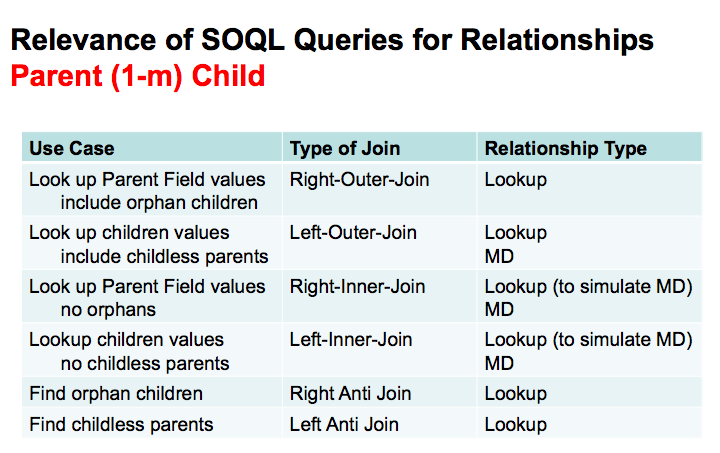
To summarize all the joins we can say that to use Outer joins to display the records where there is no restriction of the relationship, i.e. to fetch all the records with or without a value in the related field. When you want to find the records which do not have a value in the related fields i.e. childless parent or orphaned Child, then use the Anti-Join patterns.
Date Functions
Force.com’s SOQL has provided with various functions which are exclusive to only date fields only and we can fetch data filtered appropriately with the help of these functions.
Functions are broadly divided into 5 categories:
- Calendar functions: the syntax of the functions is as follows:
CALENDAR_MONTH, CALENDAR_QUARTER, CALENDAR_YEAR
- DAY functions: the syntax of the functions is as following:
DAY_IN_MONTH, DAY_IN_WEEK, DAY_IN_YEAR, DAY_ONLY
- FISCAL functions: the syntax of the functions is as follows:
FISCAL_MONTH, FISCAL_QUARTER, FISCAL_YEAR
- HOUR function: the syntax of the functions is as following:
HOUR_IN_DAY
- WEEK function: the syntax of the functions is as following:
WEEK_IN_MONTH, WEEK_IN_YEAR
Example of the Date Function in the query is as below:
SELECT Title, Name FROM Position__c WHERE CALENDAR_ YEAR (Date_Closed__c) = 2015
Aggregate Result with GROUP BY
Force.com platform in the Spring 10 release has introduced more new features in SOQL and these were the inclusion of Group By and Having Clause. These clauses help in generating reports and analysis on the go from the data in hand. These queries are useful while making Roll-up Summaries on the objects with the lookup relationship.
Let’s work on a scenario where we can implement the roll up like feature, suppose we want to find the total number Job Application which has been applied in various departments. To achieve this we would write a SOQL similar to the one given below:
SELECT Position__r.Department__c deptname, COUNT(id) total FROM Job_Application__c GROUP BY Position__r.Department__c
This query will have a result set similar to the one below:
In the query above we see a new of dealing with the grouped fields, here we are first of all referring the aggregated field with the alias name i.e. deptName. It can also be seen that the field which is aggregated is from the related object and job is obtained using the path traversal expression. In the second field, we are fetching the total numbers of Job Applications which are applied in a given department as the result set is grouped according to the department, for this field we used the alias name as the total. The aliasing the aggregated fields provides us with the means to refer them in the aggregated results.
Now the main difference between a normal SOQL and a SOQL with the aggregated field is that the result of the query is not a list of sObject but it is a list of AggregateResult. Since the new result set is containing the fields which were specified in the query and they are referred in the aggregate result using the alias name and are fetched using getter method as shown below.
List <AggregateResult> aggrs = [SELECT Position__r.Department__c deptname, COUNT(id) total FROM Job_Application__c GROUP BY Position__r.Department__c];
for (AggregateResult ja : aggrs)
{
System.debug(ja.get(‘deptname’) + ‘ | ‘ + ja.get(‘total’));
}
How to Use Aggregate result in Visualforce Page
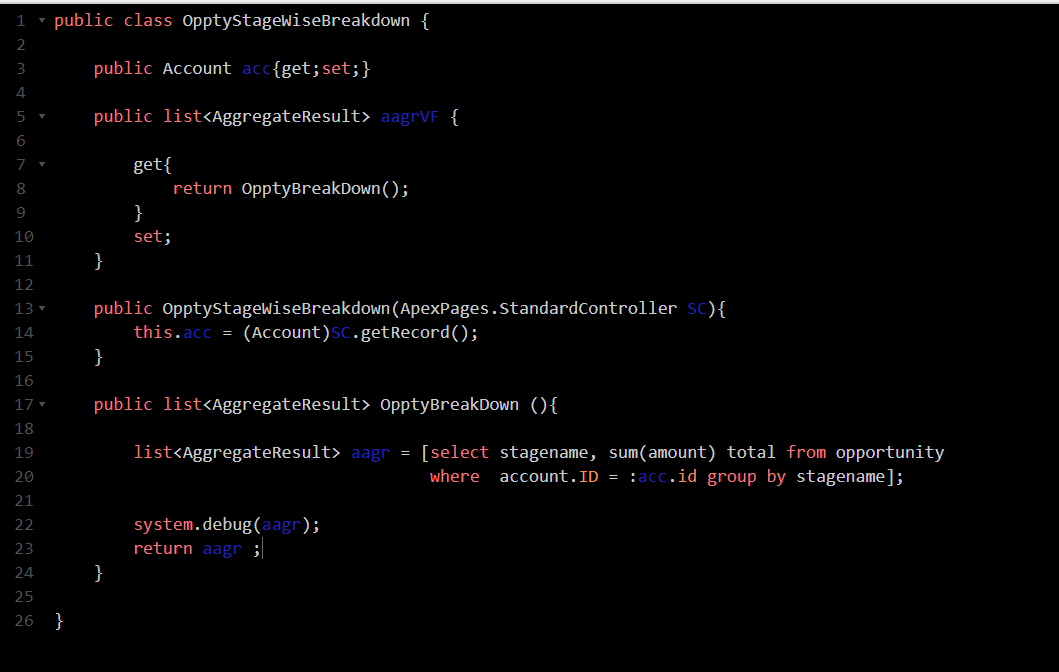
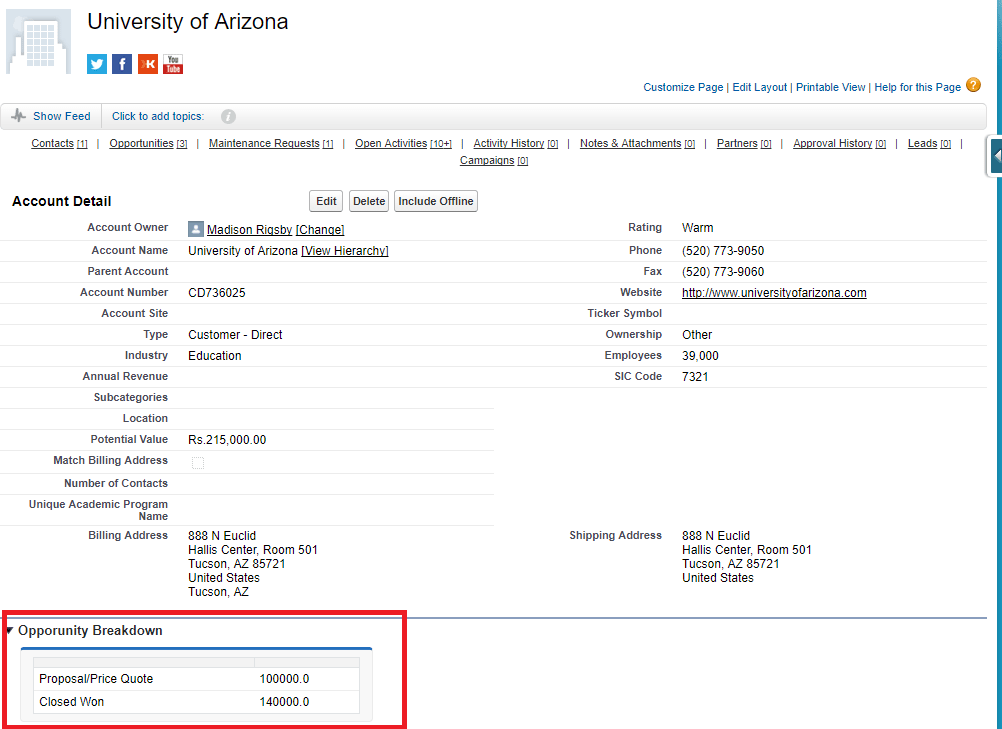
In this section, we are going to see how we can use the Aggregate result in a Visualforce page. For this, we are going to create an extension and use Account standard controller. In this extension, I am going to fetch all the opportunities of an account and segregate them according to their present stage name and display the total amount of each stage.
To display the value of each stage I have created a Page Block Table, where I am passing the List of the Aggregate result as the value and created a variable to traverse the list. I am going to place this Visualforce page as a section on the account standard detail page and it will display the information related to the specific account.
Controller Extension:
VisualForce Page:

Output UI:
Summary
This includes the common patterns found in SQL and can now be implemented in SOQL as well like Joins and aggregate functions and other functions. These methods help improve the overall code efficiency and performance.
Scenario-based Question
- Find the Maximum, minimum and Sum of all the opportunities of each account whose stagename is Closed Won?
ANS:
Select account.id, min(Amount), max(Amount), sum(Amount) TotalOppValue from Opportunity where stagename = ‘Closed Won’ group by account.id
ResultSet:

Also Have a look at the below resources:
Also Have a look at the below learning resources:
The post Insights of SOQL and Relationship Queries on Force.com appeared first on Salesforce Next Gen.
]]>Continue reading Apex Trigger Best Practices and the Trigger Framework
The post Apex Trigger Best Practices and the Trigger Framework appeared first on Salesforce Next Gen.
]]>Apex Trigger Best Practices
In this section we will understand the best practices a user needs to follow to ensure the Trigger runs smoothly throughout its lifetime.
We have always run in the situation where we have begun with a trigger which has a few lines of codes and serves a single purpose. But as the time progress our trigger becomes more and more complex with addition of new business logic and keeps on growing. Soon it becomes difficult/ impossible to manage.
Sooner or later we are going to find our self in a situation where a trigger has become too difficult to maintain and even the slightest change may have a disastrous effect. Therefore I have compiled few best practices for writing Apex Trigger to avoid the above mentioned scenarios and they are mentioned below:
1. One Trigger Per Object
The reason this is on top my best practice list is that, if we make more than one Trigger on an object then we are not able to control the order of execution of these trigger’s i.e. there is no proper flow control. A single Trigger is capable enough of handling all the possible combinations of DML events and Trigger’s context. Namely insert, update delete and undelete (Before and After). So as a best practice we just need to create a single Trigger and it will handle all of the context. For example see the below code:
trigger OptyTrigr on Opportunity (
before delete, after insert, after update, after delete, after undelete, before insert, before update) {
Write your Trigger logic here
}
2. Logic-less Trigger
Next good practice is to make Trigger without covering any business logic inside the trigger itself, make it logic-less piece of code. All we want to do here is to invoke the Trigger on the desired DML event and let it delegate the task to a specific handler class. The main reason behind that is testing a Trigger is not easy if all the business logic is written in the body of the Trigger. If we have written methods inside the body of the trigger, then these methods cannot be exposed for testing purpose and methods of trigger cannot be used anywhere in the org. Therefore stuffing logic inside the body of the Trigger will make a mess one day in future. Therefore we should create a helper class which receives delegation from the Trigger and all the application logic is written there. Below is an example of the handler class.
trigger OpportunityTrigger on Opportunity (after insert) //Trigger
{
OpportunityTriggerHandler.HandleAfterInsert(Trigger.new);
}
public class OpportunityTriggerHandler { // Handler Class
public static void handleAfterInsert(List opps) {— Business Logic—-}
}
3. Handler methods Specific to the Context
One more best practice is to create methods which are specific to the context, i.e. they are invoked based on the DML event. If I am handling more than one DML Event then I would write as many methods in the handler class not the Trigger and I would route the trigger flow to the correct Handler method based on the context variables like Trigger.isAfter or Trigger.isInsert etc.
Now we come to the stage that we already know the best practice to create a Trigger but why we should use a Framework for the same. We are going to find answers to this question below.
Why Use Framework?
Trigger framework simplifies the development of a trigger, but it is not necessary to use framework all the time for the development of the trigger. Framework helps in the following manner:-
1. Helps in following best practices
2. Implementation of new logic and new handler method in an easy manner.
3. Maintenance of code and testing of Trigger is simplified
4. Enforces consistent implementation of the trigger business logic
5. It Implements tool, utilities and abstraction and make the handler logic as lightweight as possible which will help in maintaining the code
Let’s discuss the usability of the framework in detail.
Routing Abstraction
Routing abstraction is a logic in which the flow of the trigger transaction is transferred to a method and this transfer of control is based on the context of trigger. The logic will check in which context the trigger was invoked and it will dispatch the flow to the method responsible for handling the context. To implement this logic we have to make the logic to route the flow but if you use trigger framework then this routing would be handled by the framework.
Recursion Detection and Prevention
Another common mistake a developer makes is letting the trigger run in a recursive manner. Recursion is a very powerful tool, but if appropriate care is not taken then it can result in unexpected outcome. Trigger framework, in this case, acts a watchdog and observes all the trigger execution and can detect recursion and figure out a way to handle the situation in an appropriate way.
Centralize Enablement and disablement of Trigger
Turing on and off a trigger is not an easy task and the traditional method using change sets is time consuming. The ability to disable the trigger at will is a huge advantage and this can be achieved using trigger framework. Trigger framework can be connected to a custom setting in the org and it can control the on and off of the trigger.
Let’s understand by following an Example of Framework provided in salesforce developer guide.
Trigger Framework example
To begin with let’s have a look at the basic Implementation of a Trigger on opportunity object.
//Trigger
trigger OpportunityTrigger on Opportunity (after insert, after update, after delete, after undelete) {
new OpportunityTriggerHandler().run();
}
// The Handler Class
public class OpportunityTriggerHandler extends TriggerHandler {
public OpportunityTriggerHandler() {}
}
You can see that although there are more than on context that are being called in the trigger but we have only one line the trigger’s actual body. The only line of code that we have written in the trigger’s body is the one where we are calling the run method of the trigger handler class, i.e. “new OpportunityTriggerHandler().run();”.
Let’s make this example more practical by adding a scenario and logic to it. But where will we write the logic, if you guessed Helper class, then you are right, we will make use of predefined context handler methods which are overridable. As context method are called automatically based on the DML Event we do not have to worry about calling them.
Ok So let’s assume that we have a requirement where we have to update Amount field to zero when an opportunity is marked Closed/Lost. To implement this logic event we will use before update trigger. So the first thing which we will do is to override the existing before update method in the handler class and write our application logic there, and it will get called automatically by the framework. Write code as shown below.
// The Handler Class
public class OpportunityTriggerHandler extends TriggerHandler {
public OpportunityTriggerHandler() {}
protected void override beforeUpdate() {
setLostOppsToZero();
}
private void setLostOppsToZero(List) {
for(Opportunity o : (List) Trigger.new) {
if(o.StageName == ‘Closed Lost’ && o.Amount > 0) {
o.Amount = 0;
}
}
}
}
Here you can see that not a single line of code was written inside the trigger. The only thing which we did was to override the method beforeUpdate in the handler class. But not only this, we had to do one more task and that was to cast the Trigger.new context variable into the list opportunity. We have to cast the context variable into the list of opportunity because trigger automatically cast these variables to the respective object automatically but when these variables are referred outside of the trigger, then we have to first cast them into the specific object type and then perform the required task, as shown above.
So now we know that whenever there is a change in the requirement then we do not have to make any changes in the trigger body but instead modify the trigger handler class. We can have as many context hander methods as there are the DML Events.
Below is the schematic of the Trigger Framework, it mentions what is offered by the framework and what developer has to provide to it.
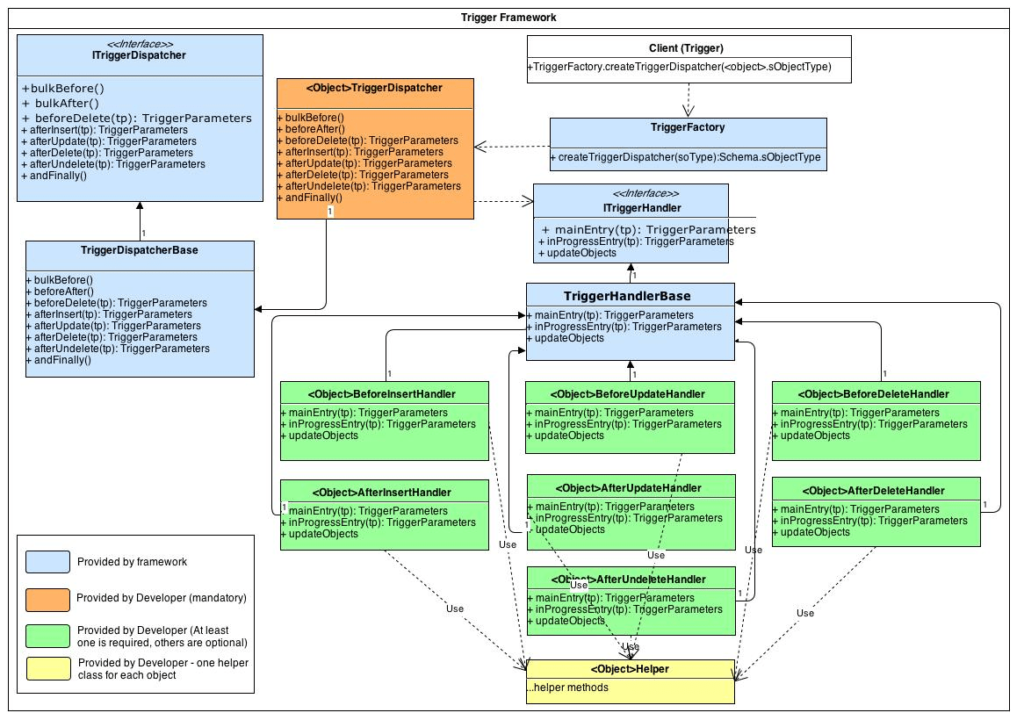
Entity Diagram of Trigger Framework Image Source: https://code.google.com/archive/p/apex-trigger-architecture-framework/
We have seen now how to implement the framework but how is the framework doing all this. We just created a Trigger handler class that inherit from a base class TriggerHandler provided by the framework. This class has the following roles.
1. It has the definition of the overridable context methods for each event
2. It supervises and manages execution of the Trigger
3. It also provides the routing logic to call the right context method
The run() Method
Run method is the method which provides access to the trigger framework. It initiates when it is called from inside the trigger. It is the method which runs the supervisory logic and is responsible for the appropriate routing of the trigger flow. It does all this by checking the current context and then calls the appropriate context method. Below is the source code of the run method.
public void run() {
if(!validateRun()) return;
addToLoopCount();
// dispatch to the correct handler method
if(Trigger.isBefore && Trigger.isInsert) {
this.beforeInsert();
} else if(Trigger.isBefore && Trigger.isUpdate) {
this.beforeUpdate();
} else if(Trigger.isBefore && Trigger.isDelete) {
this.beforeDelete();
} else if(Trigger.isAfter && Trigger.isInsert) {
this.afterInsert();
} else if(Trigger.isAfter && Trigger.isUpdate) {
this.afterUpdate();
} else if(Trigger.isAfter && Trigger.isDelete) {
this.afterDelete();
} else if(Trigger.isAfter && Trigger.isUndelete) {
this.afterUndelete();
}
}
The methods called in the handler are defined logic-less, they are meant to be overridden if nothing overrides it then no action is taken and nothing really happens. They are defined as below:
Protected virtual void afterInsert(){
}
Supervisor Logic
Trigger handler not only route the trigger execution but also performs other tasks as well, like preventing the recursion etc. Trigger framework provides a utility with which we can control the number of executions per trigger invocation. See the example below:
public class OpportunityTriggerHandler extends TriggerHandler {
public OpportunityTriggerHandler() {
this.setMaxLoopCount(1);
}
public override void afterUpdate() {
List opps = [SELECT Id FROM Opportunity WHERE Id IN :Trigger.newMap.keySet()];
update opps; // this will throw after this update
}
}
Trigger framework also provides us with power to bypass invocation of a trigger. Although it is not a good practice to bypass a trigger but in a scenario where the creation of an object ends up creating another object, in this case a trigger may invoke when the second object is inserted. Below is an example of code where the trigger handler is bypassing the invocation of trigger and later on when the task is completed we can clear the bypass logic from the trigger, see the example code below.
public class OpportunityTriggerHandler extends TriggerHandler {
public override void afterUpdate() {
List opps = [SELECT Id, AccountId FROM Opportunity WHERE Id IN :Trigger.newMap.keySet()];
Account acc = [SELECT Id, Name FROM Account WHERE Id = :opps.get(0).AccountId];
Case c = new Case();
c.Subject = ‘My Bypassed Case’;
TriggerHandler.bypass(‘CaseTriggerHandler’);
insert c; // won’t invoke the CaseTriggerHandler
TriggerHandler.clearBypass(‘CaseTriggerHandler’);
c.Subject = ‘No More Bypass’;
update c; // will invoke the CaseTriggerHandler
}
}
Finally on/off switch ability to enable / disable trigger at the production environment. It has always been difficult to enable and disable the Trigger at production, when it is causing production issue. This is achieved by creating a custom setting in salesforce org and this functionality can be extended to Visualforce page and an admin can easily enable / disable a trigger at Production.
Also check other trigger resource:
- Design Patterns for Bulkifying an Apex Trigger
- Making the Apex trigger a bit more complex!!
- Writing a Simple Apex Trigger !!
- Your first Salesforce Apex Trigger from scratch!!!
- Salesforce Interview Questions on Trigger
References:
Apex Trigger framework : https://github.com/kevinohara80/sfdc-trigger-framework/blob/master/src/classes/TriggerHandler.cls
Entity Diagram of Trigger Framework : https://code.google.com/archive/p/apex-trigger-architecture-framework/
Trigger Pattern for Tidy, Streamlined, Bulkified Triggers : http://developer.force.com/cookbook/recipe/trigger-pattern-for-tidy-streamlined-bulkified-triggers
The post Apex Trigger Best Practices and the Trigger Framework appeared first on Salesforce Next Gen.
]]>Continue reading Design Patterns for Bulkifying an Apex Trigger
The post Design Patterns for Bulkifying an Apex Trigger appeared first on Salesforce Next Gen.
]]>As Salesforce is built on the multi-tenant architecture, it has multiple platform limits which govern the uses of resources at one particular transaction. As the Apex trigger can operate on multiple records at the same time, it can easily breach the governor limits and therefore it is suggested that Apex trigger should be bulkified before it is moved to production.
Benefits of bulkified Trigger are many for e.g.:
- Better performance
- Consume fewer resources and time over the server
- It rarely breach the governor limits
To bulkify trigger means to work on collections of sObject instead of individual records. Bulk design concept works on all sObject in the context variable. Normally trigger executes on one record at a time if the origin of the execution was through the user interface, but if the origin was a bulk API or DML then the trigger executes on the whole set rather than one record at time, therefore we should keep in mind that the trigger may perform on the collection of sObject and it is a best practice to bulkify the trigger.
Let have a look in the below example:
Trigger FirstBulktrigger on Account(before insert){
For(account test : Trigger.New){
Test.description = ‘Bulk Trigger was used’;
}
}
In the above Apex trigger, we traverse through each and every account record available in the Trigger.New context variable and set the description of each account to ‘Bulk Trigger was used’.
Performing SOQL in a bulkified Trigger
SOQL is used in Trigger for so many reasons and one reason could be to fetch the related records. To fetch the related records of all the available records in the Trigger’s context variable, we are likely to hit the platform limits which 100SOQL per synchronous transaction.
The best practices suggest the following code pattern:
- Avoid writing SOQL in for loops in a Trigger.
- Always fetch the required amount of records in the Query by using where filter clause.
- We should try to use inner query wherever possible.
Let’s have a look at the below example:
Trigger BulkSOQlExampleTrigger on Account( before insert){
List<account> accountListWithOpp = [select Id, Name (select name from contacts)from Account where Id IN : Trigger.New ];
For(Account acc : accountListWithOpp){
Contact[] relatedContacts = acc.contacts;
}
}
We can perform a bulk DML as well in a similar way:
Trigger BulkSOQlExampleTrigger on Account( before insert){
List<account> accountListWithOpp = [select Id, Name (select name from contacts)from Account where Id IN : Trigger.New ];
For(Account acc : accountListWithOpp){
Contact[] relatedContacts = acc.contacts;
}
For(Contact con : relatedContacts){
Con.lastname = ‘Bulk DML’;
}
}
And that’s how we bulkify a Trigger.
Want to know about interview questions related to Apex Trigger then click on the below
Interview Questions Apex Trigger
The post Design Patterns for Bulkifying an Apex Trigger appeared first on Salesforce Next Gen.
]]>Continue reading Making the Apex trigger a bit more complex!!
The post Making the Apex trigger a bit more complex!! appeared first on Salesforce Next Gen.
]]>Making a Call to class’s method from the Trigger.
This way we are able to implement the OOPs concept, our trigger’s code is efficient and maintenance of the code is easier.
In the following code, we are going to call a method from a utility class, this method is used for sending an email to a recipient.
To create the trigger, go to Developer Console->file->New-> Apex Trigger. Give it a name for e.g. SendEmailExampleTrigger and select Contact sObject.
You will get some predefined code in the console, replace it with this code and save it.
trigger SendEmailExampleTrigger on Contact (after insert, after delete) {
if (Trigger.isInsert) {
EmailManager.sendMail(SampleEmail@Address.com’, ‘Email’s Subject’,
‘Email’s Body’);
}
}
**** Email Manager utility class need to be created separately.
To test this trigger all we need to do is insert a contact record and we can see that the email is sent to the mentioned email in the code.
Adding Related records using Trigger
One of the main benefits of using triggers over workflow is to access any related records irrespective of the relationship they have, where as in workflow you can only make changes to the parent record.
In the below trigger, we are going to add a contact to account if there exists no contact information for the account. First, the trigger will make use of an SOQL query to find if there is any related contact and if it finds none then it will create a contact according to the business logic.
trigger AddRelatedContact on Account(after insert, after update) {
List<contact> contactList = new List< contact >();
Map<Id,Account> accountshavingContacts = new Map<Id,Account>(
[SELECT Id,(SELECT Id FROM contact) FROM Account WHERE Id IN: Trigger.New]);
// We have to loop through the map to fetch all the accounts with no contacts
for(Account acc : Trigger.New) {
if (accountshavingContacts.get(acc.Id).contacts.size() == 0) {
// Means there is no related contact for the account
contactList.add(new contact(lastName=acc.Name + ‘ triggercontact,
AccountId=a.Id));
}
}
if (contactList.size() > 0) {
insert contactList;
}
}
To test the Trigger create a sample account record and you will find that it will have an associated contact record.
find interview Questions on Trigger here
Interview Questions Apex Trigger
The post Making the Apex trigger a bit more complex!! appeared first on Salesforce Next Gen.
]]>Continue reading Writing a Simple Apex Trigger !!
The post Writing a Simple Apex Trigger !! appeared first on Salesforce Next Gen.
]]>Now we know where to write a Trigger, let’s begin with a simple example. In this scenario I would like to add a custom text in the last name of a contact.
Let’s have a look at the basic structure of a trigger
trigger MyCustomTriggerName on CustomObject__c (trigger_events) {
Line of codes to execute(Business Logic)
}
Using the above-mentioned structure we will write our code, in the above code we can give Trigger any name we want, and since we want the trigger to be on contact standard object, the structure of trigger looks like below
trigger ContactTestTrigger on contact (before insert) {
Line of codes to execute(Business Logic)
}
Now that we have defined the basic structure of the trigger now we will write the business logic as discussed in the beginning.
trigger ContactTestTrigger on contact (before insert) {
for(contact con : Trigger.new){
con.lastname = ‘New Last Name using Trigger’;
}
}

This is it, we have written a simple Trigger which initiates at before insert event of a contact. Based on the occurrence of the DML event, there are broadly two types of Triggers; Before Trigger and After Trigger. Further, the trigger can be classified into the below groups based on the events.
- Before insert, after insert.
- Before update, after update.
- Before delete, after delete.
- Before undelete.
In Trigger, we can modify the data without explicitly calling any DML operation, and if the operation is performed then it results in an error. The record is committed to the database once the trigger has completed its execution
Here you also see the use of a variable Trigger.new in the for loop, it is a trigger’s context variable. Trigger’s context variable holds the values of the record which initiated the execution of the trigger, for e.g. Trigger.New contains the list of contacts which initiated the trigger. There are some Trigger’s context variables which return Boolean values and with the help of context variables, we can determine which event fired the trigger. There are many context variable available in Salesforce and can be studied in detail here.
This concludes how to write a Simple Trigger
Next, I would like to present, how to call apex class method in trigger, callout, and using trigger exceptions
find interview Questions on Trigger here
Interview Questions Apex Trigger
Also, Have a look at the below learning resources:
-
SOQL (Salesforce Object Query Language)
-
Apex Trigger Best Practices and the Trigger Framework
-
Salesforce Interview Question and Answers Part 2
-
Salesforce Interview Questions on Test Class
-
Salesforce-lightning-interview-questions-2018
6. Salesforce Interview Questions Batch Class
The post Writing a Simple Apex Trigger !! appeared first on Salesforce Next Gen.
]]>Continue reading Your first Salesforce Apex Trigger from scratch!!!
The post Your first Salesforce Apex Trigger from scratch!!! appeared first on Salesforce Next Gen.
]]>Before we dive deep into the abyss of Salesforce Trigger, we should know a little more about Triggers and why do we need a Trigger.
Triggers are set of code lines which are scheduled to run on a DML event, i. e. when a record is created, updated, deleted, merged or recovered and automate the flow of execution before or after the DML event.
But we have another tool to automate business logic on DML event and that is Workflows. As we know that there are certain scenarios, in which we are not able to use Workflow for e.g., If we want to create a record of the separate object, on an update of standard contact object then we simply cannot use workflow. With workflow we can only perform few task i.e., field update, send email, send an outbound message and create a task.

To overcome these limitations of workflow, Salesforce provided us with Trigger. The trigger is the core of Apex when it comes to automating business logic on any DML event.
There are two places where you can write Trigger:
- Sandbox
- Developer Edition
To upload Triggers on production, we need to make sure that it passes the Salesforce quality check, and should have enough code coverage to be eligible for deployment (at least 1% Trigger’s code coverage and overall production code coverage to be 75% and above).
Once we meet these criteria we can deploy our Trigger to production. There are a couple of ways to write Trigger in Salesforce:
- You can go to object definition page and there you can create a trigger specific to an object (this method provides pre defined text to the trigger which helps in writing the code)
- Setup >> Customize >> Users >> Triggers >> New
- Open developer console, click on new and select apex and then select Apex Trigger.
Next, we will begin with the syntax of the Apex Trigger
Next Post: Writing a Simple Apex Trigger !!
find interview Questions on Trigger here
Interview Questions Apex Trigger
The post Your first Salesforce Apex Trigger from scratch!!! appeared first on Salesforce Next Gen.
]]>Continue reading Custom settings
The post Custom settings appeared first on Salesforce Next Gen.
]]>They are similar to a custom object, it enables a user to create custom data, make an association between them similar to the custom object. The difference is that the custom settings are exposed in the application cache, this data can then be efficiently accessed without querying the database and reduce the overall overhead at the server and improves the efficiency of the App. The custom setting can be used with validation rule, apex class or formula fields etc.
There are two types of custom settings:
- List Custom setting
- Hierarchy Custom Setting
List Custom setting provides a reusable set of static data, we can put frequently access data in the custom setting and this can be accessed without SOQL query to the database. Data in list custom setting does not change with profile or user and is available throughout the organization.
Hierarchy custom setting is based on organization’s hierarchy profile logic and is not available throughout the organization. It checks the context of the user for its profile, organization and then returns the lowest value.
The custom setting can be created from UI of Salesforce and can be managed after creating the setting.
Custom Setting methods
These methods are all instance specific methods, they are called and operate by a particular instance of the custom setting. Custom methods are divided based on the type custom setting we are accessing.
List Custom Setting Methods
The following are instance methods are used to fetch values from list custom settings.
- getAll(): Map of the dataset is returned in this method
- getInstance(dataSetName): it returns the data of the specific dataset mentioned in the method.
- getValues(dataSetName): it returns the data specific to the dataset name mentioned in the method.
Hierarchy Custom setting methods
The following are instance methods are used to fetch values from Hierarchy custom settings.
- getInstance(): the return result is specific for a particular user.
- getInstance(userId):returns the result specific for a specific user.
- getInstance(profileId):returns the result specific for a specific profile.
- getOrgDefault(): Returns the result for the Org
- getValues(userId): Returns the result for the specific user.
- getValues(profileId): Returns the result for the specific user
Also, Have a look at the below resources:
Also, Have a look at the below learning resources:
-
SOQL (Salesforce Object Query Language)
-
Apex Trigger Best Practices and the Trigger Framework
-
Salesforce Interview Question and Answers Part 2
-
Salesforce Interview Questions on Test Class
-
Salesforce-lightning-interview-questions-2018
6. Salesforce Interview Questions Batch Class
7. Custom Setting in Salesforce
The post Custom settings appeared first on Salesforce Next Gen.
]]>Continue reading Playing with sObject Collections
The post Playing with sObject Collections appeared first on Salesforce Next Gen.
]]>I cannot imagine a single day of apex developer where he/she does not use sObject collection in the development. They are the core part of Apex coding when it comes to writing efficient code. sObject collections help in minimizing the probability to hit the governor limit.
First, in the collections come List – or list of sObject
A list can be of any data type but in this post, we are only dealing with sObject or custom objects. Lists are used when we want to process data in bulk. As we all the transaction limits of Apex popularly known as Governor Limit.
List can be used with DML Operations, they can store the data returned by a SOQL Query. A list can be created by using the below code :
List<Account> accountList = new List<Account>();
List<abc__c> custObjList__c = new List< abc__c >();
List can also be populated using a SOQL query while declaring it as below:
List<Account> accountList = [select Id, name from account limit 10];
Elements or new record can be added to a created list and once a record is added to the list, it gets indexed.
List<Account> accountList = new List<Account>();
Account A1 = new Account(Name = “Test Account”);
accountList.add(A1);
Account A2 = accountList.get(0);
Records can be processed in bulk if we pass the list variable to the DML Operation as below:
Insert accountList;
Sorting the List of sObject
To sort a list of sObject we can make use of a predefined method list.sort.
Default order of sort is as below:-
- First in the order of label
- Then on name field if applicable
- Then standard field in alphabetical order except id and name field
- Lastly on custom field in alphabetical order
For instance, assume two records have a similar name and indistinguishable standard fields, and there are two custom fields, FieldA and FieldB, the value of FieldA is utilized first to sort.
For custom sort order kindly have a look at the below link :
Next Comes Sets in the Collection
Sets only allow unique entity in its confinement, elements added in sets do not get indexed. Set have method like contains or contains all. It is used to determine the uniqueness of sObject.
Ex: Set<Account> accountSet = new Set<Account>{a1, a2};
Finally Map of sObject
Map is the collection of key value pair, and data can be retrieved with the help of the key. It can hold sObject in both key as well as value.
Similar to List map can also be populated using SOQL
Ex: Map<ID, Account> mapOfAccount = new Map<ID, Account>([SELECT Id, fieldA__c FROM Account])
Use case of map can be assumed as the in memory join of tables or relation of two tables.
Next: Custom settings
The post Playing with sObject Collections appeared first on Salesforce Next Gen.
]]>Continue reading SOQL (Salesforce Object Query Language)
The post SOQL (Salesforce Object Query Language) appeared first on Salesforce Next Gen.
]]>SOQL is the Salesforce Object query language, it is similar to SQL in syntax. SOQL is a tool which helps us to retrieve a record from database in Salesforce. A sample SOQL is written below:
Select Id, Name from Account;
The result of the above statement is a list of accounts, i.e. a SOQL returns a list of sObject. We can rewrite the above statement as below.
List<account> examplelist = [Select Id, Name from Account];
Individual records can be accessed from this list using a loop. We can use SOQL to create a new sObject as well.
Contact newContactObject = new contact(Account = [select name from account where billingCity = ‘new delhi’ limit1 ];)
newContactObject.firstname = ‘test’;
newContactObject.lastname = ‘contact’;
Working with the result of SOQL Query
The result of the query only include the fields which are mentioned in the query, if we try to access a field which was not fetched in the query then we end up having a runtime error.
Account a = [Select id from account limit 1].name —- this will throw runtime error
Account a = [Select id,name from account limit 1].name —- this will run uninterrupted
Accessing fields of sObject through relationship in SOQL
There are two types of relationship when it comes to fetching record from SOQL
- Fetching values of parent record from a child record
- Fetching all the child records of a parent.
The first scenario is achieved using a dot notation in SOQL query as written below:
Select id, name, parentobj.name, parentobj.custfield__c from myObject__c limit 1;
The second scenario is achieved by using a nested query as mentioned below:
Select id, name, (select firstname, lastname from contacts) from account;
When we write a nest query we make use of the child relationship name as ‘contacts’ is the relationship name between account and contact, we have used the plural of contacts. It is a user defined text for a custom relationship.
In the custom relation we make use of ‘__r’ instead of the regular ‘__c’ keyword, as written below.
Select Id, name, custObject__r.name from contact limit 1;
*Note, it is advised that we should avoid searching for records which contains a null value, this helps in improving the performance of the query.
How to use Apex variable in SOQL Queries
SOQL can reference apex variable in the statement, variable has to be prefixed with a colon(:) as written below:
Contact con = new contact(lastname = “test”, firstname =”contact”);
Insert con
Select name from contact where Id =:con.Id;
We can use apex variable in the where clause, In or Not In clause, numeric values of limit or offset.
SOQL can also fetch the records which have been soft deleted from the org i.e. they are still present in recycle bin. We just have to add literal ALL ROWS at the end of the query to fetch all the records in an org, as mentioned below.
Select name from contact ALL ROWS;
How to write SOQL for a for Loop
Records returned by the SOQL can be used as an input for for loop the syntax is written below.
For( myVar : [Query]){
}
Variable should be of same sObject type as of the SOQL query.
Regular SOQL and SOQL in the for loop differ from each other on the basis of the method they use to fetch record from the database, SOQL for loop use efficient chuning of data and make calls to query and querymore method where as standard SOQL can only return number of records or number of sObjects.
We should make sure that we are not making any DML call inside for loop as it results in breach off governor limit. Therefore we should use a list of sObject and add the individual objects to this list and then after the execution of the loop we should perform a DML Operation.
Next: Playing with sObject Collections
The post SOQL (Salesforce Object Query Language) appeared first on Salesforce Next Gen.
]]>Continue reading DML Operation
The post DML Operation appeared first on Salesforce Next Gen.
]]>Upserting records
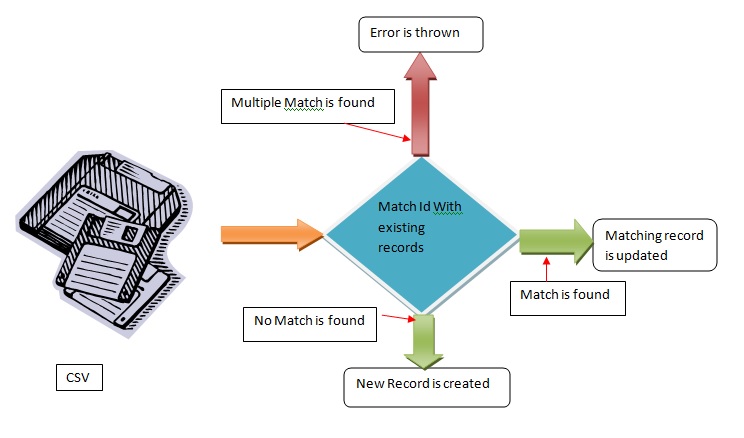
This command incorporates two DML operation i.e. insert and update in one statement. It has to be provided with a unique identifier such as Record Id, so that it can search the database and find the requested record, if there is no record matching the record Id then a new record is created, if a match found then the record is updated. But if the record Id or key passed have multiple matches, then it neither updates nor creates a record and throw an error
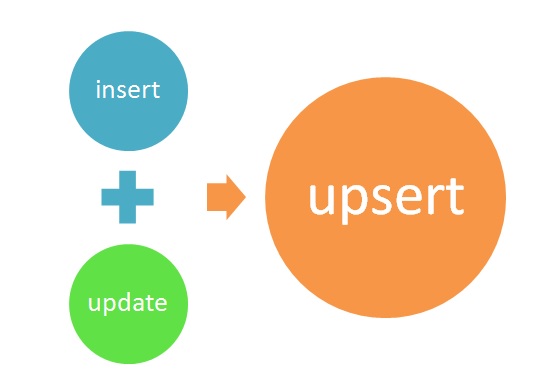
Upsert operation is supported in Dataloader, Apex, and API. It is feasible to create parent child relationship in one statement.
Below is the schematic representation of an Upsert Statement.
Benefits of using Upsert:
It simplifies the process of insertion and updating the records, information about Salesforce Id is not mandatory we can use external Id for this purpose. We do not have to manually export and match the records. It helps in preventing the duplication of records.
Best Practice for Upsert:
Make external Id, Unique and case insensitive. Make use of compound fields to make a unique identifiers.
Use Case for Upsert:
Export data from production to sandbox.
- Create a new field and make it as external Id, follow the best practice to make this field
- Deploy new field in the sandbox
- Start export of data from production and import to sandbox using the various tools available like dataloader or data import wizard
- Use the newly created field for matching the data in sandbox.
Upsert command and external id are very handy when we are integrating data from external datasource, with the help of external id we can reference our record. Most of the data uploading tool like dataloader, dataimport wizard or 3rd party connectore like boomi has options to specify the external Id.
Merge Records
If there are duplicates in your org then Merge operation comes into picture to help you clean up the data.
Merge operation can take up to three records , update the selected record and delete the other two records, in case the delete records have related objects then these objects get reparented.
Merge is mainly available on Contacts, lead and account object
Steps to merge these standard objects are mentioned below:
Next: SOQL (Salesforce Object Query Language)
The post DML Operation appeared first on Salesforce Next Gen.
]]>